> ## Documentation Index
> Fetch the complete documentation index at: https://docs.prophecy.ai/llms.txt
> Use this file to discover all available pages before exploring further.
# SAML authentication (SCIM optional)
> Leverage SAML for authentication for Prophecy users
Available for [Express and Enterprise Editions](/administration/platform/editions) only.
Security Assertion Markup Language (SAML) lets Prophecy delegate user authentication to your identity provider (IdP). System for Cross-domain Identity Management (SCIM) optionally automates provisioning and deprovisioning of users and teams from your IdP into Prophecy.
This page describes how to set up SAML and SCIM, which requires configuration in both Prophecy and your preferred IdP.
## Prerequisites
Review the following prerequisites.
* To access SSO settings, you must be a [cluster admin](/administration/management/users/access/role-based-access) for your deployment.
* SAML is available for [Express and Enterprise Editions](/administration/platform/editions).
* SCIM is only available for the [Enterprise Edition](/administration/platform/editions). To enable SCIM in your environment, update the `config` in your Prophecy deployment.
## Supported identity providers
Prophecy supports the following identity providers (IdP):
* Google
* Okta
* Azure Active Directory (Microsoft Entra ID)
* Others (custom)
## Prophecy-specific steps
### Set up SAML
To set up SAML authentication in Prophecy:
1. Log in to Prophecy as a cluster admin user.
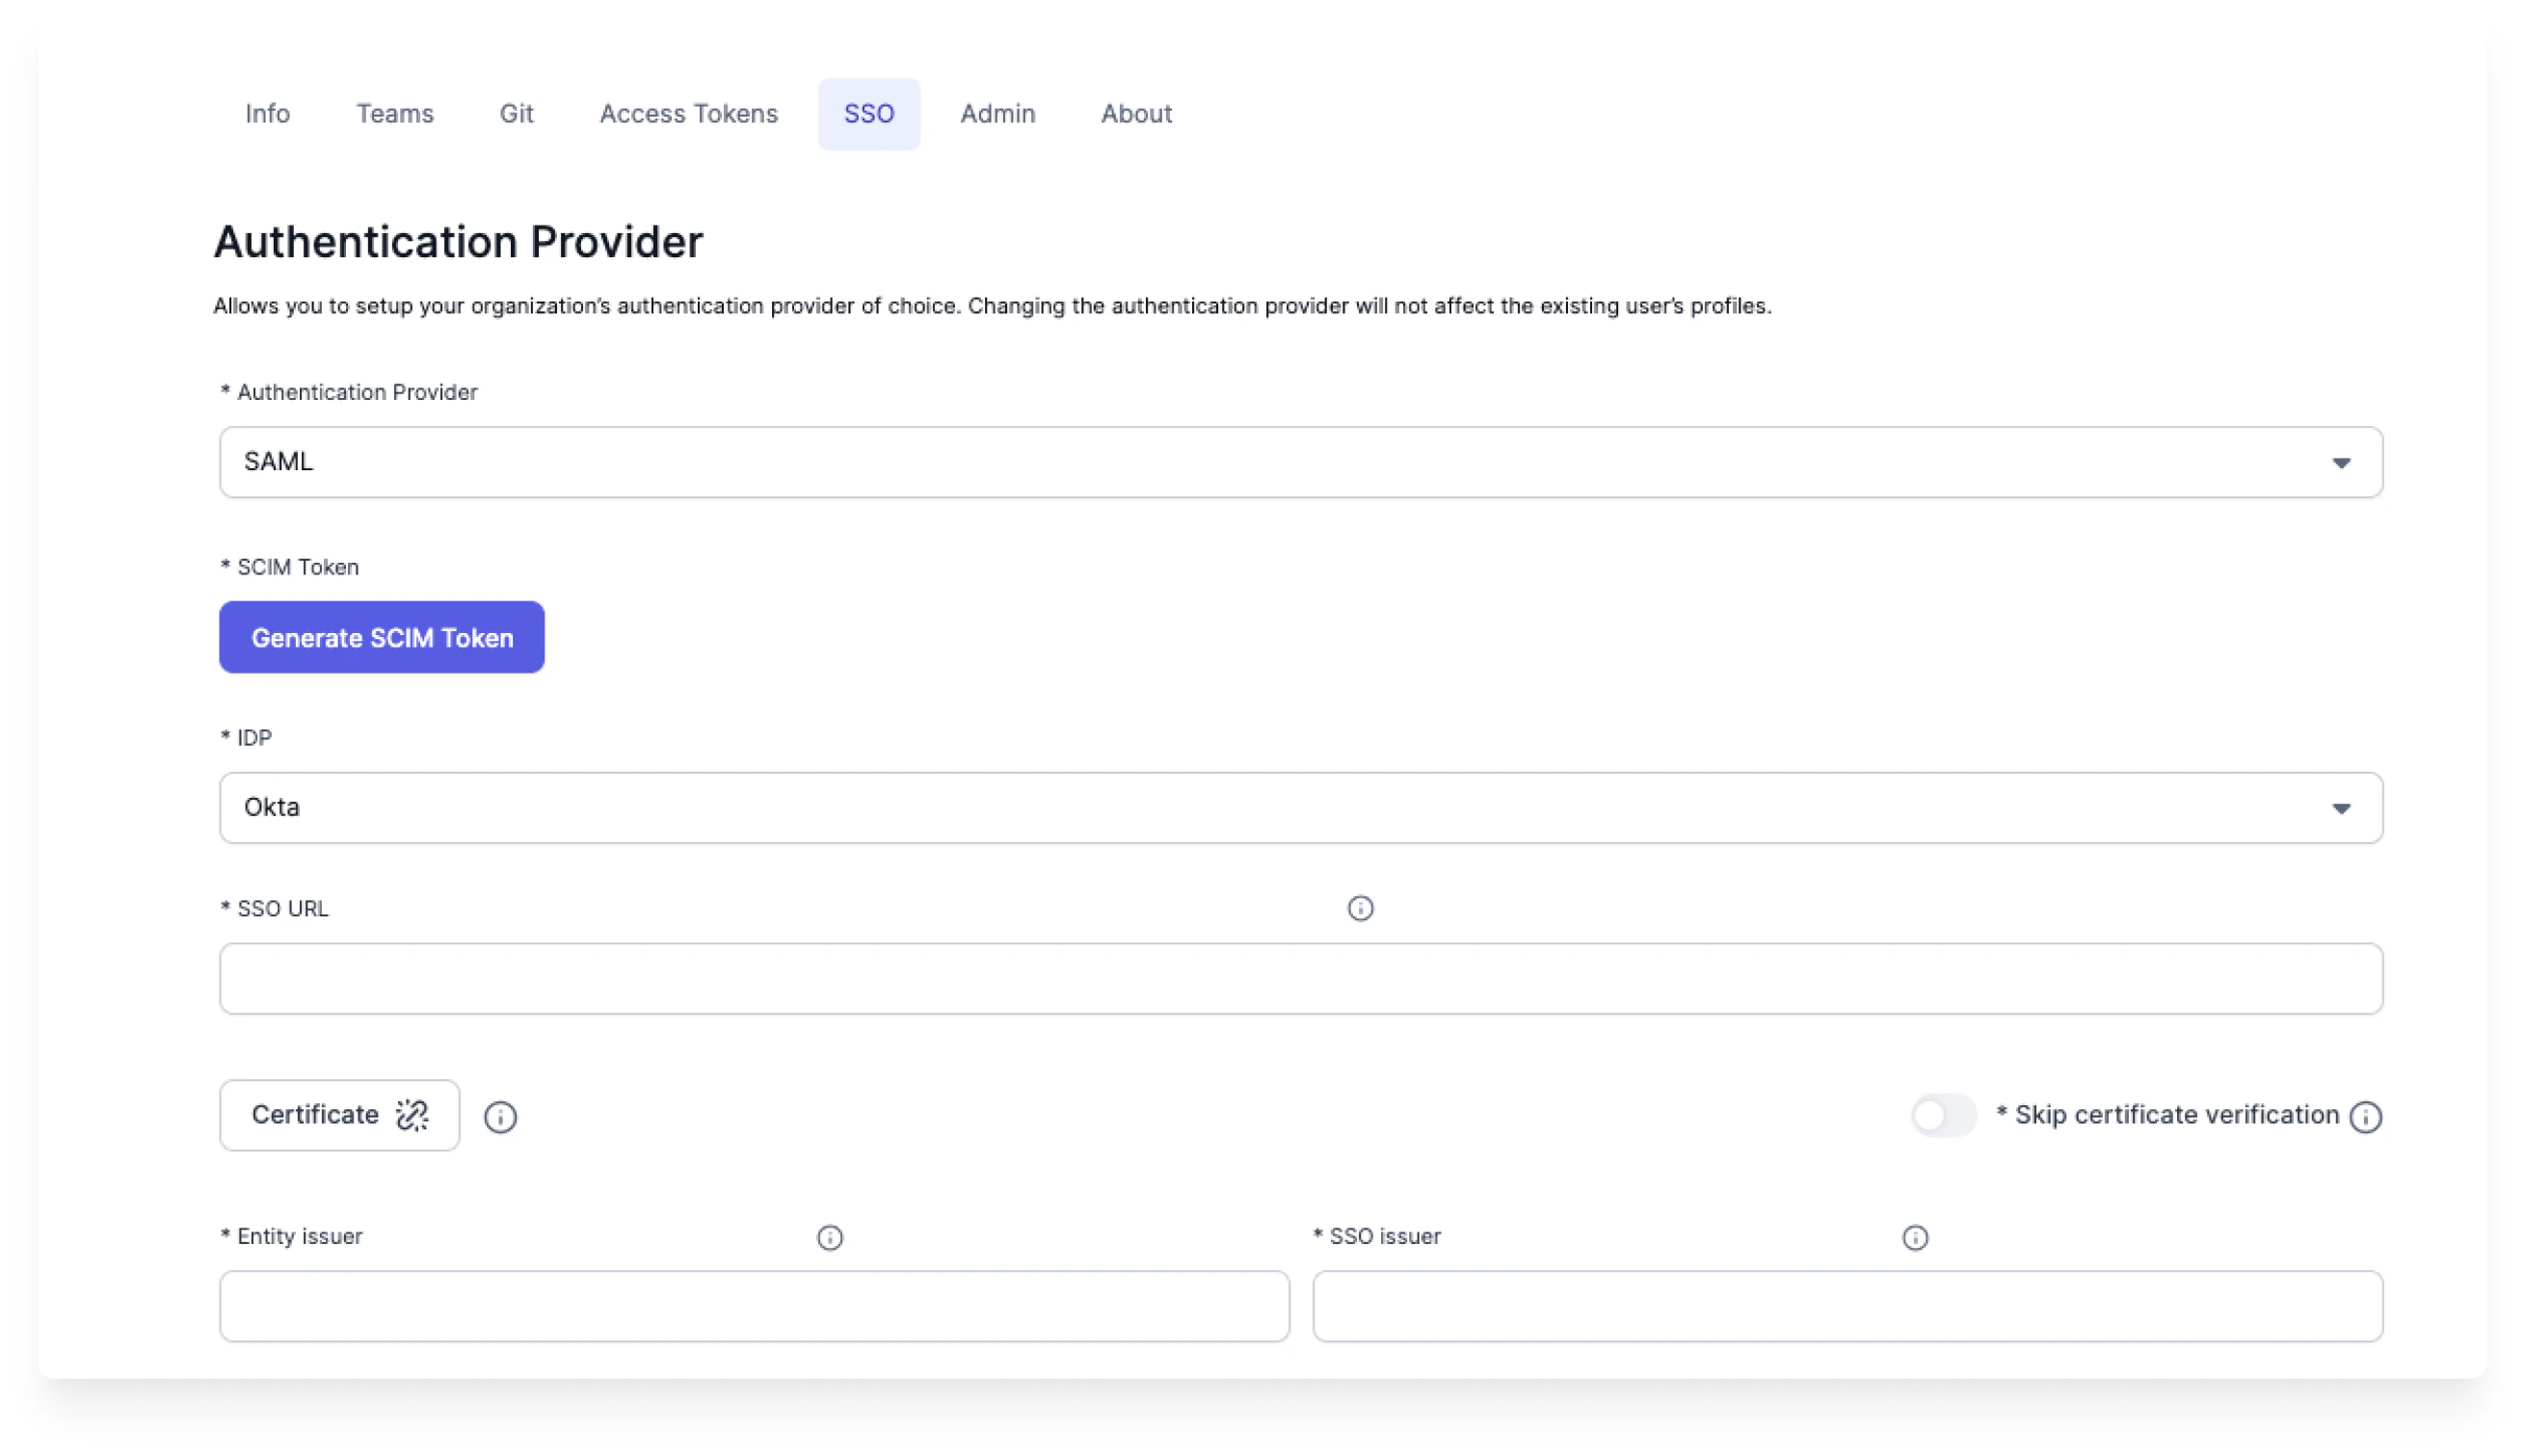
2. Navigate to the **SSO** tab of the Prophecy **Settings** page.
3. Under **Authentication Provider**, select SAML.
4. Under IdP, select the appropriate identity provider.
5. Fill out the remaining parameters:
| Parameter | Description |
| ----------------------------- | -------------------------------------------------------------------------------------------------------------------------------------------------- |
| Generate SCIM Token | If SCIM is enabled in your environment, click to create/rotate the SCIM bearer token used by your IdP/SCIM client to provision users and groups. |
| SSO URL | The Identity Provider Single Sign-On endpoint. Paste the SSO URL (Location) from your IdP metadata. Prophecy redirects users here to authenticate. |
| Certificate | The IdP SAML signing certificate. Prophecy uses this to verify SAML response signatures. |
| Skip certificate verification | Disable TLS certificate/host verification when calling the IdP SSO endpoint. |
| Entity issuer | The entity issuer you configured in the IdP. Usually, this is the label for your SAML configuration. |
| SSO issuer | The SSO issuer. For Azure AD this is the Azure AD Identifier; for Okta, it is the issuer link in the XML. |
6. Click **Save** at the bottom of the page to save your changes.
 ### Set up SCIM
SCIM allows Prophecy to automatically provision and deprovision users and teams based on your IdP configuration. To set up SCIM in Prophecy:
1. Ensure that SCIM is enabled in your Prophecy environment.
2. Complete the [SAML configuration](#set-up-saml) described above.
3. Click **Generate SCIM Token** and copy the value of the token. You will use this in your IdP settings later.
After completing these steps, you'll create users and groups in your IdP directly. See [Group-to-team mapping](/administration/management/authentication/group-team-mapping) to learn about group naming conventions.
## IdP-specific steps
The following sections describe the fields you must configure in your IdP settings to complete the SAML/SCIM setup.
### Azure Active Directory
Configure SAML for Azure Active Directory (Microsoft Entra ID) and enable SCIM provisioning
1. Log into AzureAD as an administrator and create a new Enterprise Application like `ProphecyAzureADApp`.
2. In the home page search bar, search for **Enterprise Applications**.
3. Click **New Application > Create your own application**.
4. Give name for the application like `ProphecyAzureADApp`.
5. Choose the radio button **Integrate any other application you don't find in the gallery (Non-gallery)**.
6. Click **Create**.
7. In Manage section on the left, click **Single sign-on**.
8. Choose **SAML** as the Single sign-on method.
Now the form for **Set up Single Sign-On with SAML** will open. You'll have to fill out different sections of the form.
#### Basic SAML Configuration
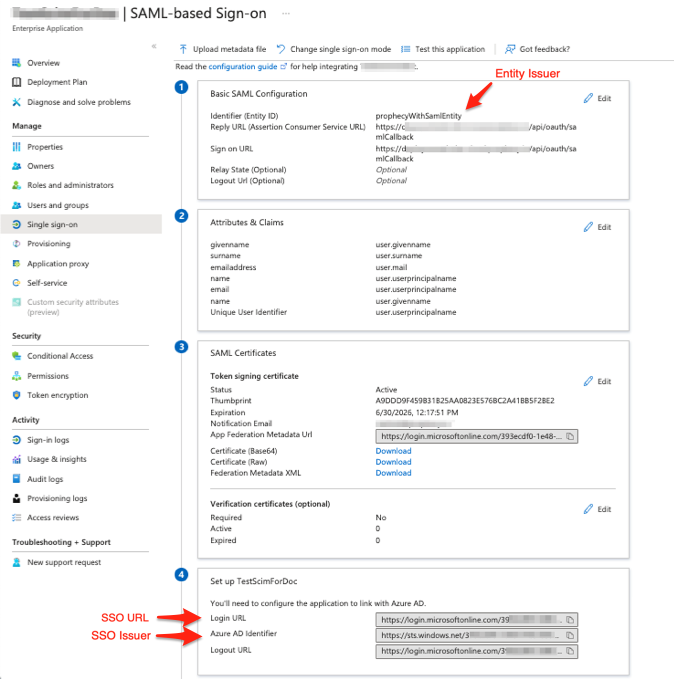
1. Provide an Identifier (Entity ID) which is a unique ID to identify this application to Microsoft Entra ID. This will be added to the Entity issuer field in Prophecy.
2. In the same section, configure **Reply URL** and **Sign on URL** as:
`https://your-prophecy-ide-url.domain/api/oauth/samlCallback`
3. Click **Save**.
#### Attributes & Claims
1. Click **Edit** button and then **Add new claim**.
2. Give **Name** as `email` and **Source Attribute** as `user.userprincipalname`, and click **Save**.
3. Add one more claim by clicking on **Add new claim**.
4. Give **Name** as `name` and **Source Attribute** as `user.givenname`, and click **Save**.
#### SAML certificates
In the **SAML certificates** section, download `Certificate (Base64)` file to be used while configuring SSO in Prophecy UI.
#### Set up ProphecyAzureADApp
In the **Set up ProphecyAzureADApp** section, copy `Login URL` and `Azure AD Identifier` to be used while configuring SSO in Prophecy UI.
### Set up SCIM
SCIM allows Prophecy to automatically provision and deprovision users and teams based on your IdP configuration. To set up SCIM in Prophecy:
1. Ensure that SCIM is enabled in your Prophecy environment.
2. Complete the [SAML configuration](#set-up-saml) described above.
3. Click **Generate SCIM Token** and copy the value of the token. You will use this in your IdP settings later.
After completing these steps, you'll create users and groups in your IdP directly. See [Group-to-team mapping](/administration/management/authentication/group-team-mapping) to learn about group naming conventions.
## IdP-specific steps
The following sections describe the fields you must configure in your IdP settings to complete the SAML/SCIM setup.
### Azure Active Directory
Configure SAML for Azure Active Directory (Microsoft Entra ID) and enable SCIM provisioning
1. Log into AzureAD as an administrator and create a new Enterprise Application like `ProphecyAzureADApp`.
2. In the home page search bar, search for **Enterprise Applications**.
3. Click **New Application > Create your own application**.
4. Give name for the application like `ProphecyAzureADApp`.
5. Choose the radio button **Integrate any other application you don't find in the gallery (Non-gallery)**.
6. Click **Create**.
7. In Manage section on the left, click **Single sign-on**.
8. Choose **SAML** as the Single sign-on method.
Now the form for **Set up Single Sign-On with SAML** will open. You'll have to fill out different sections of the form.
#### Basic SAML Configuration
1. Provide an Identifier (Entity ID) which is a unique ID to identify this application to Microsoft Entra ID. This will be added to the Entity issuer field in Prophecy.
2. In the same section, configure **Reply URL** and **Sign on URL** as:
`https://your-prophecy-ide-url.domain/api/oauth/samlCallback`
3. Click **Save**.
#### Attributes & Claims
1. Click **Edit** button and then **Add new claim**.
2. Give **Name** as `email` and **Source Attribute** as `user.userprincipalname`, and click **Save**.
3. Add one more claim by clicking on **Add new claim**.
4. Give **Name** as `name` and **Source Attribute** as `user.givenname`, and click **Save**.
#### SAML certificates
In the **SAML certificates** section, download `Certificate (Base64)` file to be used while configuring SSO in Prophecy UI.
#### Set up ProphecyAzureADApp
In the **Set up ProphecyAzureADApp** section, copy `Login URL` and `Azure AD Identifier` to be used while configuring SSO in Prophecy UI.
 #### Configure provisioning
To set up SCIM in Azure:
1. Open the Enterprise Application you just configured.
2. From the left menu of the application, click **Manage > Provisioning**.
3. From the left menu of the provisioning page, click **Manage > Connectivity**.
* Under **Select authentication method**, select **Bearer authentication**.
* For the **Tenant URL** field, use the value `https://.prophecy.io/proscim`
* For **Secret token**, use the Prophecy-generated token that you copied in the [Set up SCIM](#set-up-scim) steps.
* Click **Test connection**. Once the test succeeds, you can save the connection.
4. From the left menu of the same provisioning page, navigate to **Manage > Provisioning**.
* Set the **Provisioning Mode** to **Automatic**.
* Ensure that the **Provisioning Status** toggle is set to **On**.
5. From the left menu of the same provisioning page, navigate to **Manage > Users and groups**.
* Create groups using Prophecy's [naming conventions](/administration/management/authentication/group-team-mapping).
* Assign users to those groups.
These users and teams should automatically appear in Prophecy.
### Okta
Configure SAML for Okta and enable SCIM provisioning
1. Log in to Okta as an administrator.
2. On the homepage, navigate to **Applications** > **Applications**.
3. Click **Create App Integration**.
4. Select **SAML 2.0** and click **Next**.
5. Enter **App Name** as *Prophecy SAML App* and click **Next**.
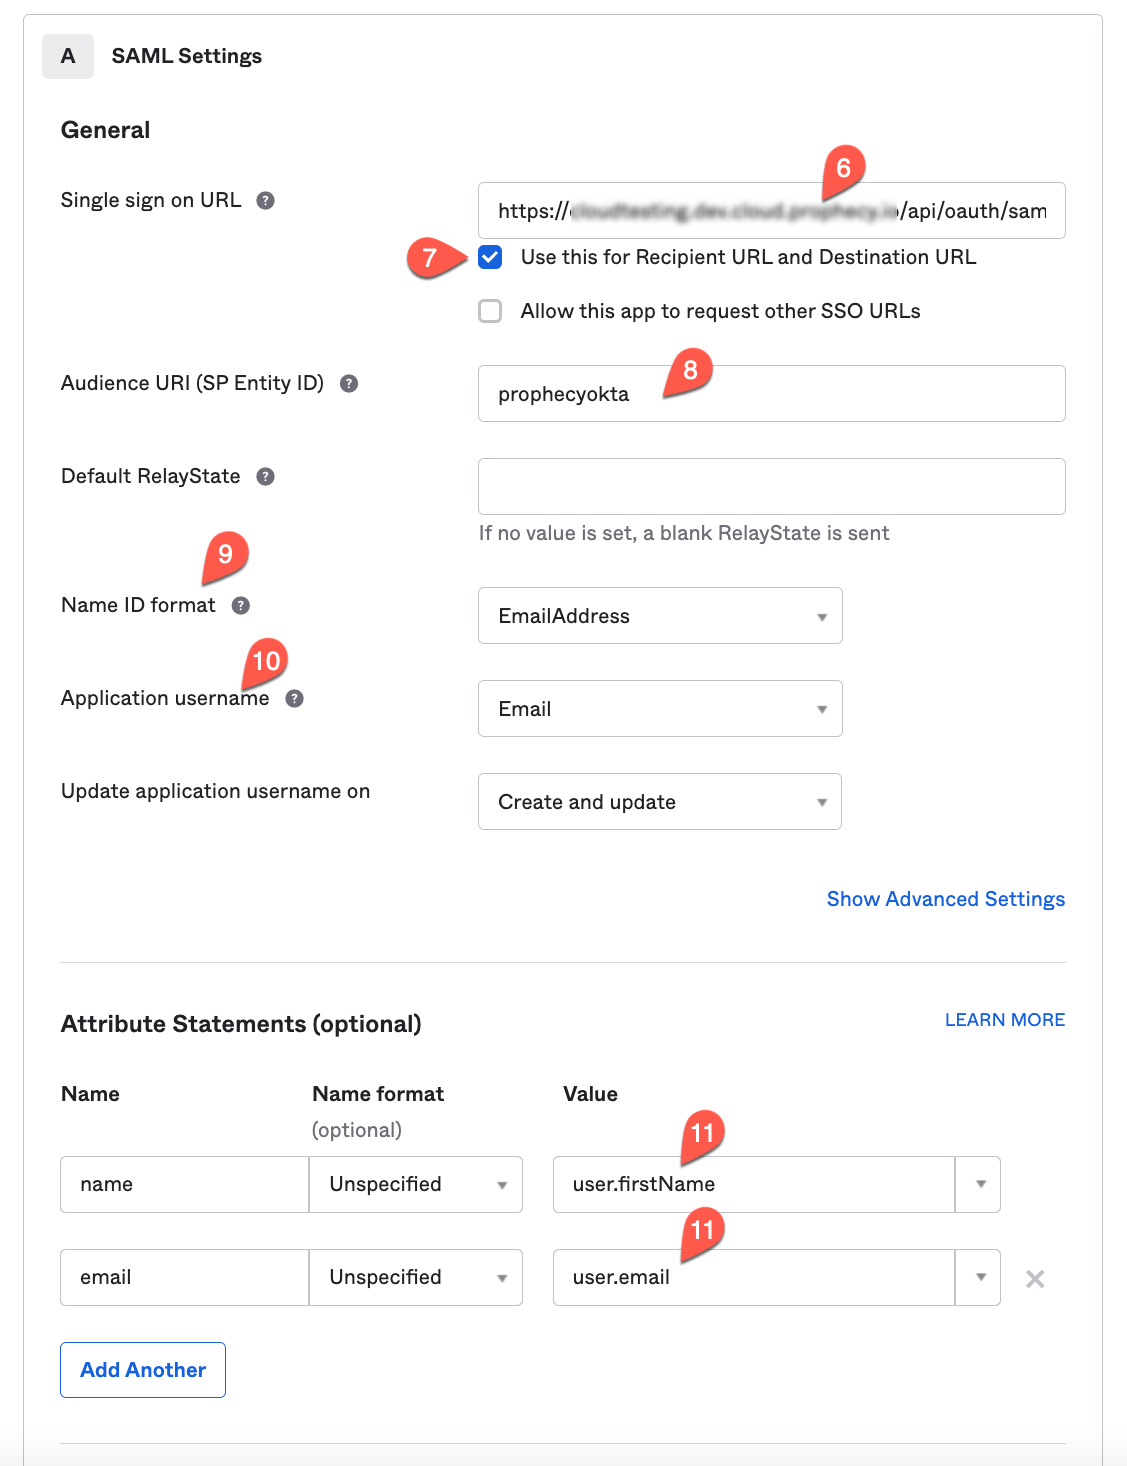
6. For **Single Sign-On URL**, specify `https://your-prophecy-ide-url.domain/api/oauth/samlCallback`.
7. Select **Use this** for both **Recipient URL** and **Destination URL**.
8. In **Audience URI (SP Entity ID)**, provide a name to serve as the entity issuer ID (for example, `prophecyokta`).
9. Set **Name ID format** to **EmailAddress** from the dropdown.
10. For **Application Username**, select **Email**.
11. Under **Attribute Statements**, add two attributes **name** and **email**.
#### Configure provisioning
To set up SCIM in Azure:
1. Open the Enterprise Application you just configured.
2. From the left menu of the application, click **Manage > Provisioning**.
3. From the left menu of the provisioning page, click **Manage > Connectivity**.
* Under **Select authentication method**, select **Bearer authentication**.
* For the **Tenant URL** field, use the value `https://.prophecy.io/proscim`
* For **Secret token**, use the Prophecy-generated token that you copied in the [Set up SCIM](#set-up-scim) steps.
* Click **Test connection**. Once the test succeeds, you can save the connection.
4. From the left menu of the same provisioning page, navigate to **Manage > Provisioning**.
* Set the **Provisioning Mode** to **Automatic**.
* Ensure that the **Provisioning Status** toggle is set to **On**.
5. From the left menu of the same provisioning page, navigate to **Manage > Users and groups**.
* Create groups using Prophecy's [naming conventions](/administration/management/authentication/group-team-mapping).
* Assign users to those groups.
These users and teams should automatically appear in Prophecy.
### Okta
Configure SAML for Okta and enable SCIM provisioning
1. Log in to Okta as an administrator.
2. On the homepage, navigate to **Applications** > **Applications**.
3. Click **Create App Integration**.
4. Select **SAML 2.0** and click **Next**.
5. Enter **App Name** as *Prophecy SAML App* and click **Next**.
6. For **Single Sign-On URL**, specify `https://your-prophecy-ide-url.domain/api/oauth/samlCallback`.
7. Select **Use this** for both **Recipient URL** and **Destination URL**.
8. In **Audience URI (SP Entity ID)**, provide a name to serve as the entity issuer ID (for example, `prophecyokta`).
9. Set **Name ID format** to **EmailAddress** from the dropdown.
10. For **Application Username**, select **Email**.
11. Under **Attribute Statements**, add two attributes **name** and **email**.
 12. Click **Next**.
13. Choose **I'm an Okta customer adding an internal app**.
14. Click **Finish**. The *Prophecy SAML App* is now displayed.
#### Download SAML Signing Certificate
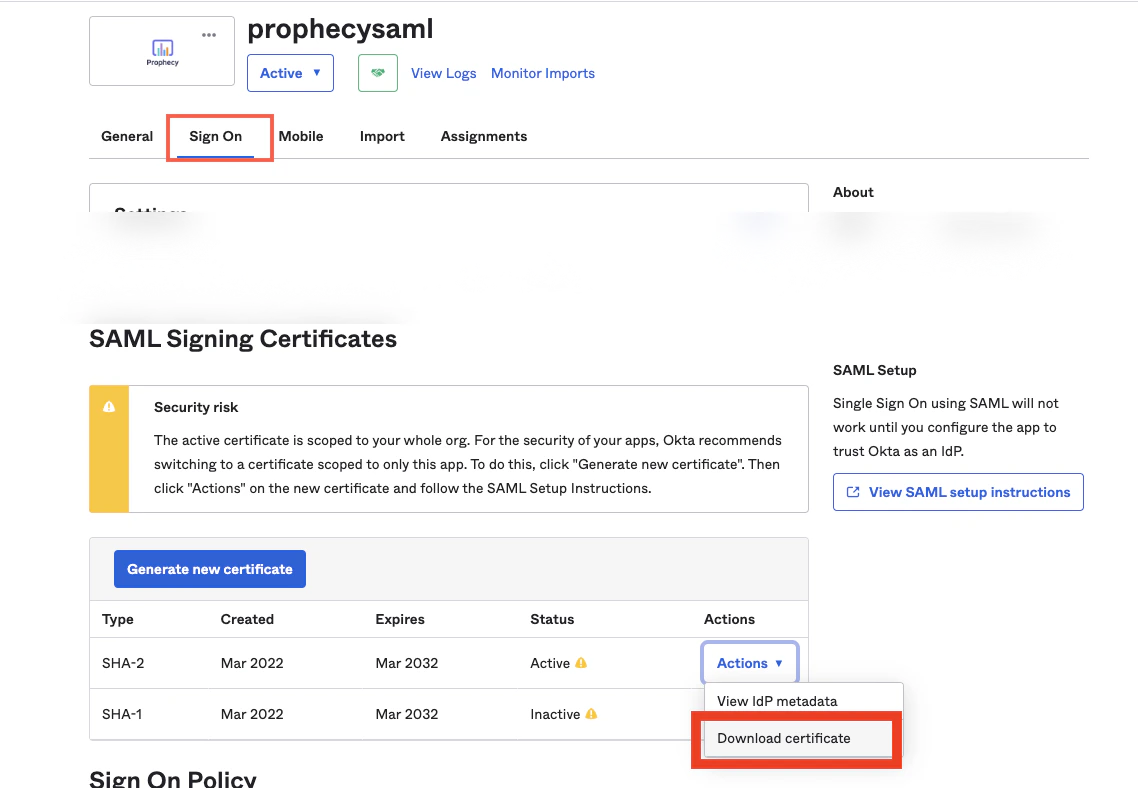
1. Navigate to the **Sign On** tab of *Prophecy SAML App* in Okta.
2. Locate the **SAML Signing Certificates** section.
3. Click the download button, as shown in the example below, to download the certificate:
12. Click **Next**.
13. Choose **I'm an Okta customer adding an internal app**.
14. Click **Finish**. The *Prophecy SAML App* is now displayed.
#### Download SAML Signing Certificate
1. Navigate to the **Sign On** tab of *Prophecy SAML App* in Okta.
2. Locate the **SAML Signing Certificates** section.
3. Click the download button, as shown in the example below, to download the certificate:
 #### SSO URL
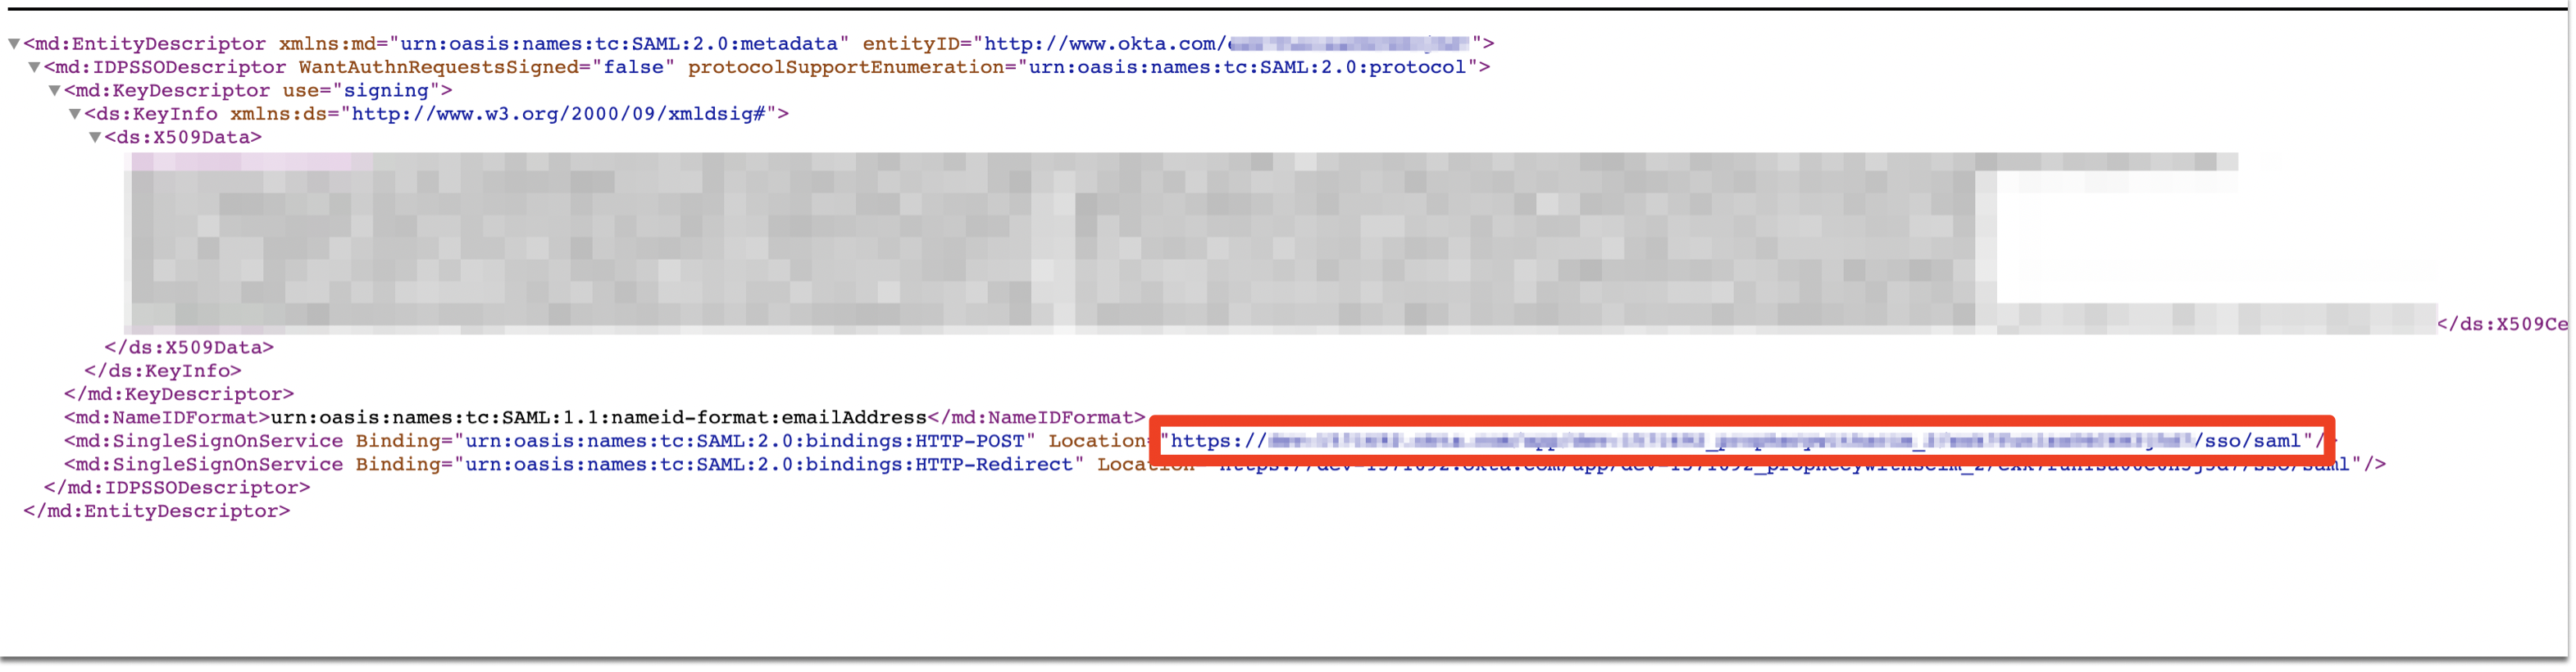
1. In the same **Sign On** tab under **SAML Signing Certificates**, click **View IdP metadata**.
2. This action opens an XML file in a new browser tab.
3. Copy the red-highlighted text in the **Location** section of the XML file and use it as the **SSO URL** in Prophecy IDE.
#### SSO URL
1. In the same **Sign On** tab under **SAML Signing Certificates**, click **View IdP metadata**.
2. This action opens an XML file in a new browser tab.
3. Copy the red-highlighted text in the **Location** section of the XML file and use it as the **SSO URL** in Prophecy IDE.
 #### Entity and SSO Issuer
1. Go to the **General** tab, then navigate to the **SAML Settings** section and click **Edit**.
2. Click **Next** to reach the **Configure SAML** section.
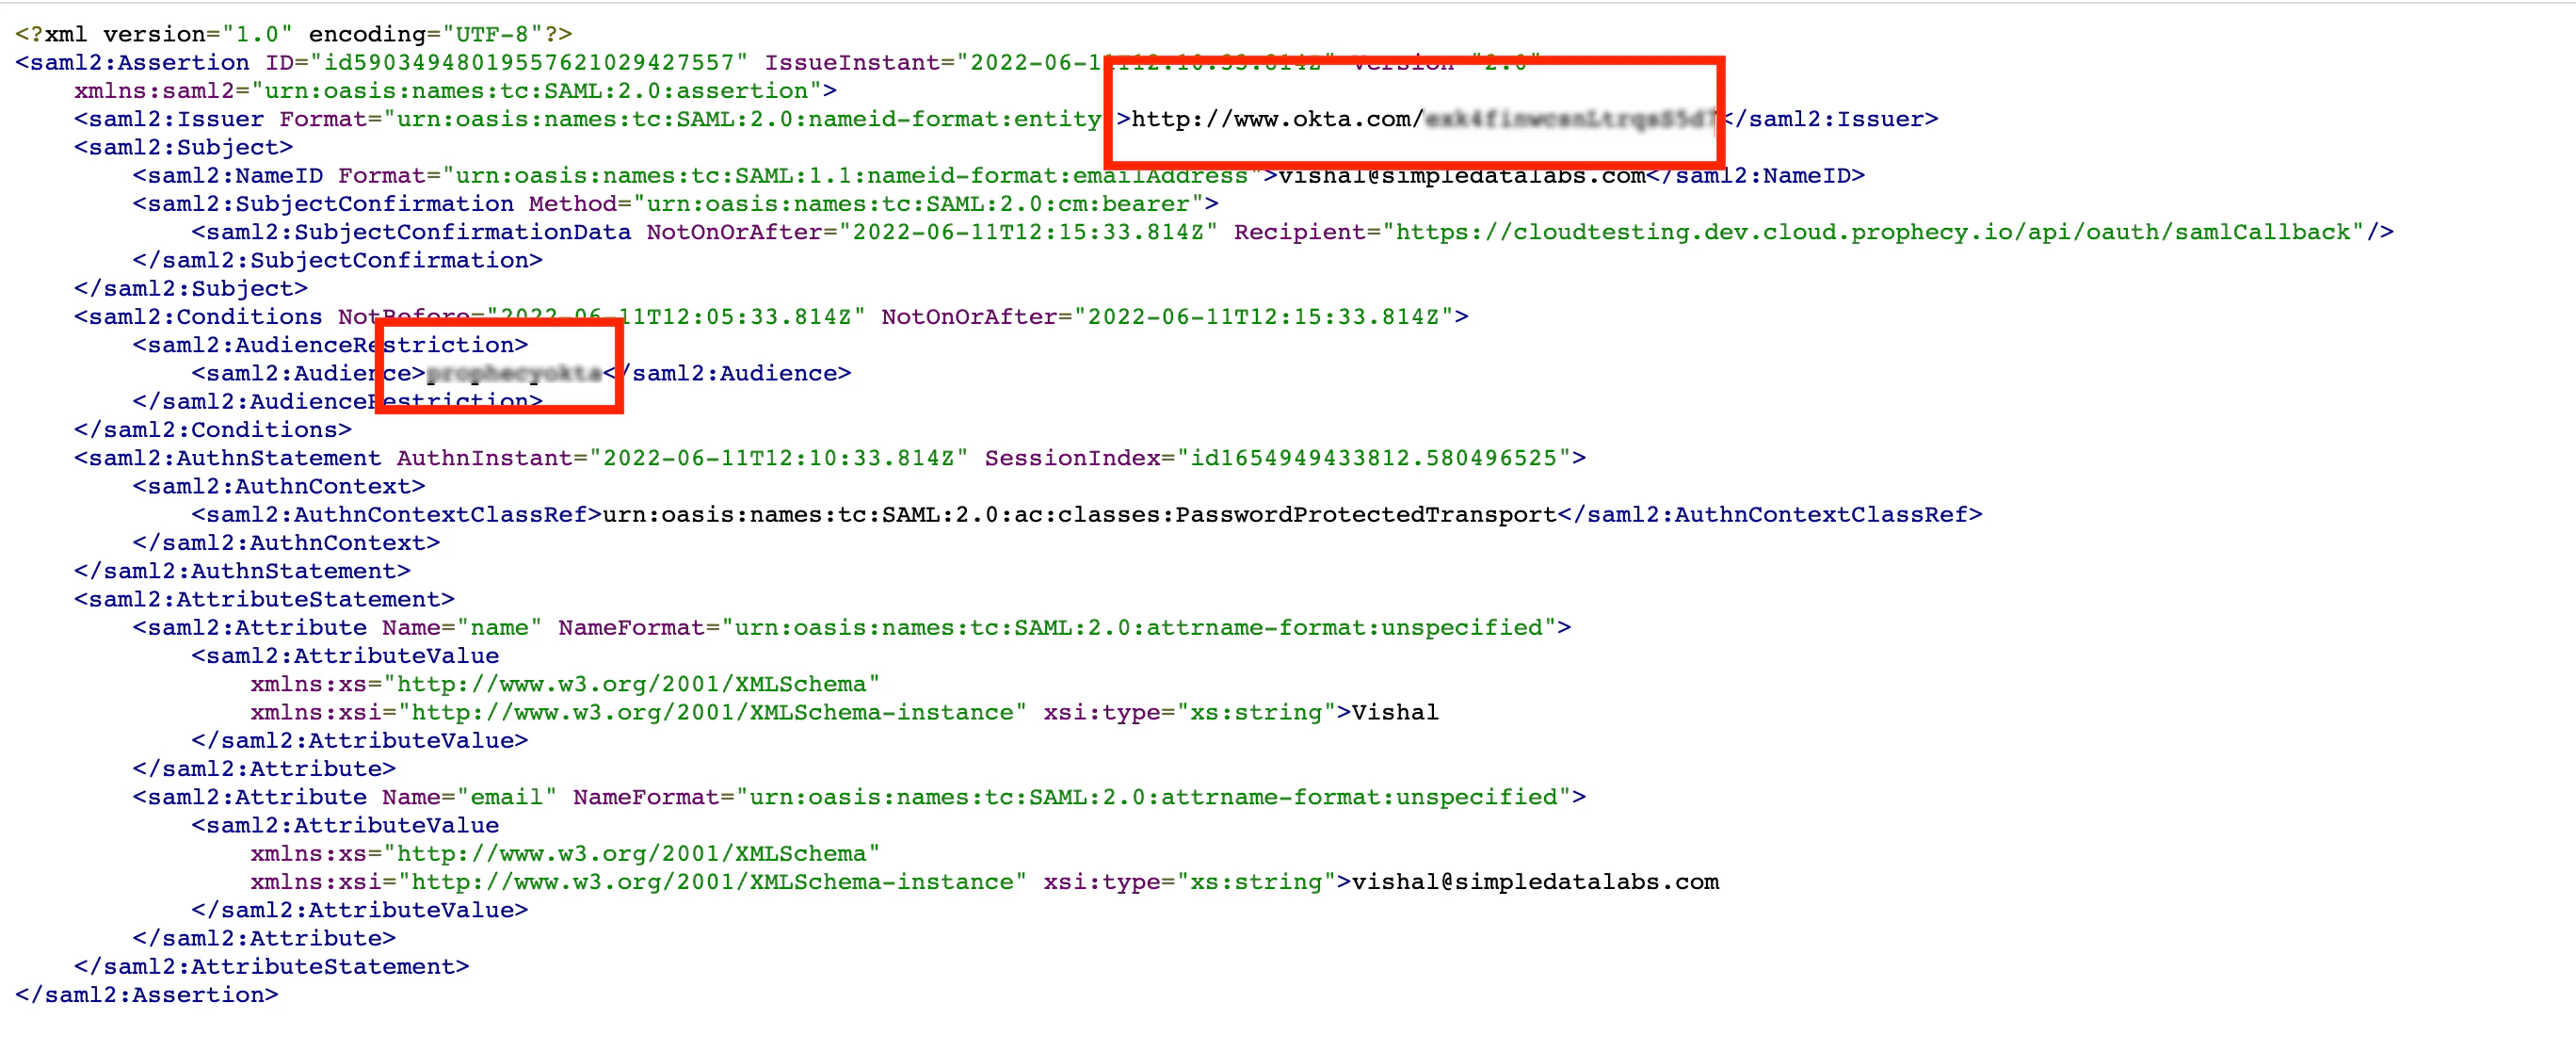
3. Scroll to the bottom and click the **Preview the SAML assertion** button.
4. This opens a new browser tab.
5. Copy the highlighted information from the preview and use it as the **Entity Issuer** and **SSO Issuer** in Prophecy IDE.
#### Entity and SSO Issuer
1. Go to the **General** tab, then navigate to the **SAML Settings** section and click **Edit**.
2. Click **Next** to reach the **Configure SAML** section.
3. Scroll to the bottom and click the **Preview the SAML assertion** button.
4. This opens a new browser tab.
5. Copy the highlighted information from the preview and use it as the **Entity Issuer** and **SSO Issuer** in Prophecy IDE.
 #### Enable SCIM provisioning
To set up SCIM in Okta:
1. Open in Prophecy application in Okta.
2. In the **General** settings, select the **Enable SCIM provisioning** checkbox.
Once SCIM is enabled, two new tabs should appear in the application settings: **Provisioning** and **Push Groups**.
1. Navigate to the **Provisioning** tab.
2. In the **To App** subtab, enable the following:
* **Create Users**
* **Update User Attributes**
* **Deactivate Users**
This allows Okta to perform the enabled actions in Prophecy.
3. In the **Integration** subtab:
* Set the **SCIM version** to `2.0`.
* For the **SCIM connector base URL**, use the value `https://.prophecy.io/proscim`
* For the **Unique identifier field for users**, type `userName`. This is an Okta-specific value.
* For **Supported provisioning actions**, ensure that **Push New Users**, **Push Profile Updates**, and **Push Groups** checkboxes are enabled.
* Set the **Authentication Mode** to **HTTP Header**.
* Under **HTTP Header**, set the **Bearer** token to the Prophecy-generated token that you copied in the [Set up SCIM](#set-up-scim) steps.
* Click **Test Connector Configuration**.
* When successful, click **Save**.
Now that you have set up the connection, you need to create and activate your group assignments.
1. Open the **Assignments** tab.
2. Create users and assign them to groups using Prophecy's [naming conventions](/administration/management/authentication/group-team-mapping).
3. Navigate to the **Push Groups** tab.
4. Follow the steps in [Enable Group Push](https://help.okta.com/en-us/content/topics/users-groups-profiles/usgp-enable-group-push.htm) in the Okta documentation to activate group provisioning in Prophecy.
Once you have pushed groups, the corresponding users and teams should appear in Prophecy. When groups are "active" in Okta, any changes to these groups should automatically sync with Prophecy.
#### Enable SCIM provisioning
To set up SCIM in Okta:
1. Open in Prophecy application in Okta.
2. In the **General** settings, select the **Enable SCIM provisioning** checkbox.
Once SCIM is enabled, two new tabs should appear in the application settings: **Provisioning** and **Push Groups**.
1. Navigate to the **Provisioning** tab.
2. In the **To App** subtab, enable the following:
* **Create Users**
* **Update User Attributes**
* **Deactivate Users**
This allows Okta to perform the enabled actions in Prophecy.
3. In the **Integration** subtab:
* Set the **SCIM version** to `2.0`.
* For the **SCIM connector base URL**, use the value `https://.prophecy.io/proscim`
* For the **Unique identifier field for users**, type `userName`. This is an Okta-specific value.
* For **Supported provisioning actions**, ensure that **Push New Users**, **Push Profile Updates**, and **Push Groups** checkboxes are enabled.
* Set the **Authentication Mode** to **HTTP Header**.
* Under **HTTP Header**, set the **Bearer** token to the Prophecy-generated token that you copied in the [Set up SCIM](#set-up-scim) steps.
* Click **Test Connector Configuration**.
* When successful, click **Save**.
Now that you have set up the connection, you need to create and activate your group assignments.
1. Open the **Assignments** tab.
2. Create users and assign them to groups using Prophecy's [naming conventions](/administration/management/authentication/group-team-mapping).
3. Navigate to the **Push Groups** tab.
4. Follow the steps in [Enable Group Push](https://help.okta.com/en-us/content/topics/users-groups-profiles/usgp-enable-group-push.htm) in the Okta documentation to activate group provisioning in Prophecy.
Once you have pushed groups, the corresponding users and teams should appear in Prophecy. When groups are "active" in Okta, any changes to these groups should automatically sync with Prophecy.