> ## Documentation Index
> Fetch the complete documentation index at: https://docs.prophecy.ai/llms.txt
> Use this file to discover all available pages before exploring further.
# Create a Databricks fabric
> Connect Prophecy to your existing Databricks workspace
Available for [Enterprise Edition](/data-engineering/administration/platform/editions) only.
Create a Databricks fabric to connect Prophecy to your existing Databricks workspace. With a Databricks fabric, you can connect to existing Spark clusters or create new ones, run Spark pipelines, and read or write data, depending on your Databricks permissions.
The following sections describe the parameters needed to set up a Databricks fabric.
Databricks Runtime 16.4 supports both Scala 2.12 and 2.13, but defaults to Scala 2.13. Databricks Runtime 17.0 and later only support Scala 2.13.
If your cluster defaults to Scala 2.13 but your Prophecy installation uses libraries built for Scala 2.12, you might see the following error:
```text wrap theme={null}
Library installation attempted on the driver node of cluster 0805-161652-bmq6jitu and failed. Cannot resolve Maven library coordinates. Verify library details, repository access, or Maven repository availability. Error code: ERROR_MAVEN_LIBRARY_RESOLUTION, error message: Library resolution failed because unresolved dependency: io.prophecy:prophecy-libs_2.13:3.5.0-8.11.1: not found
```
To fix this, **update Prophecy to version 4.2.0.1 or later**, which adds support for Scala 2.13.
## Initial setup
The initial setup for a Databricks fabric involves authenticating Prophecy's connection to Databricks.
Begin by creating a new fabric entity in Prophecy.
1. From the left sidebar, click the **+** sign.
2. On the Create Entity page, select **Fabric**.
The **Basic Info** tab lets you define the key identifiers of the fabric.
1. Provide a name for the fabric.
2. (Optional) Provide a description for the fabric.
3. Select a [team](/data-analysis/administration/management/teams/teams) that can access the fabric.
4. Click **Continue**.
The **Providers** tab allows you to configure the SQL warehouse provider you want to use. You cannot change the fabric provider after you create the fabric.
1. Under **Provider**, select **Databricks**.
2. Enter your Databricks Workspace URL.
Example: `https://dbc-.cloud.databricks.com`.
3. Select the authentication method you want to use.
For detailed instructions, see [Authentication methods](#authentication-methods). Additionally,
read about some [policies](https://docs.databricks.com/aws/en/admin/clusters/policy-families)
that require Databricks Workspace Admin permissions.
4. Click **Complete** to save the fabric.
After you finish the initial setup, you can add job sizes and update additional settings in the fabric. Open the fabric from the metadata page to edit the fabric.
## Add job sizes
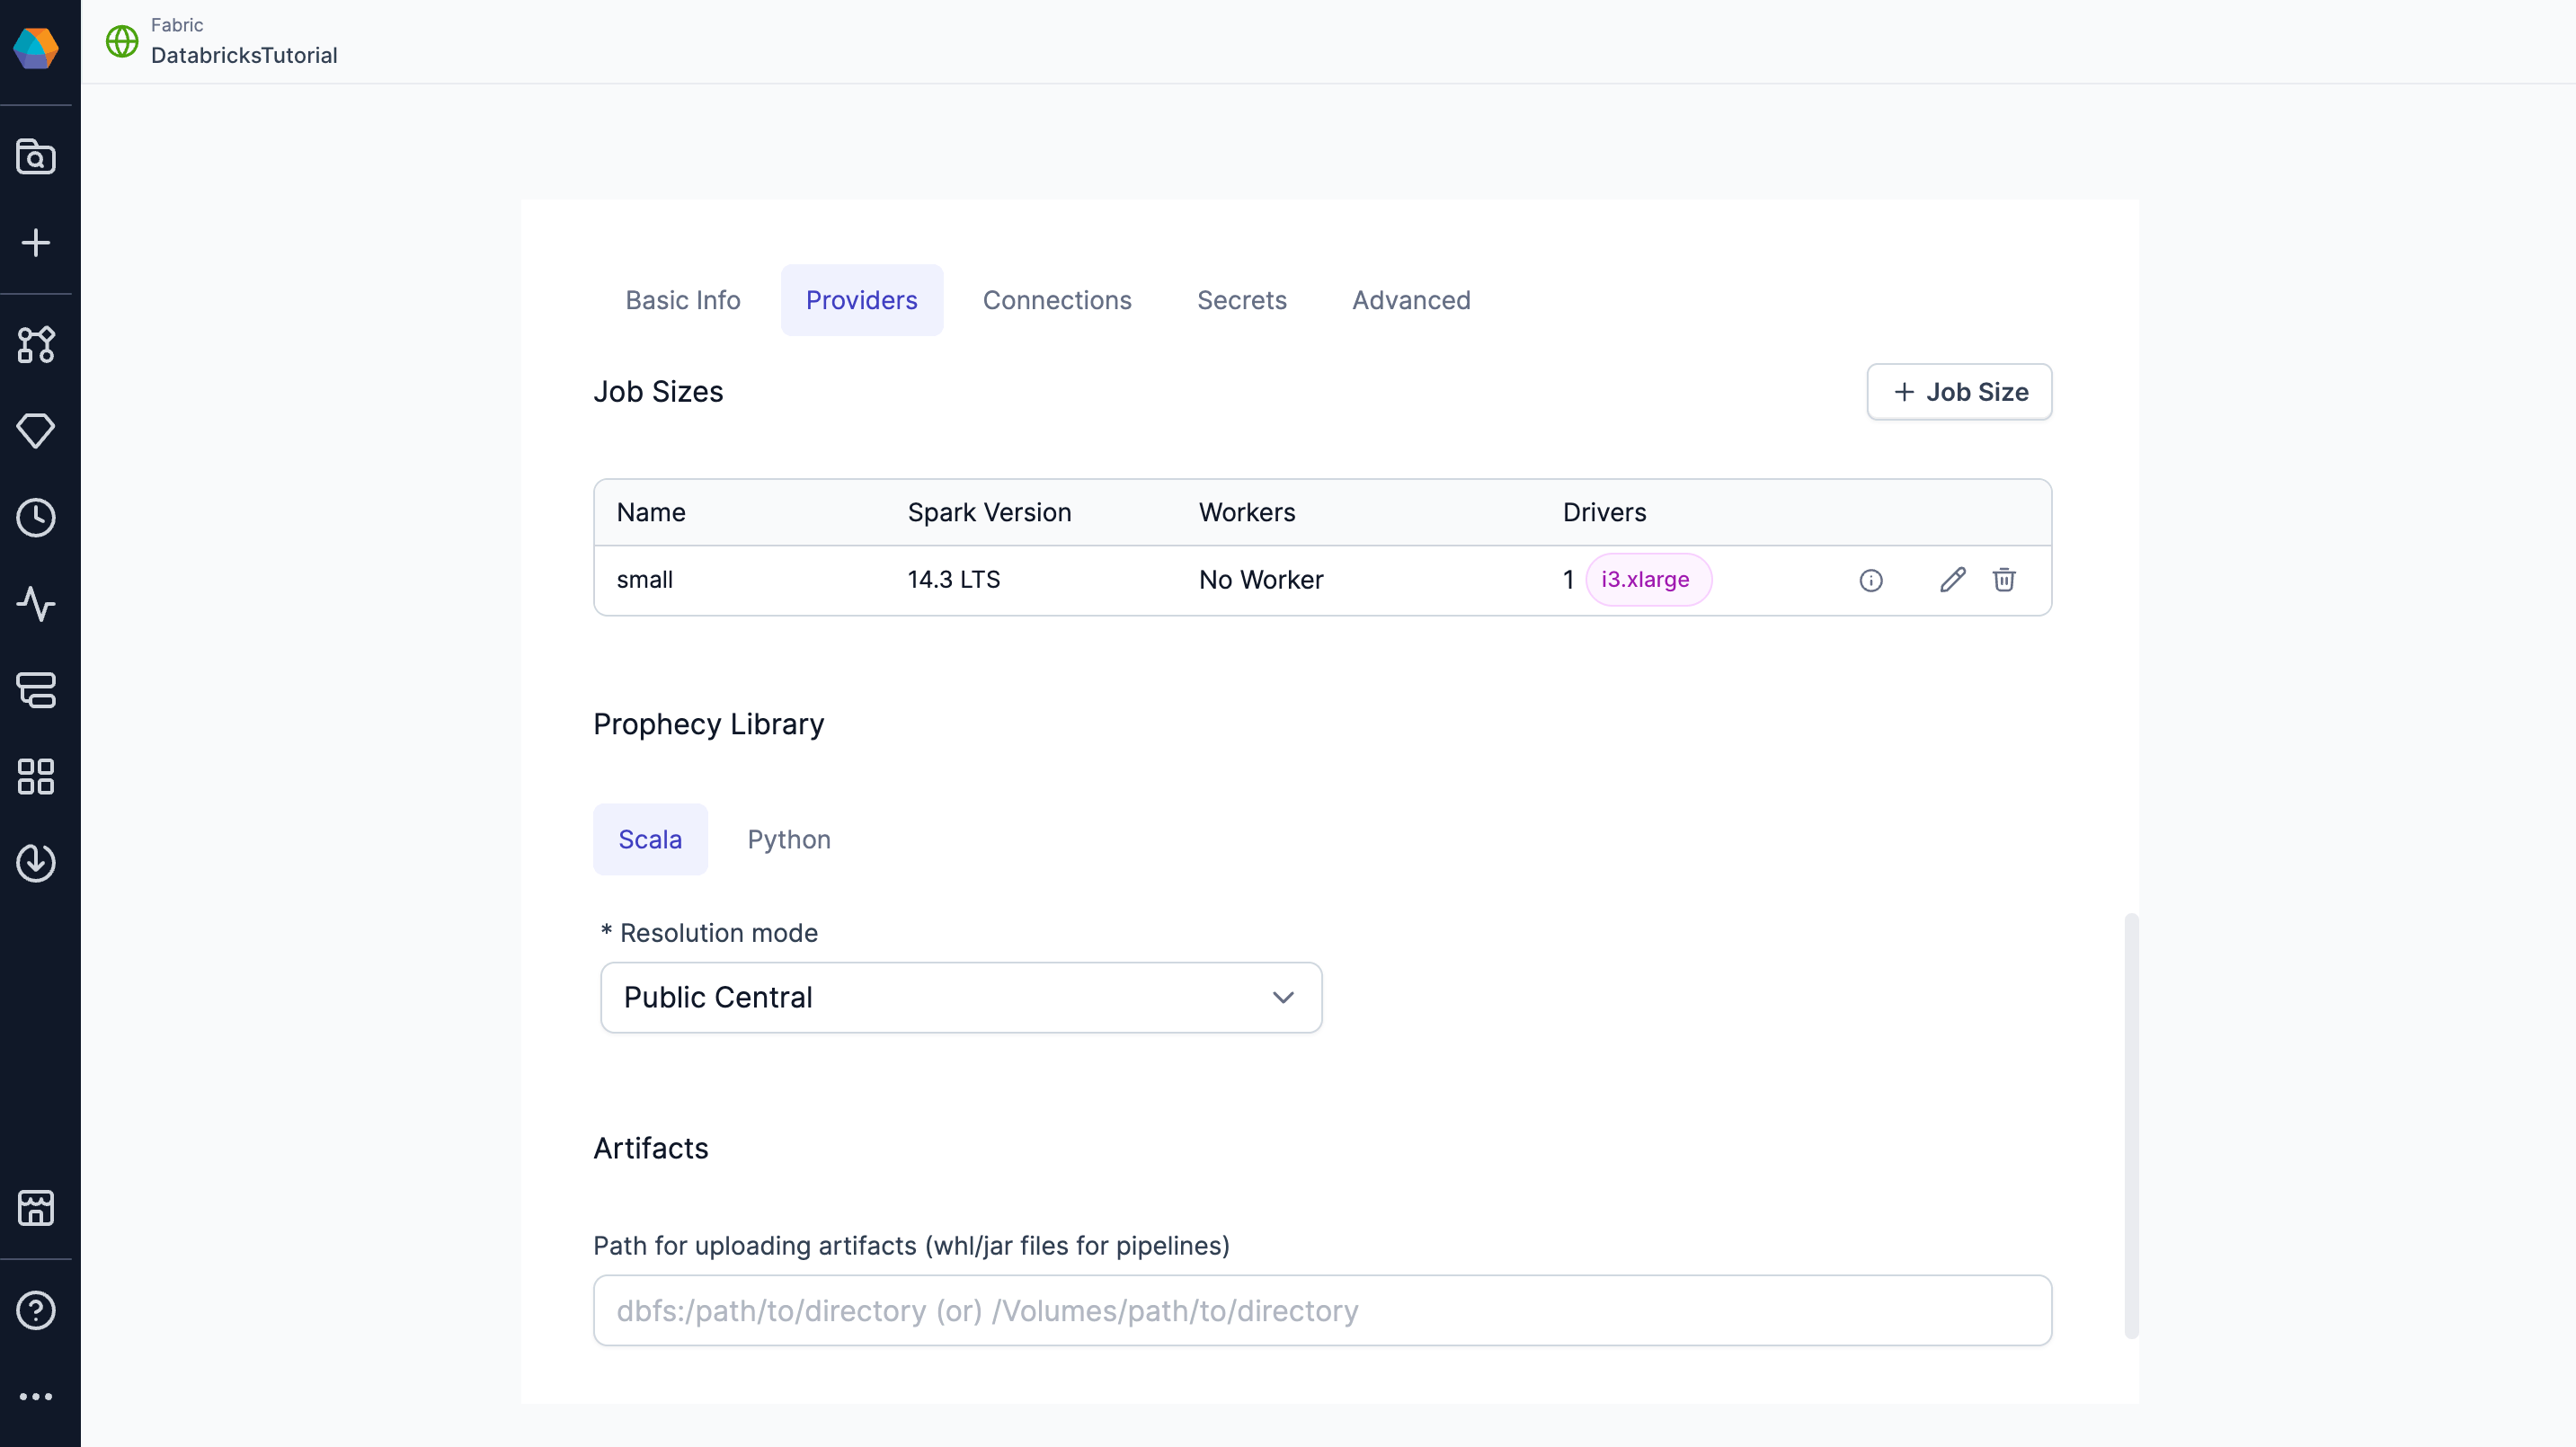
In the **Jobs** tab of a Databricks fabric, Prophecy includes a single job size by default that uses [Databricks Runtime 14.3](https://docs.databricks.com/aws/en/compute#databricks-runtime). You can modify this default configuration or define additional job sizes using the Prophecy UI.
Job sizes define the cluster configurations that Prophecy can spawn to run pipelines. We recommend choosing the smallest machine types and the fewest nodes necessary for your use case to optimize cost and performance.
To create or update a job size, use the form view or switch to the JSON editor to paste your existing compute configuration from Databricks.
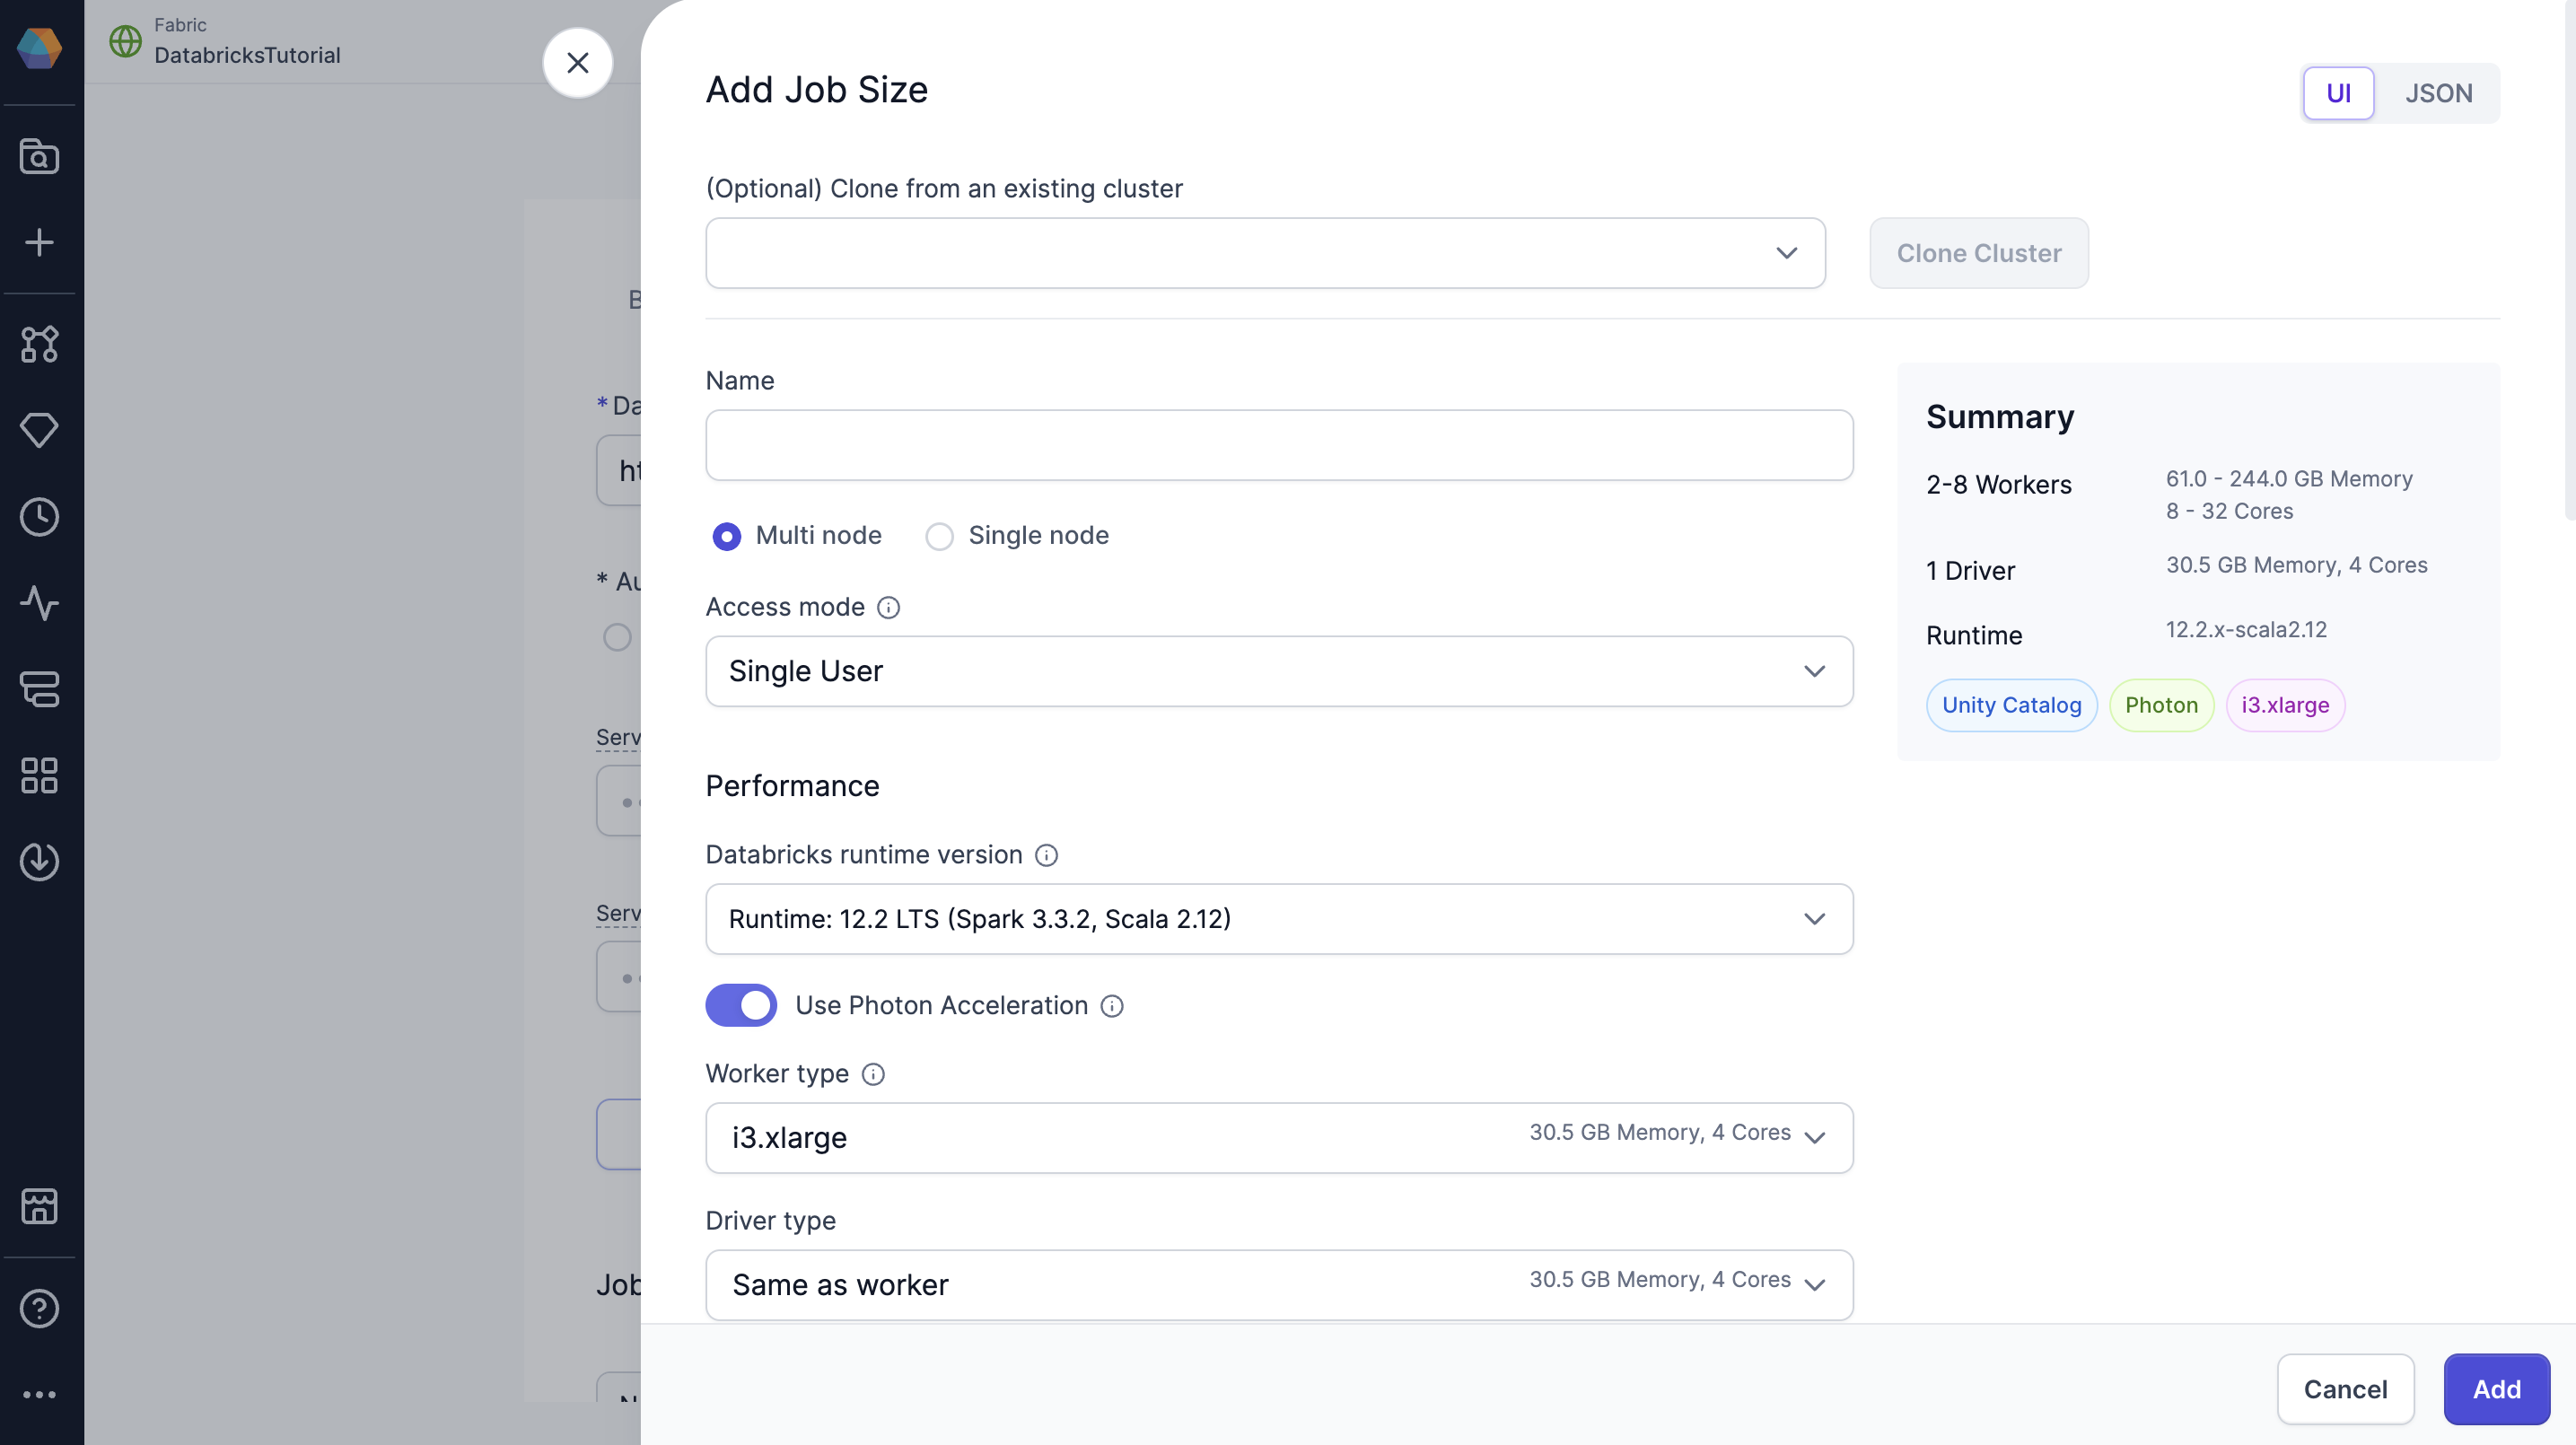 The job size configuration mirrors the compute configuration in Databricks. To learn more about
compute configuration in Databricks, visit their [reference
guide](https://docs.databricks.com/aws/en/compute/configure).
When using Unity Catalog clusters with standard (formerly shared) access mode, note their [particular limitations](https://docs.databricks.com/en/compute/access-mode-limitations.html#shared-access-mode-limitations-on-unity-catalog). You can see all supported Prophecy features in our [UC standard cluster support](/data-engineering/fabrics/spark-provider/databricks/UCShared) documentation.
If using **Auto** for the cluster access mode, you may encounter different pipeline behavior in Prophecy depending on the cluster Databricks allocates to you.
## Advanced settings
In the **Advanced** tab of a Databricks fabric, you can configure the following settings.
### Prophecy Library
Prophecy libraries are Scala and Python libraries that extend the functionality of Apache Spark. These libraries are automatically installed in your Spark execution environment when you attach to a cluster or create a new one.
| **Resolution mode** | **Description** |
| ------------------------ | ------------------------------------------------------------------------------------------------------------------------------------------------ |
| Public Central (Default) | Retrieve Prophecy libraries from the public artifact repository. Use Maven for Scala projects and PyPI for Python projects. |
| Custom Artifactory | Retrieve Prophecy libraries from an Artifactory URL. |
| File System | Retrieve Prophecy libraries from a file system. For example, you can add the public S3 bucket path: `s3://prophecy-public-bucket/prophecy-libs/` |
To use Prophecy libraries in Databricks environments that have enabled Unity Catalog, you must
[whitelist the required Maven coordinates or JAR
paths](/data-engineering/fabrics/spark-provider/databricks/whitelist-plibs).
A full list of public paths can be found in the documentation on [Prophecy
libraries](/data-engineering/extensibility/dependencies/prophecy-libs#download-prophecy-libraries).
You also can set up [Prophecy libraries in your Databricks
volumes](/data-engineering/fabrics/spark-provider/databricks/volumes-plibs).
### Artifacts
Prophecy supports Databricks volumes. When you run a Python or Scala pipeline via a job, you must bundle them as whl/jar artifacts. These artifacts must then be made accessible to the Databricks job in order to use them as a library installed on the cluster. You can designate a path to a volume for uploading the whl/jar files under Artifacts.
The job size configuration mirrors the compute configuration in Databricks. To learn more about
compute configuration in Databricks, visit their [reference
guide](https://docs.databricks.com/aws/en/compute/configure).
When using Unity Catalog clusters with standard (formerly shared) access mode, note their [particular limitations](https://docs.databricks.com/en/compute/access-mode-limitations.html#shared-access-mode-limitations-on-unity-catalog). You can see all supported Prophecy features in our [UC standard cluster support](/data-engineering/fabrics/spark-provider/databricks/UCShared) documentation.
If using **Auto** for the cluster access mode, you may encounter different pipeline behavior in Prophecy depending on the cluster Databricks allocates to you.
## Advanced settings
In the **Advanced** tab of a Databricks fabric, you can configure the following settings.
### Prophecy Library
Prophecy libraries are Scala and Python libraries that extend the functionality of Apache Spark. These libraries are automatically installed in your Spark execution environment when you attach to a cluster or create a new one.
| **Resolution mode** | **Description** |
| ------------------------ | ------------------------------------------------------------------------------------------------------------------------------------------------ |
| Public Central (Default) | Retrieve Prophecy libraries from the public artifact repository. Use Maven for Scala projects and PyPI for Python projects. |
| Custom Artifactory | Retrieve Prophecy libraries from an Artifactory URL. |
| File System | Retrieve Prophecy libraries from a file system. For example, you can add the public S3 bucket path: `s3://prophecy-public-bucket/prophecy-libs/` |
To use Prophecy libraries in Databricks environments that have enabled Unity Catalog, you must
[whitelist the required Maven coordinates or JAR
paths](/data-engineering/fabrics/spark-provider/databricks/whitelist-plibs).
A full list of public paths can be found in the documentation on [Prophecy
libraries](/data-engineering/extensibility/dependencies/prophecy-libs#download-prophecy-libraries).
You also can set up [Prophecy libraries in your Databricks
volumes](/data-engineering/fabrics/spark-provider/databricks/volumes-plibs).
### Artifacts
Prophecy supports Databricks volumes. When you run a Python or Scala pipeline via a job, you must bundle them as whl/jar artifacts. These artifacts must then be made accessible to the Databricks job in order to use them as a library installed on the cluster. You can designate a path to a volume for uploading the whl/jar files under Artifacts.
 ## Authentication methods
Prophecy supports multiple [Databricks authentication methods](https://docs.databricks.com/aws/en/dev-tools/auth).
| Method | Description |
| --------------------- | ----------------------------------------------------------------------------------------------------------------------------------------------------------------------------------------------- |
| Personal Access Token | Provide a Databricks Personal Access Token to authenticate the connection. Each user who connects to the fabric will have to provide their own PAT. Prophecy auto-refreshes PATs for AAD users. |
| OAuth | Log in with your Databricks account information. Each user who connects to the fabric will have to log in individually. |
### OAuth methods
There are two different OAuth methods for Databricks OAuth:
| Method | Authenticated Identity |
| ----------------------------- | ------------------------------------------------------------------------------------------------------- |
| User-based OAuth (U2M) | Each user signs in with their own Databricks account. Access is scoped to the individual's permissions. |
| Service Principal OAuth (M2M) | Uses a shared service principal identity. Suitable for automation and scheduling. |
When you configure a Databricks fabric and select OAuth, the OAuth method is **automatically determined** by the context.
* Interactive pipeline execution always uses U2M. U2M cannot be used for scheduled pipeline runs.
* Scheduled jobs in deployed projects always use M2M. To schedule jobs using the fabric, you **must** provide a Service Principal Client ID and Service Principal Client Secret during fabric setup.
To leverage OAuth for a Databricks Spark fabric, you or an admin must first create a corresponding
[app
registration](/data-engineering/administration/management/cluster-admin-settings/oauth-setup). The
fabric will always use the default Databricks app registration.
## Authentication methods
Prophecy supports multiple [Databricks authentication methods](https://docs.databricks.com/aws/en/dev-tools/auth).
| Method | Description |
| --------------------- | ----------------------------------------------------------------------------------------------------------------------------------------------------------------------------------------------- |
| Personal Access Token | Provide a Databricks Personal Access Token to authenticate the connection. Each user who connects to the fabric will have to provide their own PAT. Prophecy auto-refreshes PATs for AAD users. |
| OAuth | Log in with your Databricks account information. Each user who connects to the fabric will have to log in individually. |
### OAuth methods
There are two different OAuth methods for Databricks OAuth:
| Method | Authenticated Identity |
| ----------------------------- | ------------------------------------------------------------------------------------------------------- |
| User-based OAuth (U2M) | Each user signs in with their own Databricks account. Access is scoped to the individual's permissions. |
| Service Principal OAuth (M2M) | Uses a shared service principal identity. Suitable for automation and scheduling. |
When you configure a Databricks fabric and select OAuth, the OAuth method is **automatically determined** by the context.
* Interactive pipeline execution always uses U2M. U2M cannot be used for scheduled pipeline runs.
* Scheduled jobs in deployed projects always use M2M. To schedule jobs using the fabric, you **must** provide a Service Principal Client ID and Service Principal Client Secret during fabric setup.
To leverage OAuth for a Databricks Spark fabric, you or an admin must first create a corresponding
[app
registration](/data-engineering/administration/management/cluster-admin-settings/oauth-setup). The
fabric will always use the default Databricks app registration.