> ## Documentation Index
> Fetch the complete documentation index at: https://docs.prophecy.ai/llms.txt
> Use this file to discover all available pages before exploring further.
# Configure EMR SAML authentication with Okta
> Set up AWS EMR authentication using Okta
Available for [Enterprise Edition](/data-engineering/administration/platform/editions) only.
This guide describes how to configure AWS EMR Serverless authentication using Okta as the identity provider (IdP) with SAML 2.0. After setup, users in the configured Okta application can sign in to Prophecy EMR fabrics using their Okta credentials.
## Overview
When you configure SAML for EMR fabrics:
* Any user assigned to the Okta app can use the EMR fabric configured with SAML using their own credentials.
* All signed-in users are granted the AWS role defined in the fabric settings.
* Users remain signed in as long as their token is valid.
* Users must sign in again when the token expires.
## Prerequisites
To configure an EMR fabric that authenticates users with SAML, you need:
* Access to EMR or EMR Serverless compute
* Administrator access to AWS and Okta
* Permission to set environment variables in your Prophecy deployment, usually associated with the [Prophecy cluster admin](/data-engineering/administration/management/users/access/role-based-access) role.
* Ability to create or edit an EMR fabric in Prophecy.
## 1. Create an Okta SAML application
To begin, create a new Okta SAML application:
1. Sign in to Okta as an administrator.
2. Go to **Applications > Applications**.
3. Click **Create App Integration**.
4. Select **SAML 2.0** and click **Next**.
5. For **App name**, enter `Prophecy SAML App`, then click **Next**.
6. For **Single Sign-On URL**, open the Prophecy EMR fabric where you want to configure SAML.
Then, copy the provided URL under **Login URL** and paste this into the Okta field.
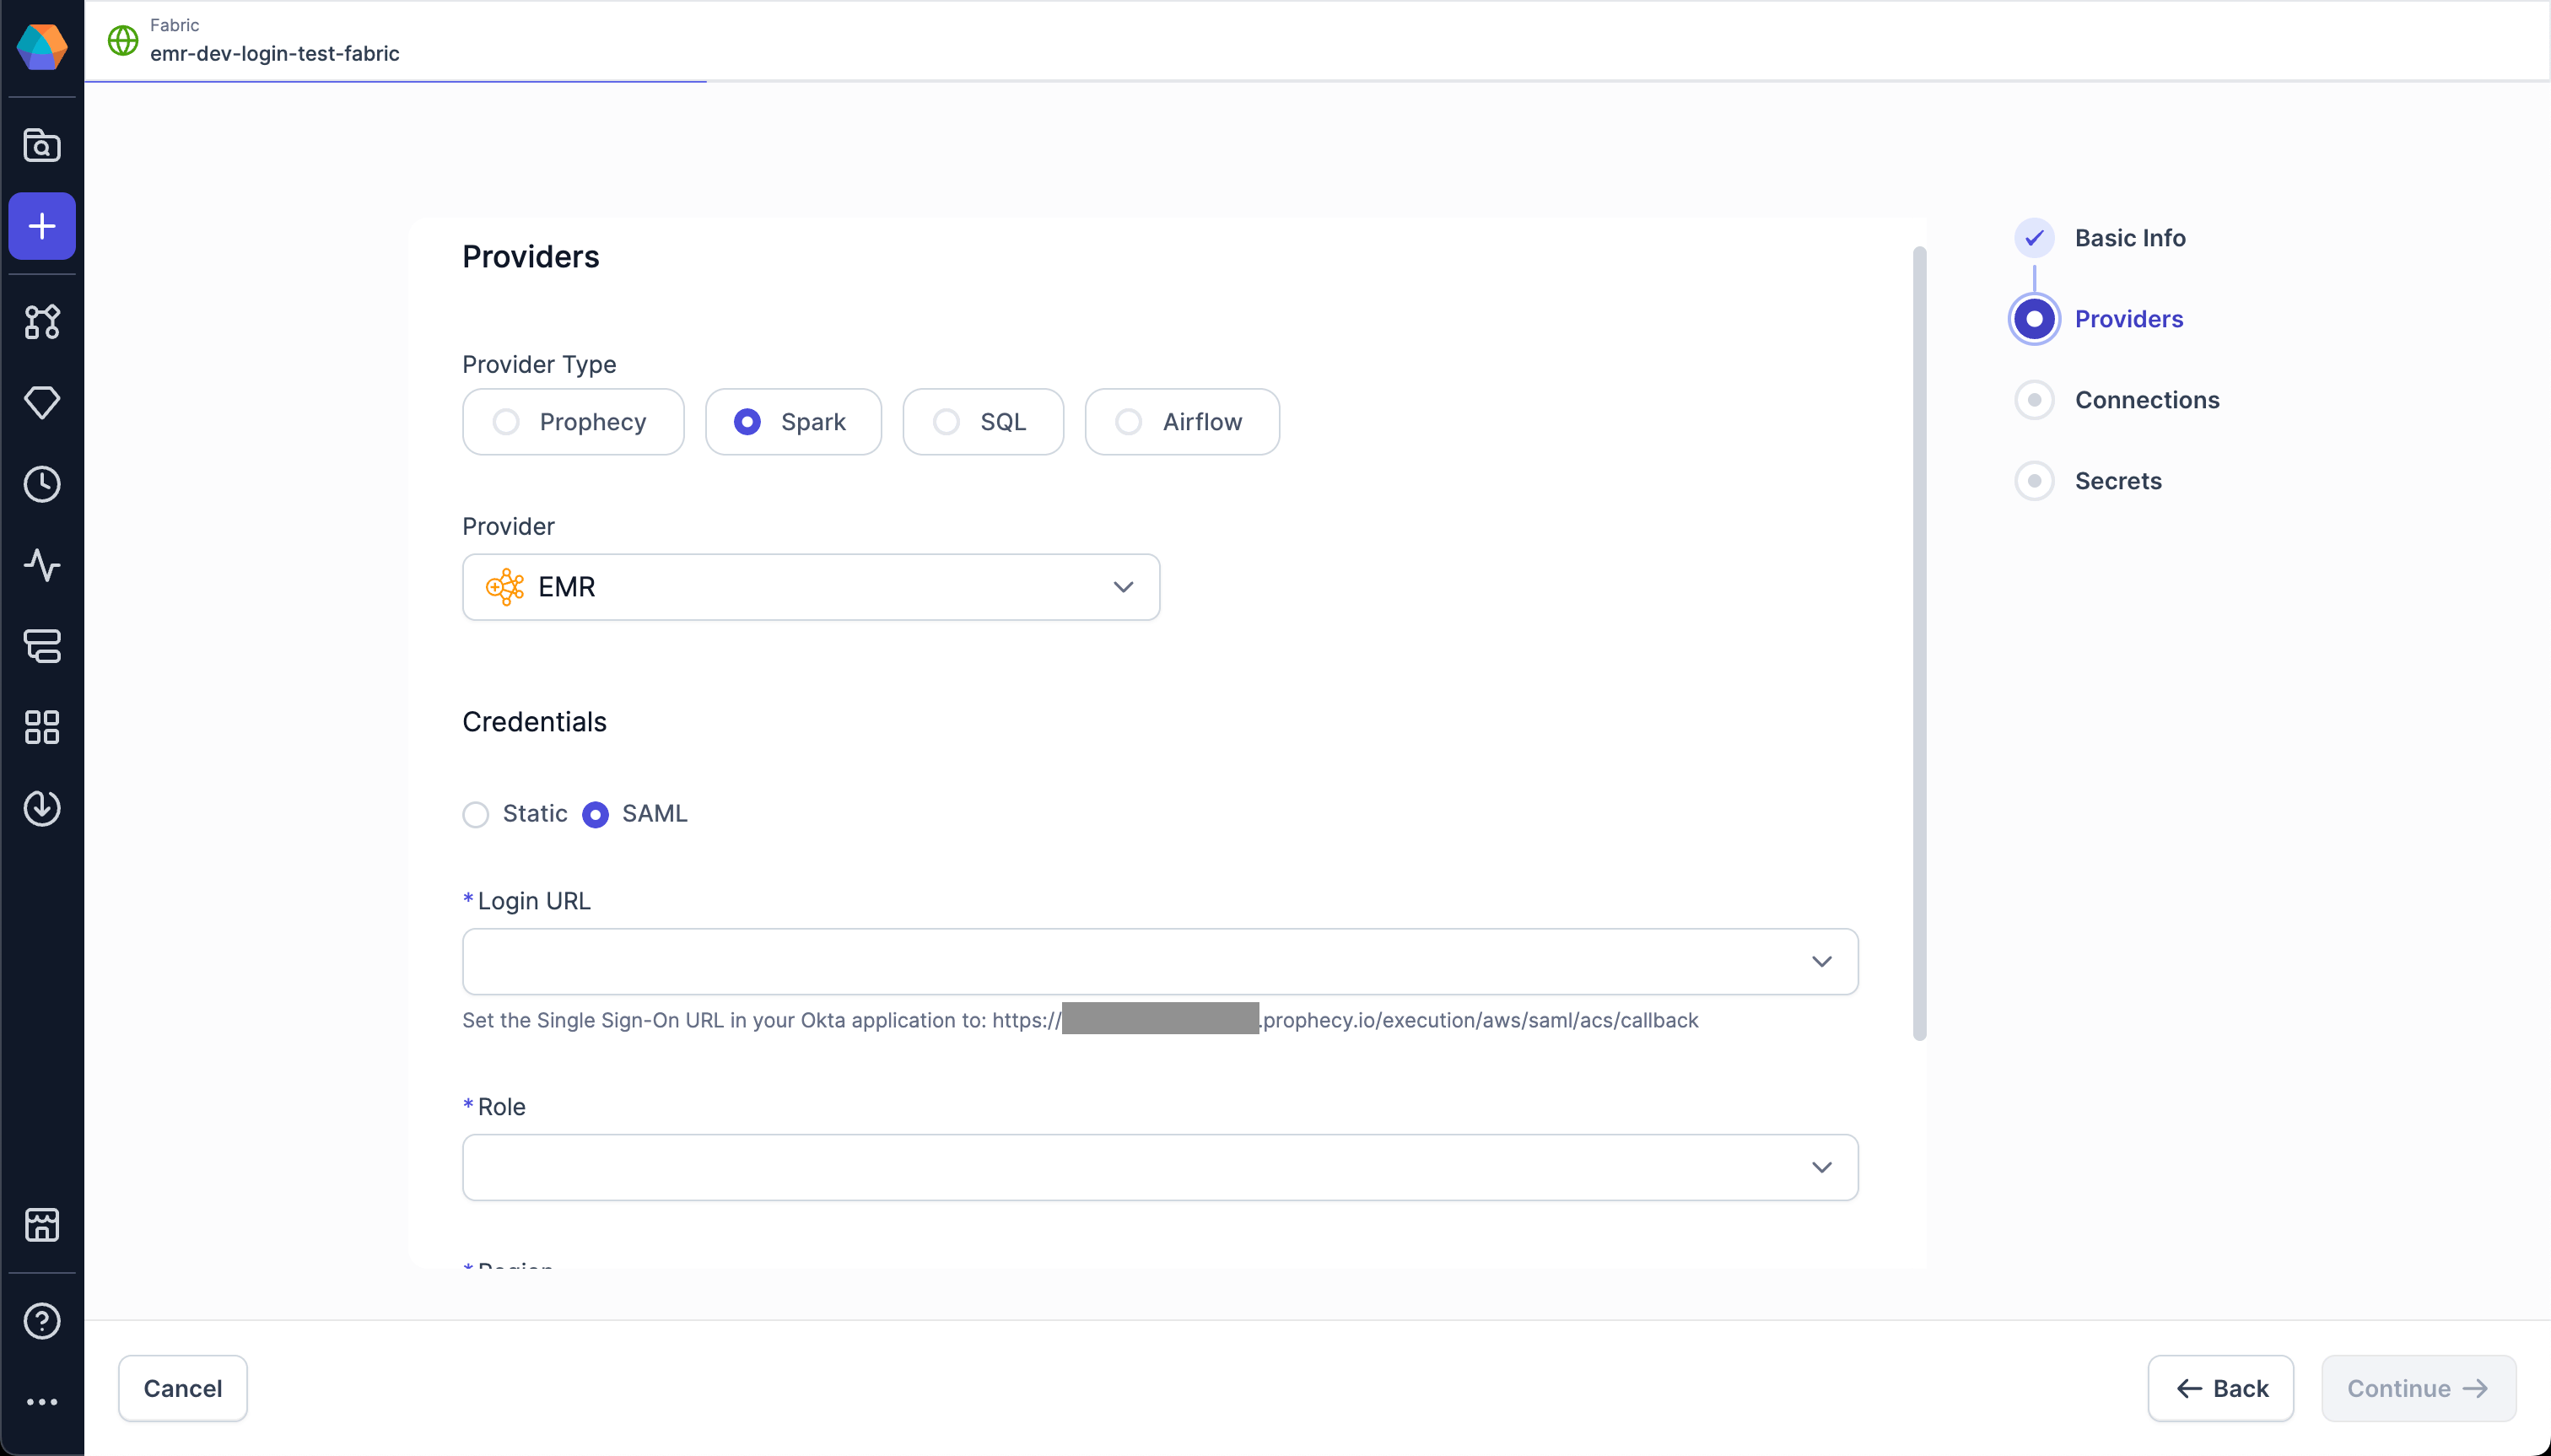 7. Below the URL, select the **Use this for Recipient URL and Destination URL** checkbox.
8. For **Audience URI (SP Entity ID)**, enter a value to identify the entity issuer (for example, `prophecyokta`).
9. Leave **Default Relay State** blank.
10. Keep the rest of the settings as-is and click **Next**.
11. Select **This is an internal app that we have created**.
12. Click **Finish**. The `Prophecy SAML App` appears in your application list.
### Assign users and groups in Okta
When you assign users/groups in the Okta application, you determine who is allowed to sign in.
1. In Okta, navigate to your application: **Applications > Applications**, then select the `Prophecy SAML App`.
2. Go to the **Assignments** tab.
3. Click **Assign** to see the following options:
* **Assign to People**: Select individual users who should have access.
* **Assign to Groups**: Select entire Okta groups to simplify management for multiple users.
4. For each user or group, click **Assign**.
5. Confirm assignments.
Only assigned users will be able to authenticate to AWS and access the Prophecy EMR fabric.
### Save the `metadata.xml` file
Next, save the metadata from this app to upload to AWS.
1. In the Okta application, open the **Sign On** tab.
2. Copy the **Metadata URL** details.
7. Below the URL, select the **Use this for Recipient URL and Destination URL** checkbox.
8. For **Audience URI (SP Entity ID)**, enter a value to identify the entity issuer (for example, `prophecyokta`).
9. Leave **Default Relay State** blank.
10. Keep the rest of the settings as-is and click **Next**.
11. Select **This is an internal app that we have created**.
12. Click **Finish**. The `Prophecy SAML App` appears in your application list.
### Assign users and groups in Okta
When you assign users/groups in the Okta application, you determine who is allowed to sign in.
1. In Okta, navigate to your application: **Applications > Applications**, then select the `Prophecy SAML App`.
2. Go to the **Assignments** tab.
3. Click **Assign** to see the following options:
* **Assign to People**: Select individual users who should have access.
* **Assign to Groups**: Select entire Okta groups to simplify management for multiple users.
4. For each user or group, click **Assign**.
5. Confirm assignments.
Only assigned users will be able to authenticate to AWS and access the Prophecy EMR fabric.
### Save the `metadata.xml` file
Next, save the metadata from this app to upload to AWS.
1. In the Okta application, open the **Sign On** tab.
2. Copy the **Metadata URL** details.
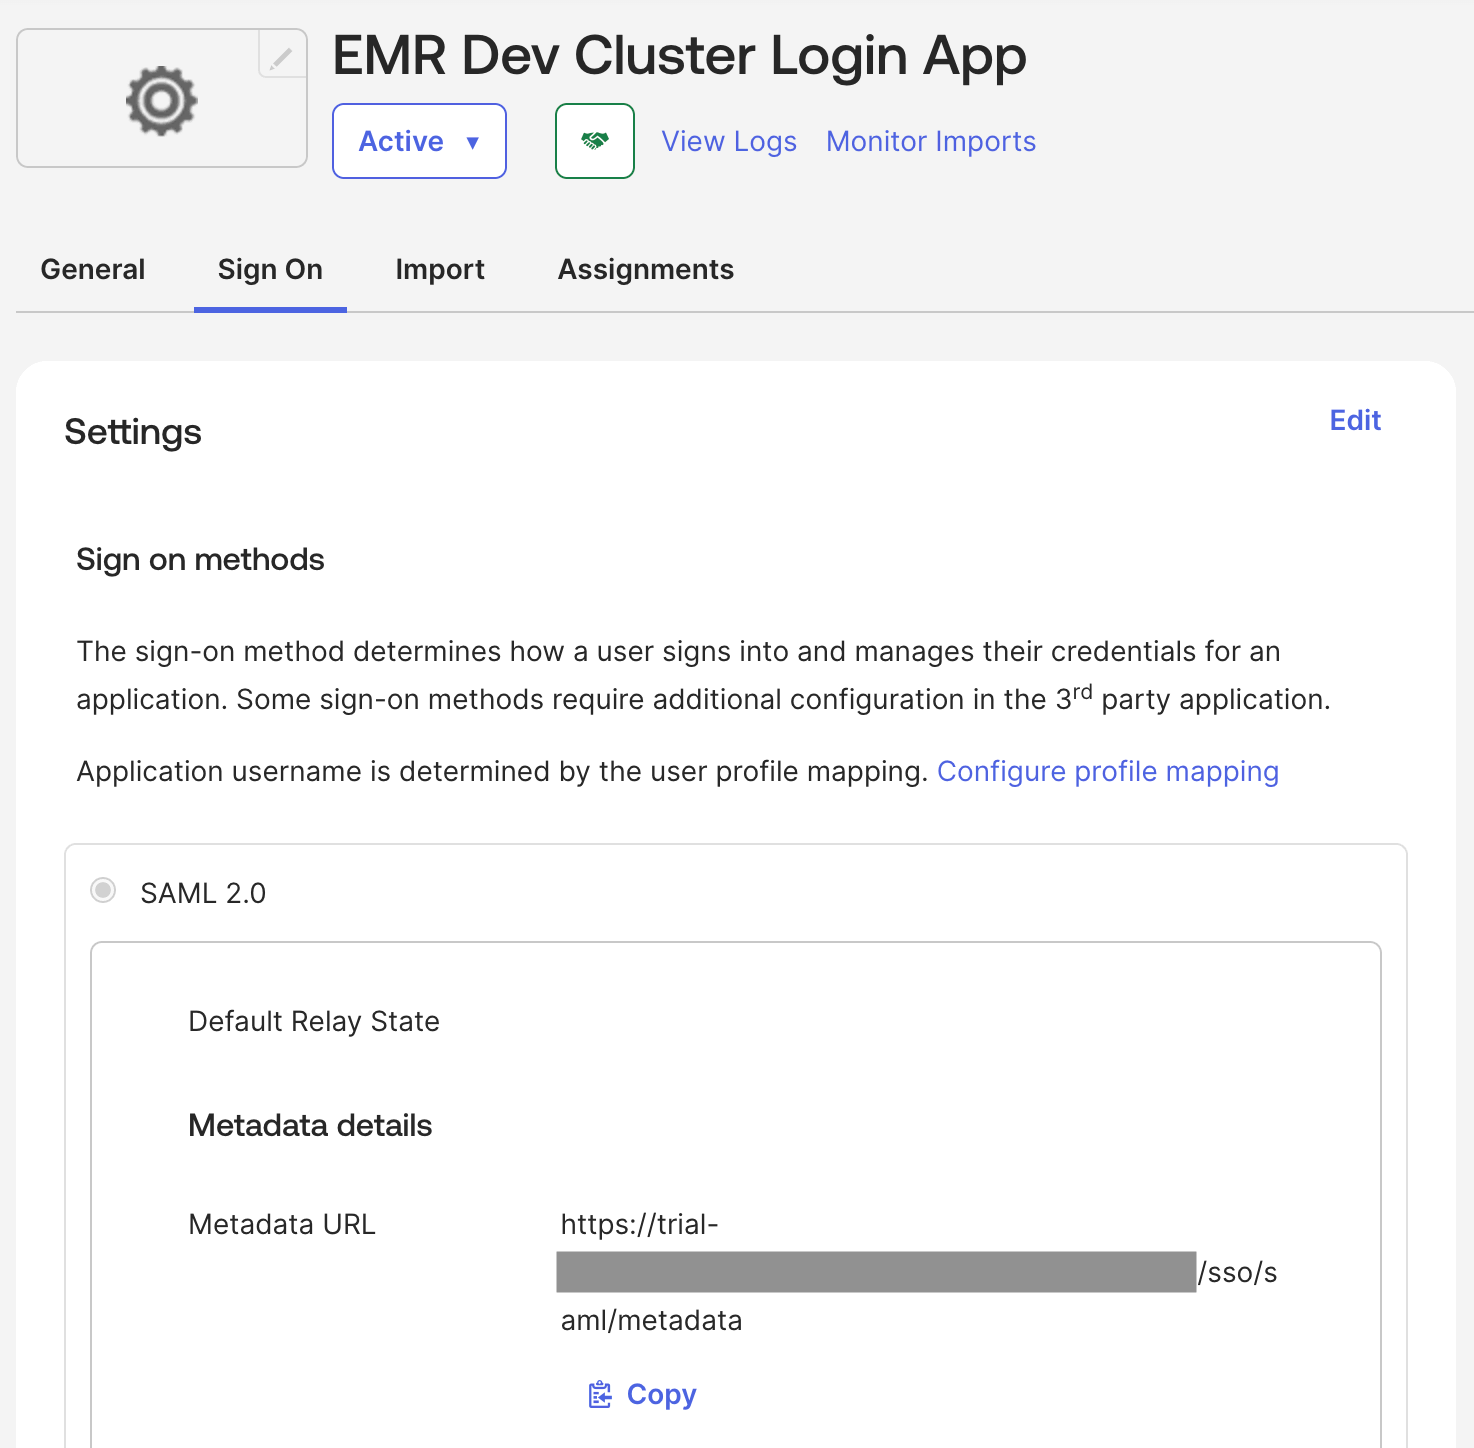 3. Save the copied information as a file called `metadata.xml`.
## 2. Create an AWS Identity Provider
Now, create a new Identity Provider in AWS.
1. In AWS, open **Identity and Access Management (IAM)**.
2. Navigate to **Identity Providers**.
3. Click **Add Provider**.
4. For **Provider type**, select **SAML**.
5. For **Provider name**, enter a descriptive name.
6. For **Metadata document**, upload the `metadata.xml` file you downloaded earlier.
3. Save the copied information as a file called `metadata.xml`.
## 2. Create an AWS Identity Provider
Now, create a new Identity Provider in AWS.
1. In AWS, open **Identity and Access Management (IAM)**.
2. Navigate to **Identity Providers**.
3. Click **Add Provider**.
4. For **Provider type**, select **SAML**.
5. For **Provider name**, enter a descriptive name.
6. For **Metadata document**, upload the `metadata.xml` file you downloaded earlier.
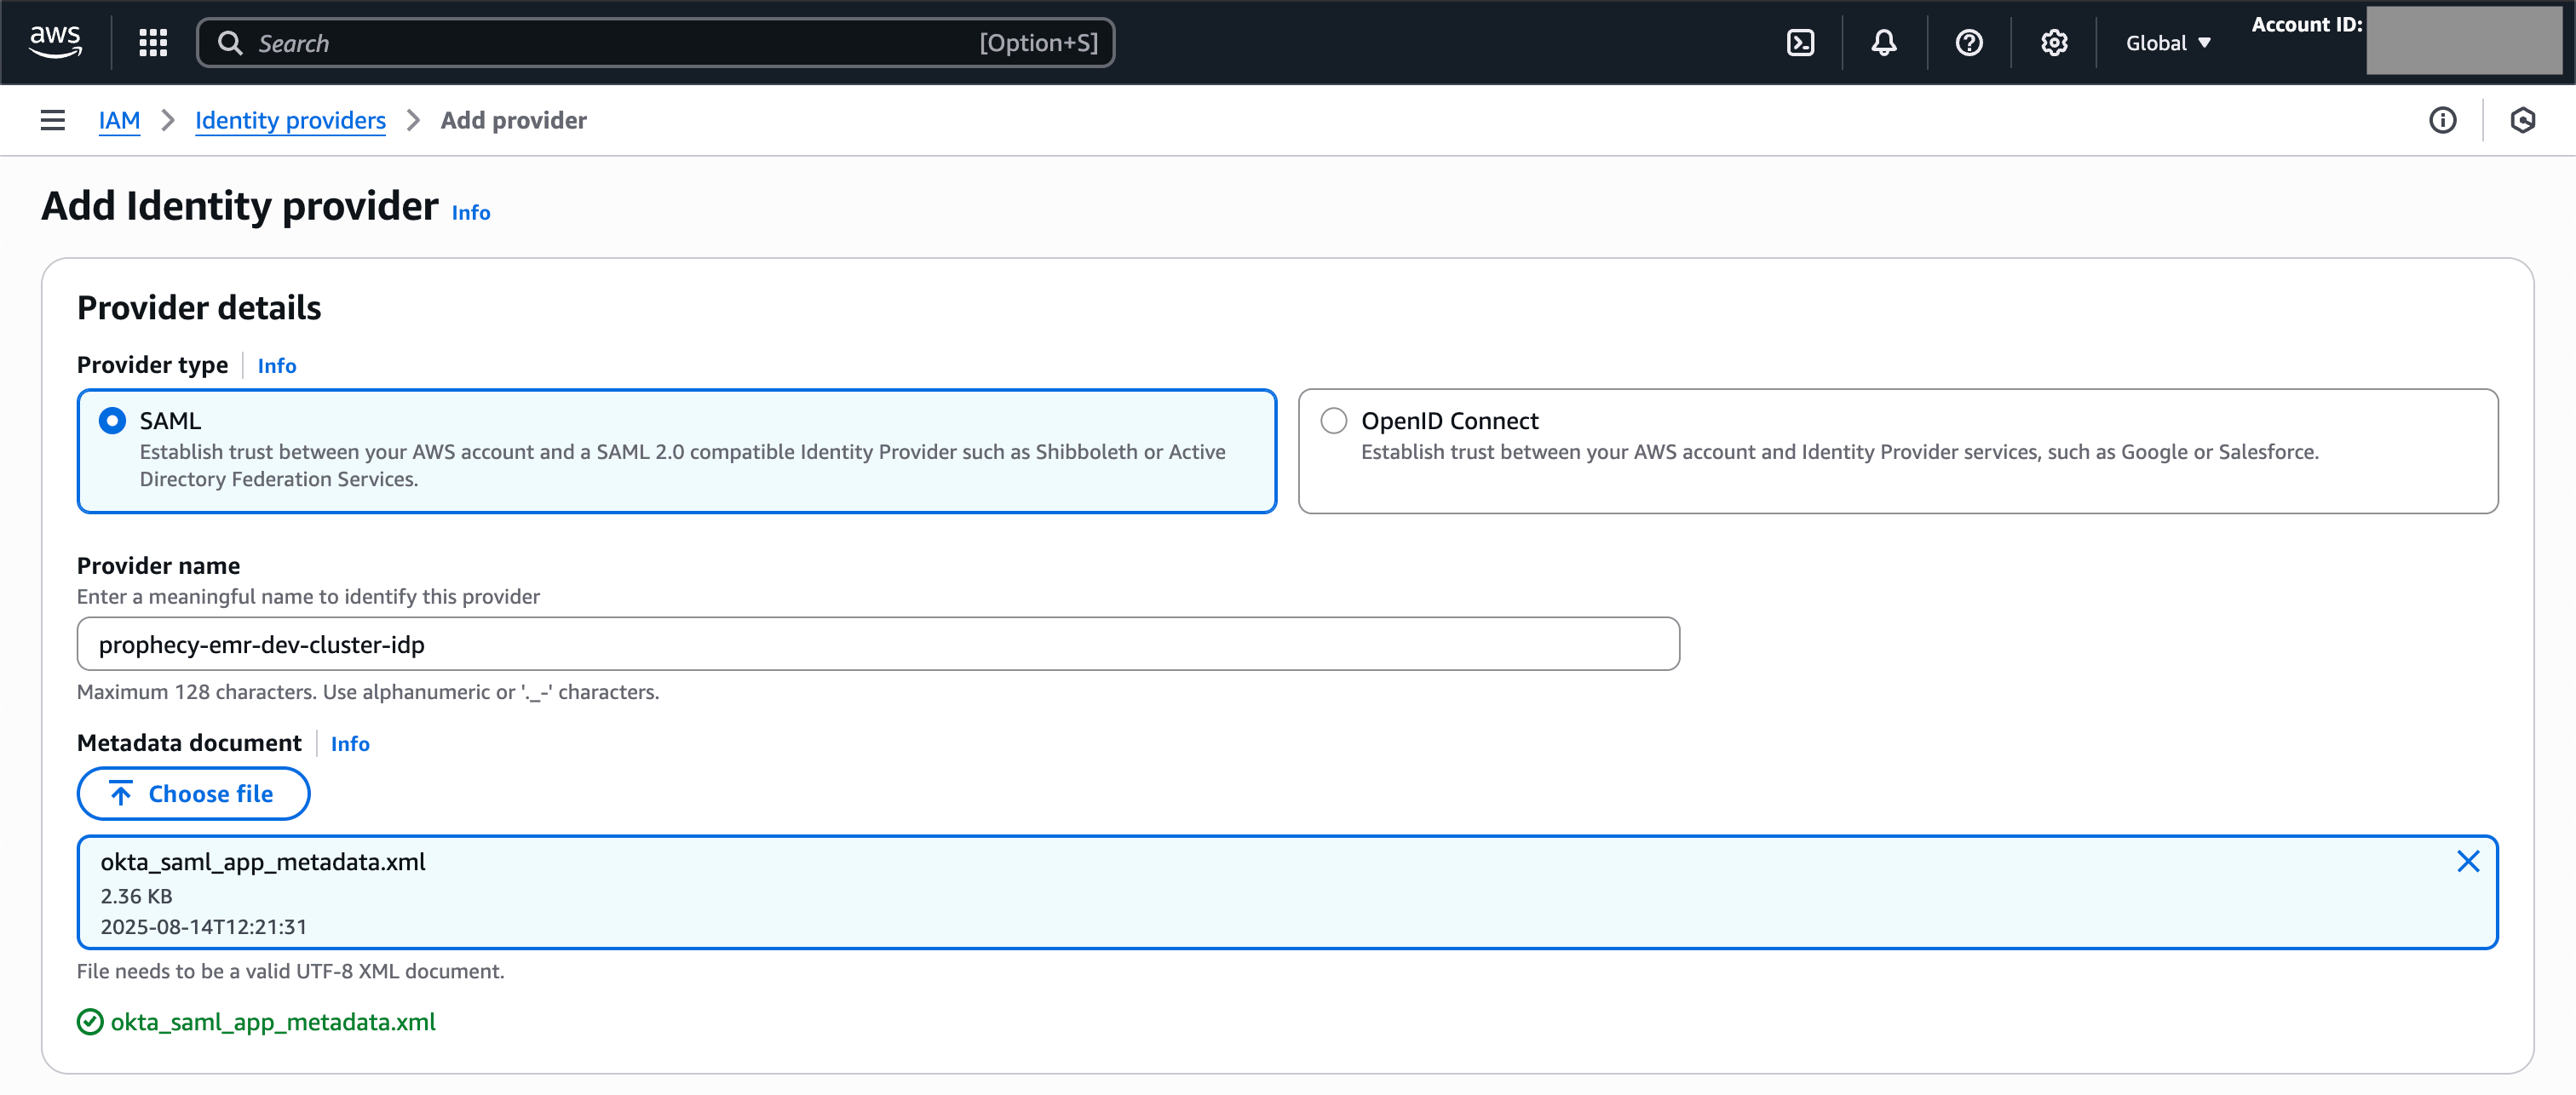 7. Click **Add Provider**.
8. Note the Identity Provider ARN, which you will use when updating the Okta SAML application.
For example: `arn:aws:iam:::saml-provider/okta-provider`
9. Note the Issuer URL, which you will use when creating an AWS role.
10. Note the SSO service location, which you will add to Prophecy via environment variables.
## 3. Create an AWS role for SAML authentication
Then, create a role that will be assigned to all users who attach to the EMR fabric.
1. In AWS, go to **IAM > Roles > Create role**.
2. For **Trusted entity type**, select **SAML 2.0 federation**.
3. For **SAML 2.0-based provider**, choose the provider created in the previous section.
4. For **Access to be allowed**, select **Allow programmatic access only**.
5. Set attribute conditions in the AWS role to perform validations before allowing a user to assume the role.
| Attribute condition | Value | Purpose |
| ------------------- | ------------------------- | ----------------------------------------------------------------------------------------------- |
| `SAML:iss` | Your Okta Issuer URL | The issuer verifies the SAML assertion was generated by your Okta tenant and not another IdP. |
| `SAML:aud` | `https://*.prophecy.io/*` | The audience ensures the SAML assertion was issued for Prophecy and not for some other service. |
6. Click **Next > Next** (you will add policies later).
7. Enter a role name and description, then click **Create role**.
8. If applicable, ensure that the role has required permissions to interact with the EMR Serverless application.
9. Optionally, edit the role to set the **Maximum session duration**.
10. Note the role ARN, which you will use when updating the Okta SAML application.
For example: `arn:aws:iam:::role/prophecy-emr-okta-login-role`
## 4. Update the Okta SAML application
In this step, add information from AWS into your Okta application.
1. In Okta, go to **Applications > Applications**.
2. Select the application created previously.
3. Go to **General > SAML Settings > Edit**.
4. In **Configure SAML**, under **Attribute Statements**, add:
| Name | Value |
| -------------------------------------------------------- | --------------------------------------------------------------------------- |
| `https://aws.amazon.com/SAML/Attributes/RoleSessionName` | `user.login` |
| `https://aws.amazon.com/SAML/Attributes/Role` | `,` |
| `https://aws.amazon.com/SAML/Attributes/SessionDuration` | Value can be less than or equal to the session duration defined in step 3.8 |
5. Click **Next**, then **Finish**.
## 5. Configure Prophecy to enable SAML for EMR
### Set environment variables
In your Prophecy deployment, set the following environment variables:
| Name | Value |
| ------------------------- | ------------------------ |
| `AWS_SAML_APP_LOGIN_URLS` | `` |
| `AWS_SAML_ASSUMED_ROLES` | `` |
### Configure an EMR fabric
Finally, you can configure a fabric to authenticate using SAML.
1. In Prophecy, create or open an EMR fabric.
2. Switch the authentication method to **SAML**.
3. Under **Login URL**, select the value from the `AWS_SAML_APP_LOGIN_URLS` environment variable.
4. Under **Role**, select the value from the `AWS_SAML_ASSUMED_ROLES` environment variable.
5. Select the appropriate AWS region.
6. Click **Fetch Environments**.
7. In the **Connect to Okta** dialog, click **Continue**. This opens the Okta sign-in page in a new tab.
8. Sign in with your Okta credentials.
9. In Prophecy, [complete the fabric configuration](/data-engineering/fabrics/spark-provider/emr/emr) and save it.
After this, users will be able to attach to the EMR fabric and sign in with Okta.
7. Click **Add Provider**.
8. Note the Identity Provider ARN, which you will use when updating the Okta SAML application.
For example: `arn:aws:iam:::saml-provider/okta-provider`
9. Note the Issuer URL, which you will use when creating an AWS role.
10. Note the SSO service location, which you will add to Prophecy via environment variables.
## 3. Create an AWS role for SAML authentication
Then, create a role that will be assigned to all users who attach to the EMR fabric.
1. In AWS, go to **IAM > Roles > Create role**.
2. For **Trusted entity type**, select **SAML 2.0 federation**.
3. For **SAML 2.0-based provider**, choose the provider created in the previous section.
4. For **Access to be allowed**, select **Allow programmatic access only**.
5. Set attribute conditions in the AWS role to perform validations before allowing a user to assume the role.
| Attribute condition | Value | Purpose |
| ------------------- | ------------------------- | ----------------------------------------------------------------------------------------------- |
| `SAML:iss` | Your Okta Issuer URL | The issuer verifies the SAML assertion was generated by your Okta tenant and not another IdP. |
| `SAML:aud` | `https://*.prophecy.io/*` | The audience ensures the SAML assertion was issued for Prophecy and not for some other service. |
6. Click **Next > Next** (you will add policies later).
7. Enter a role name and description, then click **Create role**.
8. If applicable, ensure that the role has required permissions to interact with the EMR Serverless application.
9. Optionally, edit the role to set the **Maximum session duration**.
10. Note the role ARN, which you will use when updating the Okta SAML application.
For example: `arn:aws:iam:::role/prophecy-emr-okta-login-role`
## 4. Update the Okta SAML application
In this step, add information from AWS into your Okta application.
1. In Okta, go to **Applications > Applications**.
2. Select the application created previously.
3. Go to **General > SAML Settings > Edit**.
4. In **Configure SAML**, under **Attribute Statements**, add:
| Name | Value |
| -------------------------------------------------------- | --------------------------------------------------------------------------- |
| `https://aws.amazon.com/SAML/Attributes/RoleSessionName` | `user.login` |
| `https://aws.amazon.com/SAML/Attributes/Role` | `,` |
| `https://aws.amazon.com/SAML/Attributes/SessionDuration` | Value can be less than or equal to the session duration defined in step 3.8 |
5. Click **Next**, then **Finish**.
## 5. Configure Prophecy to enable SAML for EMR
### Set environment variables
In your Prophecy deployment, set the following environment variables:
| Name | Value |
| ------------------------- | ------------------------ |
| `AWS_SAML_APP_LOGIN_URLS` | `` |
| `AWS_SAML_ASSUMED_ROLES` | `` |
### Configure an EMR fabric
Finally, you can configure a fabric to authenticate using SAML.
1. In Prophecy, create or open an EMR fabric.
2. Switch the authentication method to **SAML**.
3. Under **Login URL**, select the value from the `AWS_SAML_APP_LOGIN_URLS` environment variable.
4. Under **Role**, select the value from the `AWS_SAML_ASSUMED_ROLES` environment variable.
5. Select the appropriate AWS region.
6. Click **Fetch Environments**.
7. In the **Connect to Okta** dialog, click **Continue**. This opens the Okta sign-in page in a new tab.
8. Sign in with your Okta credentials.
9. In Prophecy, [complete the fabric configuration](/data-engineering/fabrics/spark-provider/emr/emr) and save it.
After this, users will be able to attach to the EMR fabric and sign in with Okta.