> ## Documentation Index
> Fetch the complete documentation index at: https://docs.prophecy.ai/llms.txt
> Use this file to discover all available pages before exploring further.
# Amazon EMR
> Use Amazon EMR via Livy as your Spark execution engine
Available for [Enterprise Edition](/data-engineering/administration/platform/editions) only.
Prophecy supports using Amazon EMR via Livy as your Spark execution engine for running pipelines.
These page includes steps to configure both **Amazon EMR** and **Amazon EMR Serverless** fabrics.
## Create Amazon EMR cluster with Apache Livy
In your Amazon EMR service, create a cluster. When doing so:
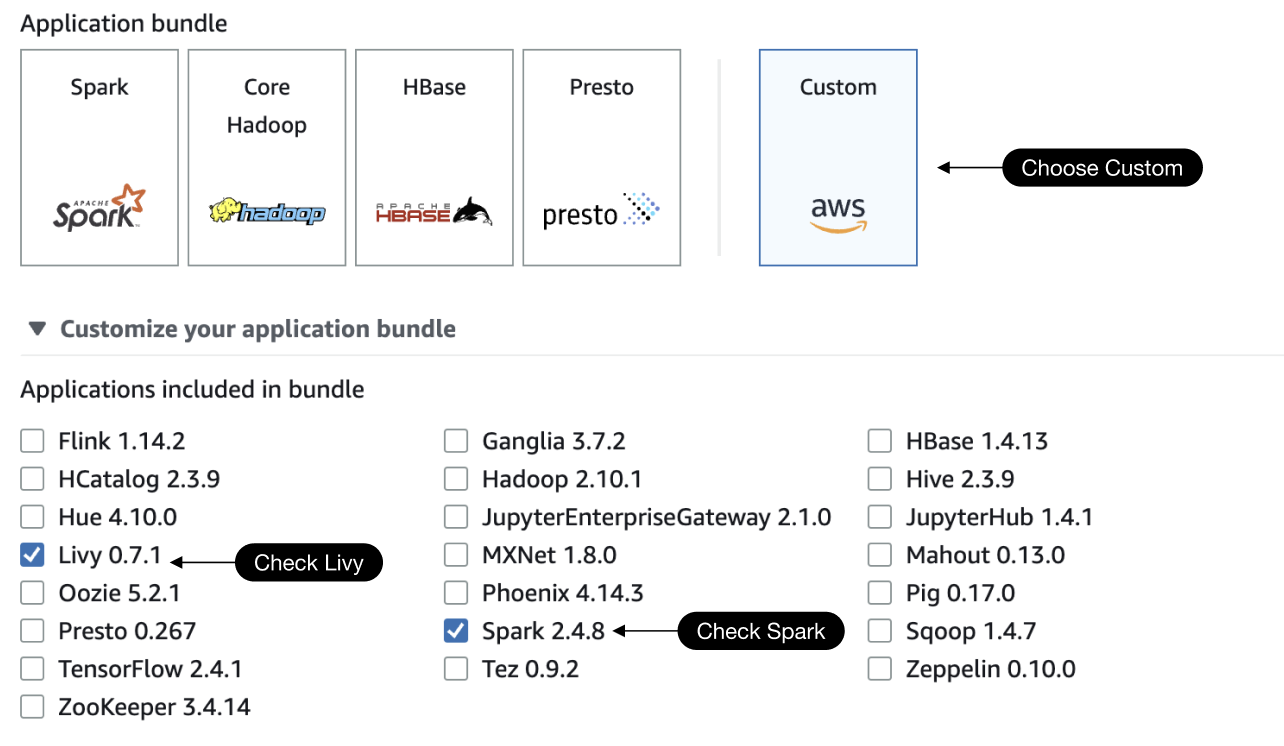
1. Under **Application bundle** select **Custom**.
2. When selecting applications, make sure **Livy** and **Spark** are included in the install.
 ## Configure network settings
To make sure that EMR can communicate with Prophecy, you need to configure specific network settings. Specifically, you need to modify the security groups of your EMR cluster.
1. Modify the **Primary Node** security group to allow incoming connections to port `8998` from the Prophecy IP. You can do so by adding an inbound rule to the Master security group that permits incoming traffic on port `8998` from the Prophecy IP address.
2. Modify the **Core Node** security group to allow outgoing connections to the Prophecy public IP `3.133.35.237` over HTTPS. Do this by adding an outbound rule to the Core security group that allows outgoing traffic over HTTPS protocol to the Prophecy public IP.
## Create a fabric
To connect EMR and Prophecy, you must create a fabric. You can either create an EMR fabric (suggested), or a [Livy fabric](/data-engineering/fabrics/spark-provider/livy/).
To create an EMR fabric:
1. Open Prophecy and click **Create Entity** from the left navigation menu. Then, click on the fabric tile.
2. Name your fabric and click **Continue**.
3. Select **EMR** as the Provider.
4. Choose an authentication method (Static or SAML).
* **Static**: Enter your AWS credentials under **Access Key** and **Secret Key**. Then, enter the region that your EMR cluster runs in.
* **SAML**: Use an Okta application to authenticate the EMR connection. Learn more in [Configure EMR SAML authentication with Okta](/data-engineering/fabrics/spark-provider/emr/emr-saml).
5. Click on **Fetch environments**.
6. Under **Spark Environment**, select the EMR cluster that you would like to connect to.
7. Enter the S3 path that points to the location where you would like your logs to persist.
## Configure network settings
To make sure that EMR can communicate with Prophecy, you need to configure specific network settings. Specifically, you need to modify the security groups of your EMR cluster.
1. Modify the **Primary Node** security group to allow incoming connections to port `8998` from the Prophecy IP. You can do so by adding an inbound rule to the Master security group that permits incoming traffic on port `8998` from the Prophecy IP address.
2. Modify the **Core Node** security group to allow outgoing connections to the Prophecy public IP `3.133.35.237` over HTTPS. Do this by adding an outbound rule to the Core security group that allows outgoing traffic over HTTPS protocol to the Prophecy public IP.
## Create a fabric
To connect EMR and Prophecy, you must create a fabric. You can either create an EMR fabric (suggested), or a [Livy fabric](/data-engineering/fabrics/spark-provider/livy/).
To create an EMR fabric:
1. Open Prophecy and click **Create Entity** from the left navigation menu. Then, click on the fabric tile.
2. Name your fabric and click **Continue**.
3. Select **EMR** as the Provider.
4. Choose an authentication method (Static or SAML).
* **Static**: Enter your AWS credentials under **Access Key** and **Secret Key**. Then, enter the region that your EMR cluster runs in.
* **SAML**: Use an Okta application to authenticate the EMR connection. Learn more in [Configure EMR SAML authentication with Okta](/data-engineering/fabrics/spark-provider/emr/emr-saml).
5. Click on **Fetch environments**.
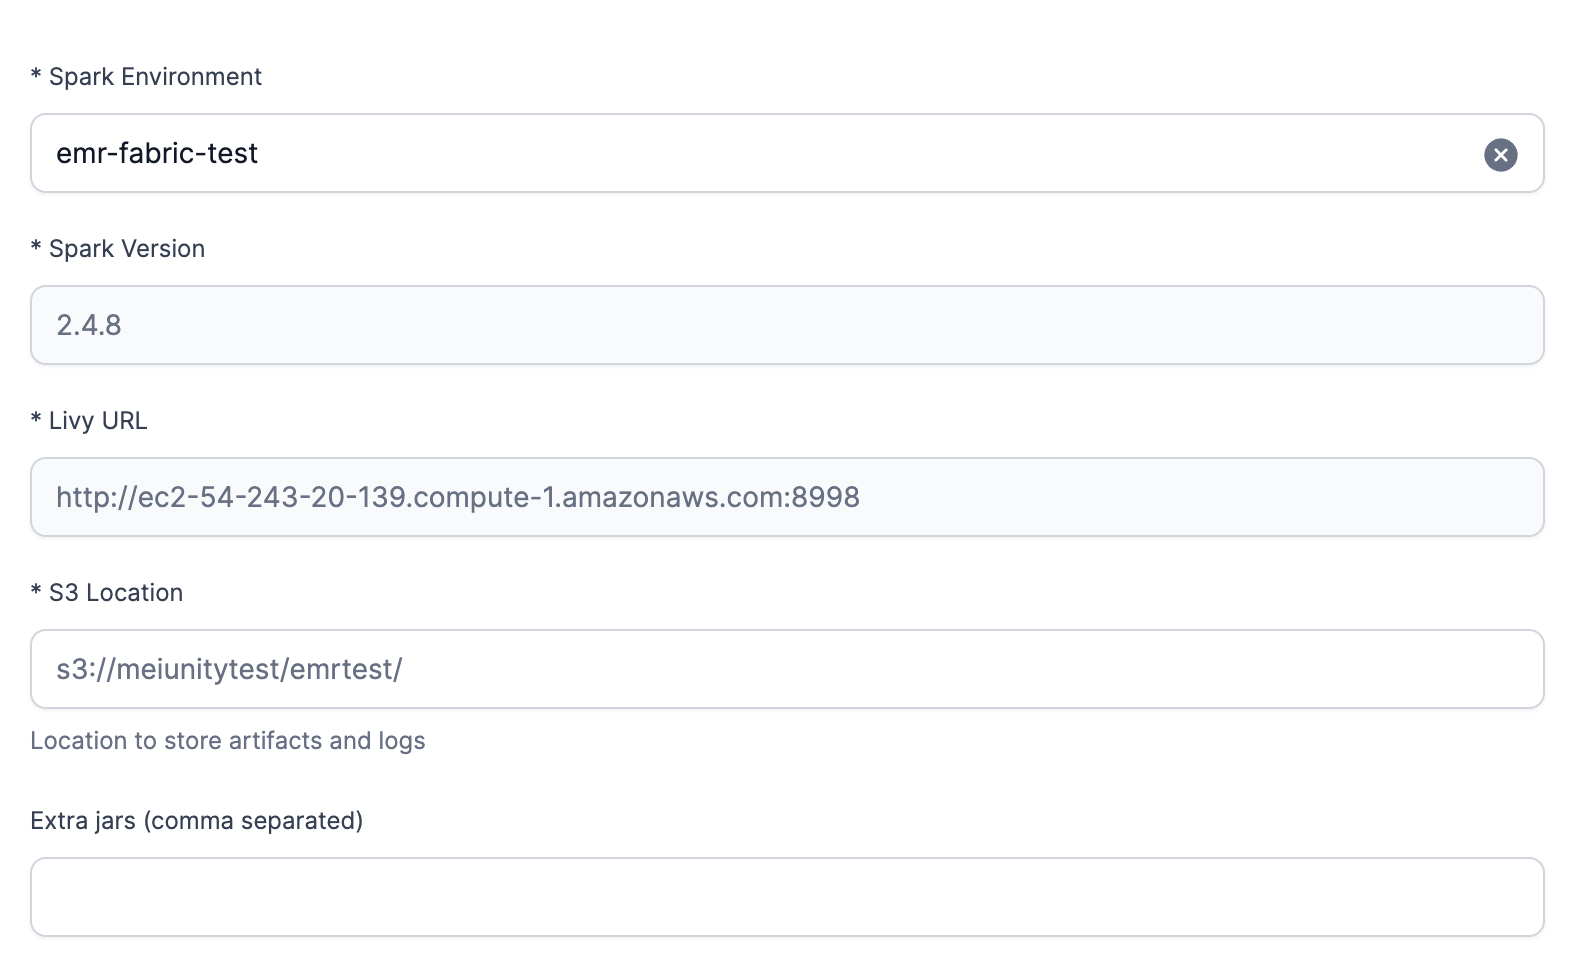
6. Under **Spark Environment**, select the EMR cluster that you would like to connect to.
7. Enter the S3 path that points to the location where you would like your logs to persist.
 8. Add the job size to your environment by clicking on **Add job Size**. [Configure your job size](/data-engineering/fabrics/spark-provider/emr/emr-job-sizes) and click on **Add**.
9. Select File System under **Scala Resolution mode** and input `s3://prophecy-public-bucket/prophecy-libs`
10. Select File System under **Python Resolution mode** and input `s3://prophecy-public-bucket/python-prophecy-libs`
11. Click **Complete** to save your new EMR fabric.
To create an EMR fabric for your serverless cluster:
1. Open Prophecy and click **Create Entity** from the left navigation menu. Then, click on the fabric tile.
2. Name your fabric and click **Continue**.
3. Choose **EMR** as the Provider.
4. Choose an authentication method (Static or SAML).
* **Static**: Enter your AWS credentials under **Access Key** and **Secret Key**. Then, enter the region that your EMR cluster runs in.
* **SAML**: Use an Okta application to authenticate the EMR connection. Learn more in [Configure EMR SAML authentication with Okta](/data-engineering/fabrics/spark-provider/emr/emr-saml).
5. Click on **Fetch environments**.
6. Under **Spark Environment**, select the EMR serverless cluster that you would like to connect to. From the list of active clusters, you can identify your EMR Serverless cluster by finding `emr-serverless-services` within the Livy URL. This will automatically populate some of the following fields.
8. Add the job size to your environment by clicking on **Add job Size**. [Configure your job size](/data-engineering/fabrics/spark-provider/emr/emr-job-sizes) and click on **Add**.
9. Select File System under **Scala Resolution mode** and input `s3://prophecy-public-bucket/prophecy-libs`
10. Select File System under **Python Resolution mode** and input `s3://prophecy-public-bucket/python-prophecy-libs`
11. Click **Complete** to save your new EMR fabric.
To create an EMR fabric for your serverless cluster:
1. Open Prophecy and click **Create Entity** from the left navigation menu. Then, click on the fabric tile.
2. Name your fabric and click **Continue**.
3. Choose **EMR** as the Provider.
4. Choose an authentication method (Static or SAML).
* **Static**: Enter your AWS credentials under **Access Key** and **Secret Key**. Then, enter the region that your EMR cluster runs in.
* **SAML**: Use an Okta application to authenticate the EMR connection. Learn more in [Configure EMR SAML authentication with Okta](/data-engineering/fabrics/spark-provider/emr/emr-saml).
5. Click on **Fetch environments**.
6. Under **Spark Environment**, select the EMR serverless cluster that you would like to connect to. From the list of active clusters, you can identify your EMR Serverless cluster by finding `emr-serverless-services` within the Livy URL. This will automatically populate some of the following fields.
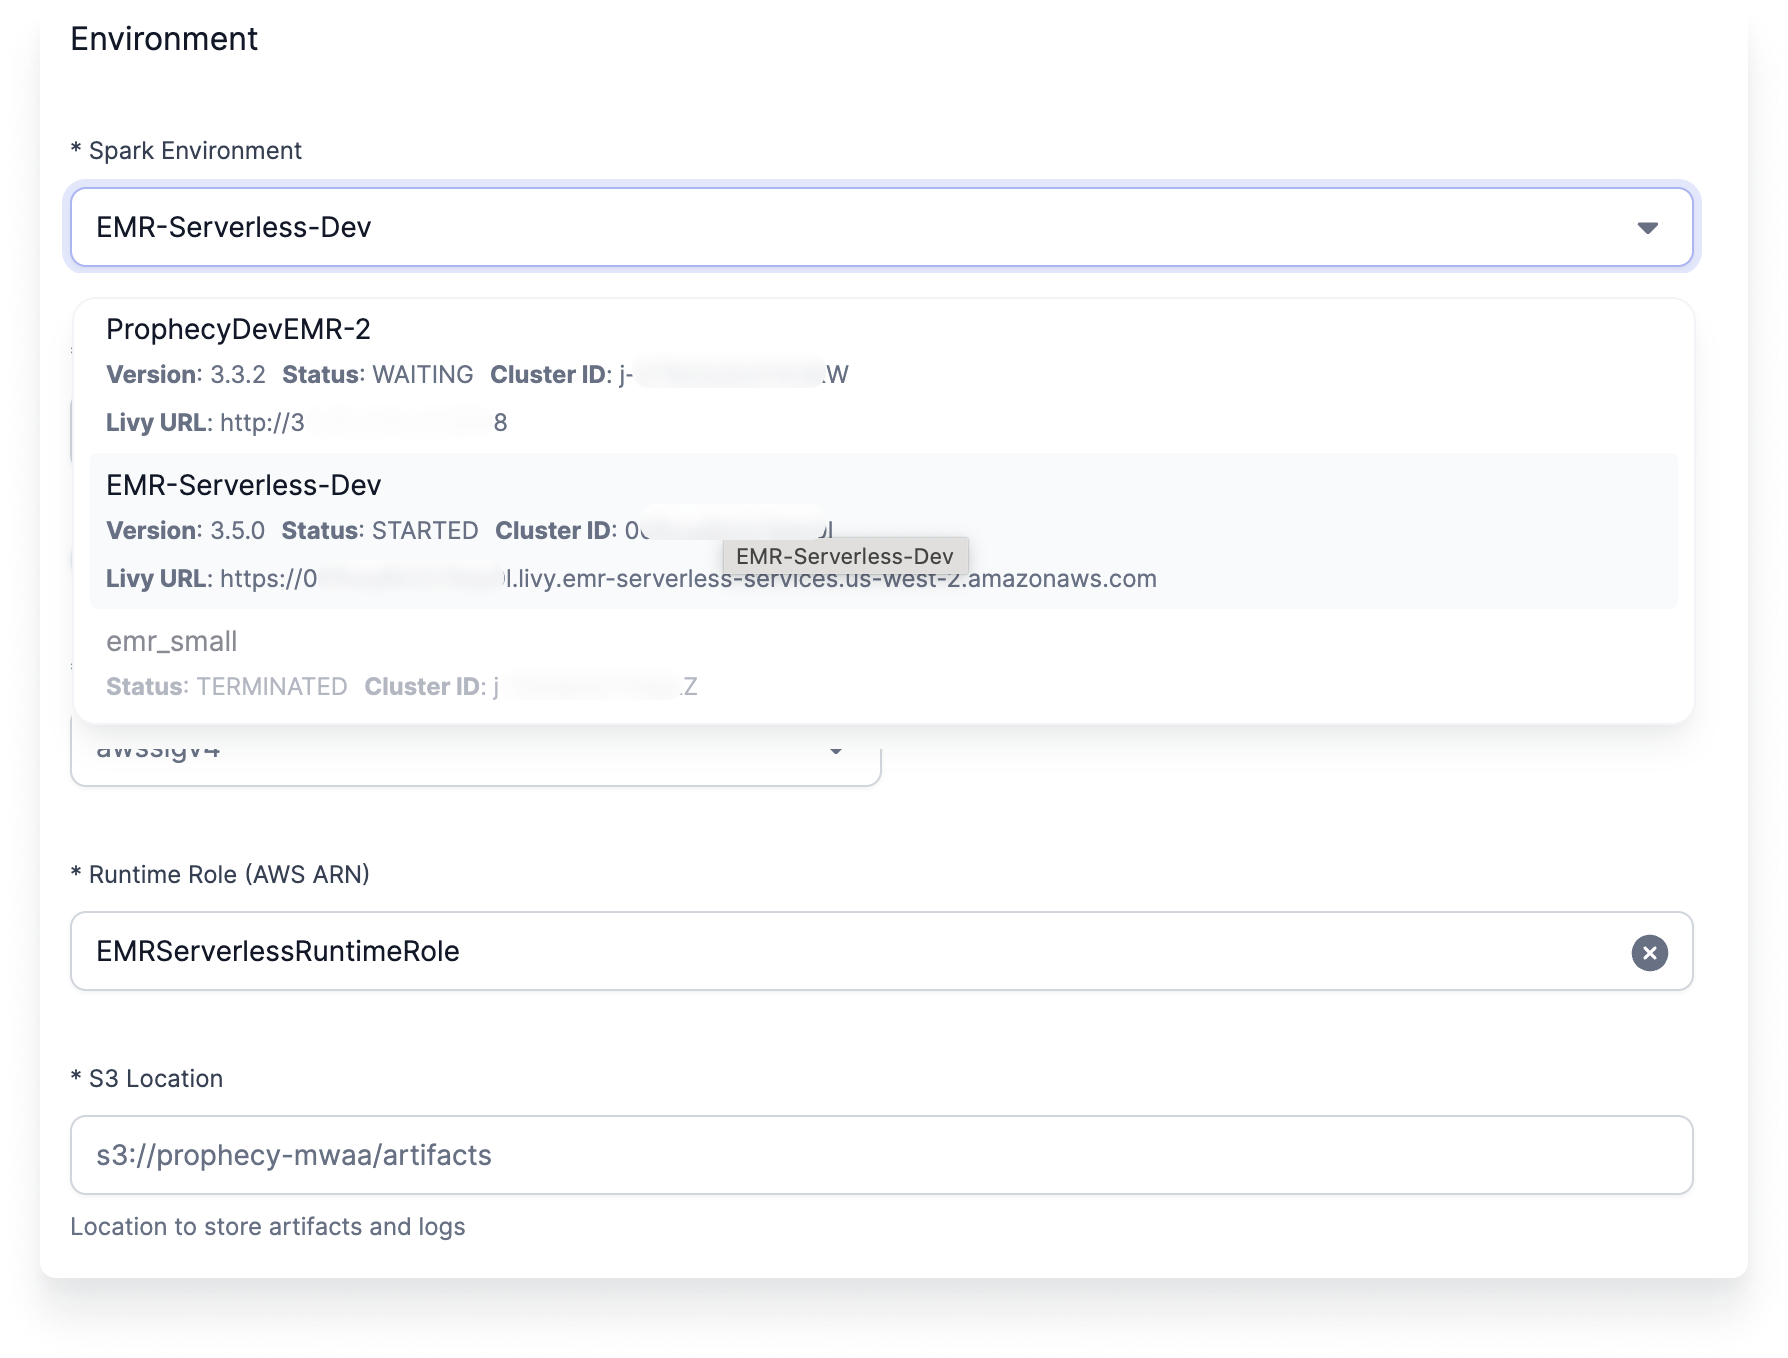 7. For the **Authentication type**, select `AWS Sig V4`. This is the only option that will work for EMR Serverless.
8. Select your **Runtime Role**. The role must have enough permissions to use the selected Serverless App.
9. Enter the S3 path that points to the location where you would like your logs and pipeline artifacts to persist.
10. Add the job size to your environment by clicking on **Add Job Size**. [Configure your job size](/data-engineering/fabrics/spark-provider/emr/emr-job-sizes) and click on **Add**.
11. Note that the Spark and Scala versions are fixed.
12. Select File System under Scala Resolution mode and input `s3://prophecy-public-bucket/prophecy-libs`.
13. Select File System under Python Resolution mode and input `s3://prophecy-public-bucket/python-prophecy-libs`.
14. Click **Complete** to save your new EMR fabric.
Livy does not work with Python version 3.8 and above.
To create a Livy fabric:
1. Open Prophecy and click **Create Entity** from the left navigation menu. Then, click on the fabric tile.
2. Name your fabric and click **Continue**.
3. Choose **Livy** as the Provider.
4. Paste your Livy URL. You can find your Livy URL under the **Applications** tab on your EMR cluster page.
5. Choose your Authentication type.
6. Click **Test Connection**.
Once your connection is tested, you'll have to configure a few more settings:
7. Fill out the Spark and Scala version based on the values found in your EMR console. Refer to [Spark documentation](https://spark.apache.org/docs) to find the Scala version in relation to your Spark version.
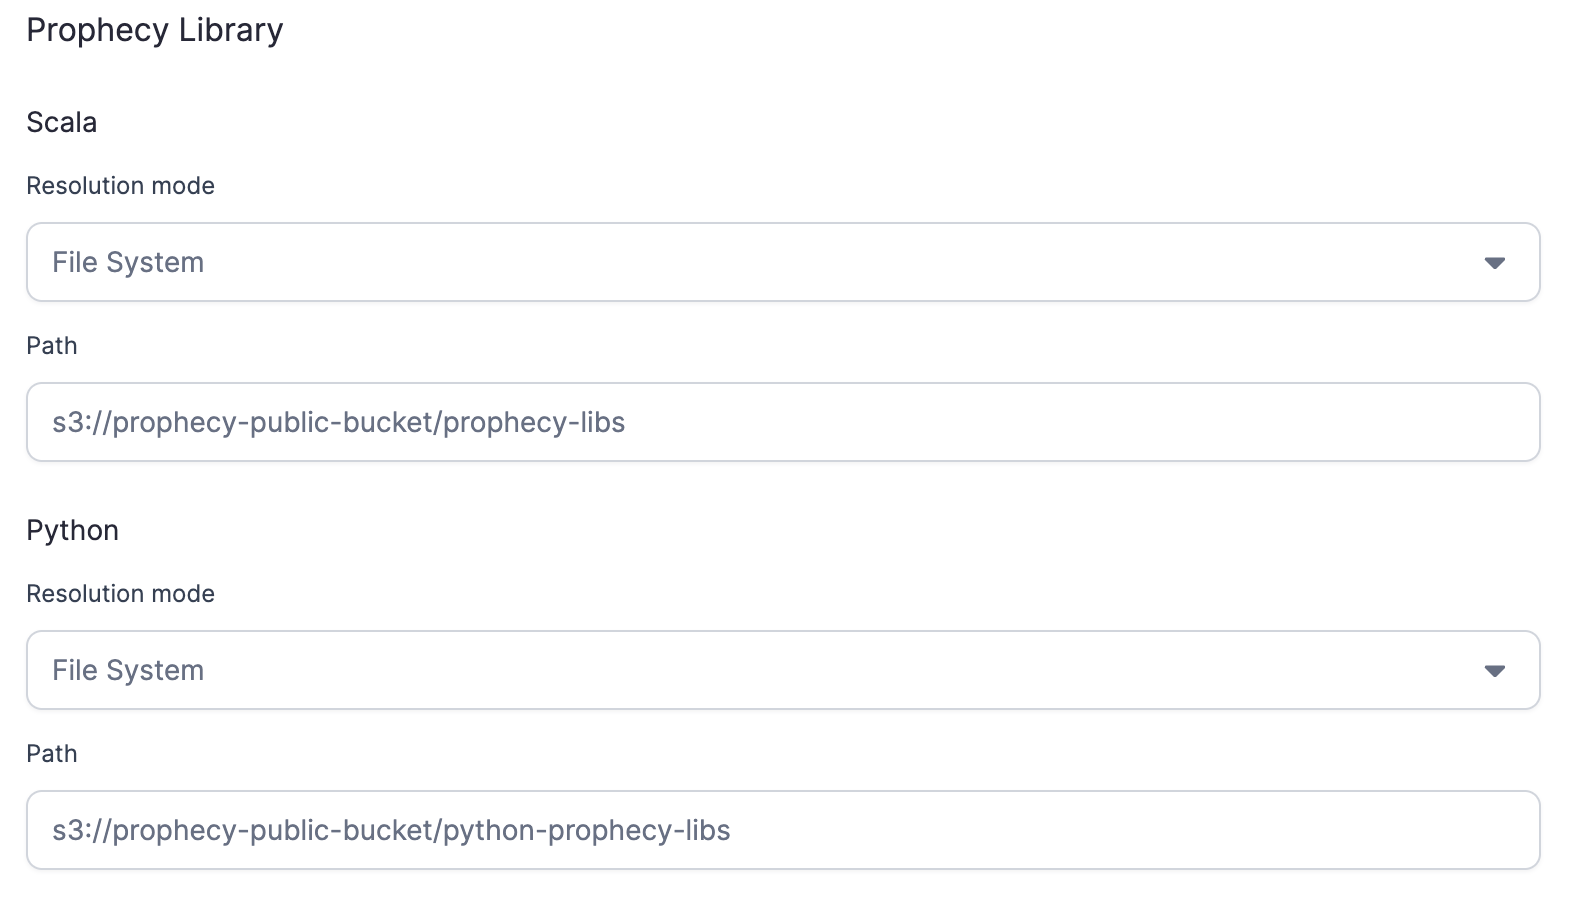
8. For the Prophecy Library configurations, choose the File System Resolution mode and provide the S3 folder names for dependencies.
7. For the **Authentication type**, select `AWS Sig V4`. This is the only option that will work for EMR Serverless.
8. Select your **Runtime Role**. The role must have enough permissions to use the selected Serverless App.
9. Enter the S3 path that points to the location where you would like your logs and pipeline artifacts to persist.
10. Add the job size to your environment by clicking on **Add Job Size**. [Configure your job size](/data-engineering/fabrics/spark-provider/emr/emr-job-sizes) and click on **Add**.
11. Note that the Spark and Scala versions are fixed.
12. Select File System under Scala Resolution mode and input `s3://prophecy-public-bucket/prophecy-libs`.
13. Select File System under Python Resolution mode and input `s3://prophecy-public-bucket/python-prophecy-libs`.
14. Click **Complete** to save your new EMR fabric.
Livy does not work with Python version 3.8 and above.
To create a Livy fabric:
1. Open Prophecy and click **Create Entity** from the left navigation menu. Then, click on the fabric tile.
2. Name your fabric and click **Continue**.
3. Choose **Livy** as the Provider.
4. Paste your Livy URL. You can find your Livy URL under the **Applications** tab on your EMR cluster page.
5. Choose your Authentication type.
6. Click **Test Connection**.
Once your connection is tested, you'll have to configure a few more settings:
7. Fill out the Spark and Scala version based on the values found in your EMR console. Refer to [Spark documentation](https://spark.apache.org/docs) to find the Scala version in relation to your Spark version.
8. For the Prophecy Library configurations, choose the File System Resolution mode and provide the S3 folder names for dependencies.
 9. Click **Complete** to save your new Livy fabric.