> ## Documentation Index
> Fetch the complete documentation index at: https://docs.prophecy.ai/llms.txt
> Use this file to discover all available pages before exploring further.
# Iceberg
> Read from or write to tables managed by Iceberg
Dependencies:
* ProphecySparkBasicsPython 0.2.15+
Cluster requirements:
* UC dedicated clusters not supported
* UC standard clusters not supported
* Livy clusters not supported
Reads from and writes to Iceberg tables, including Iceberg merge operations and time travel.
## Required Settings
To use the Source gem with the Iceberg catalog table type, you must configure the following required settings at the environment, initialization, and runtime stages.
### Environment Setting
Configure the following Spark JAR dependency package in your fabric environment:
`https://repo1.maven.org/maven2/org/apache/iceberg/iceberg-spark-runtime-3.3_2.12/1.5.0/iceberg-spark-runtime-3.3_2.12-1.5.0.jar`
This dependency is available on your compute platform where you installed Spark, such as your Databricks cluster, EMR, or Dataproc.
### Initialization Settings
Configure the following Spark session property during the Spark session initialization.
* Key: `spark.sql.extensions`
* Value: `org.apache.iceberg.spark.extensions.IcebergSparkSessionExtensions`
You can also do this during cluster bootstrap. For example, you can set `--properties
"spark:spark.sql.extensions=org.apache.iceberg.spark.extensions.IcebergSparkSessionExtentions" \`
with a create clusters command.
### Runtime Settings
The following properties allow you to configure multiple catalogs and your respective metastores for Iceberg tables and data management.
To configure Spark conf properties:
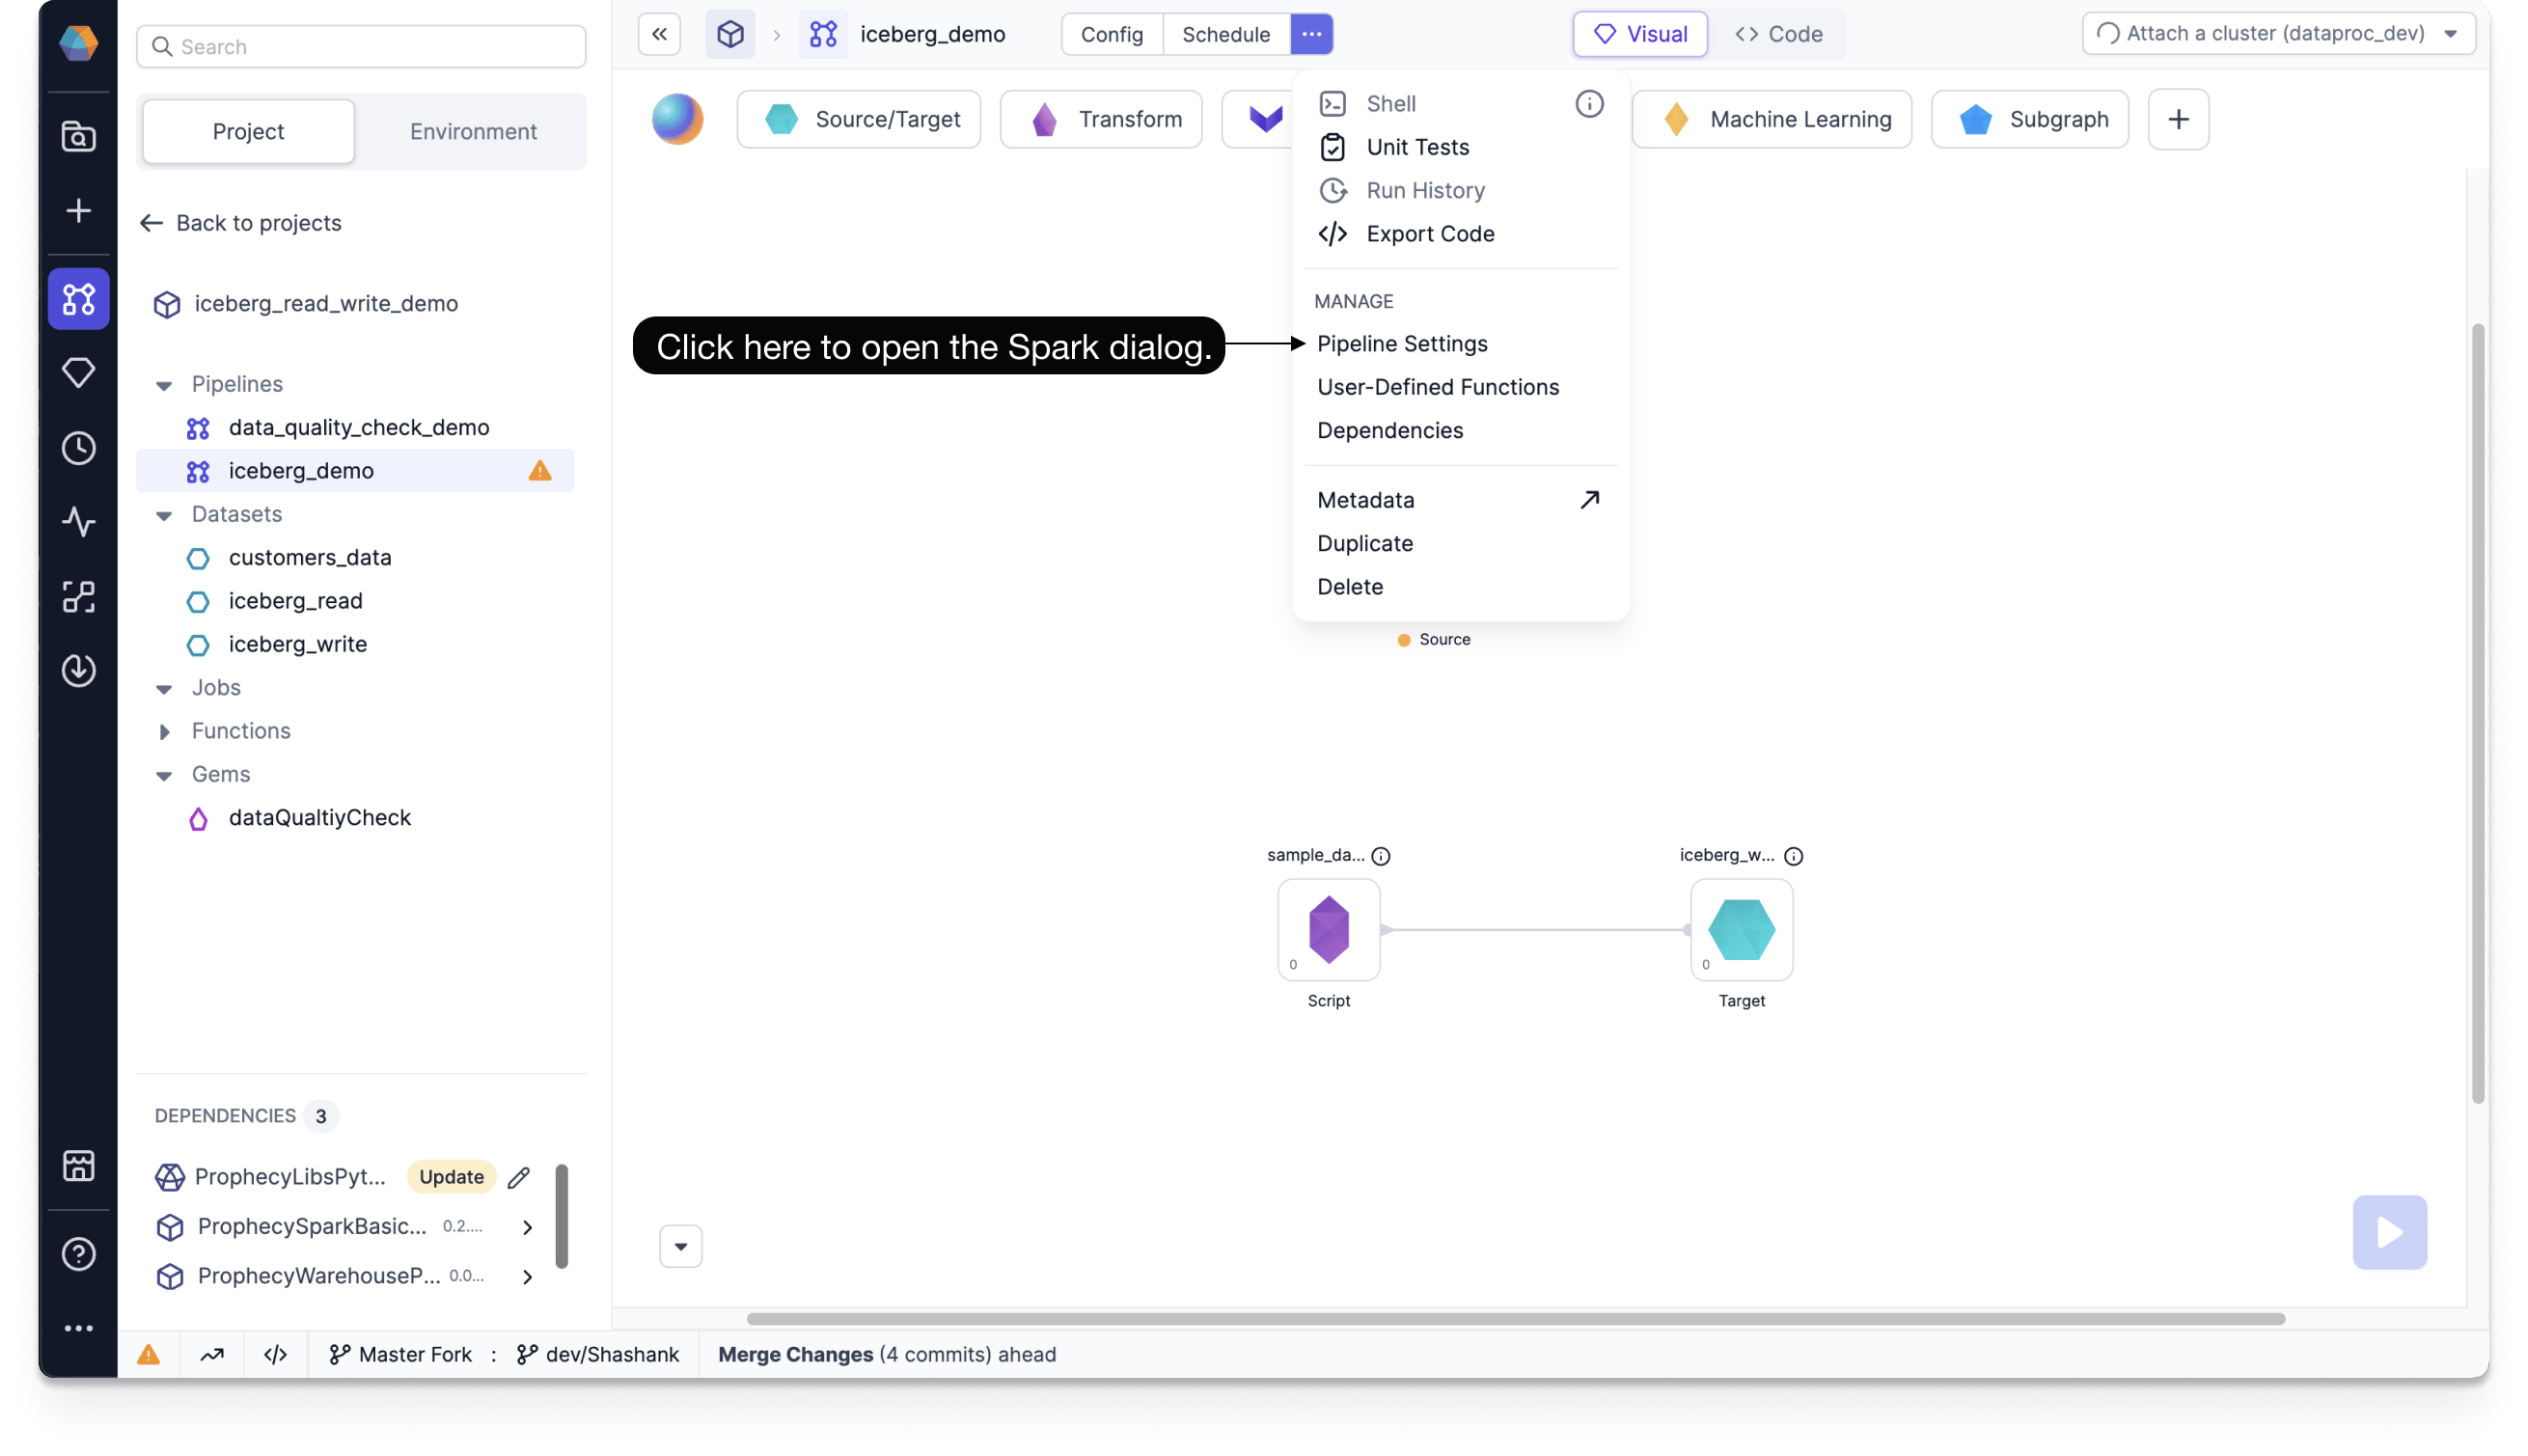
1. Navigate to **Pipeline Settings**.
* Click **...** at the top of the Prophecy canvas.
* Under **Manage**, click **Pipeline Settings**.
 2. In your **Spark** tab, under **Spark Configuration**, add your Spark conf properties.
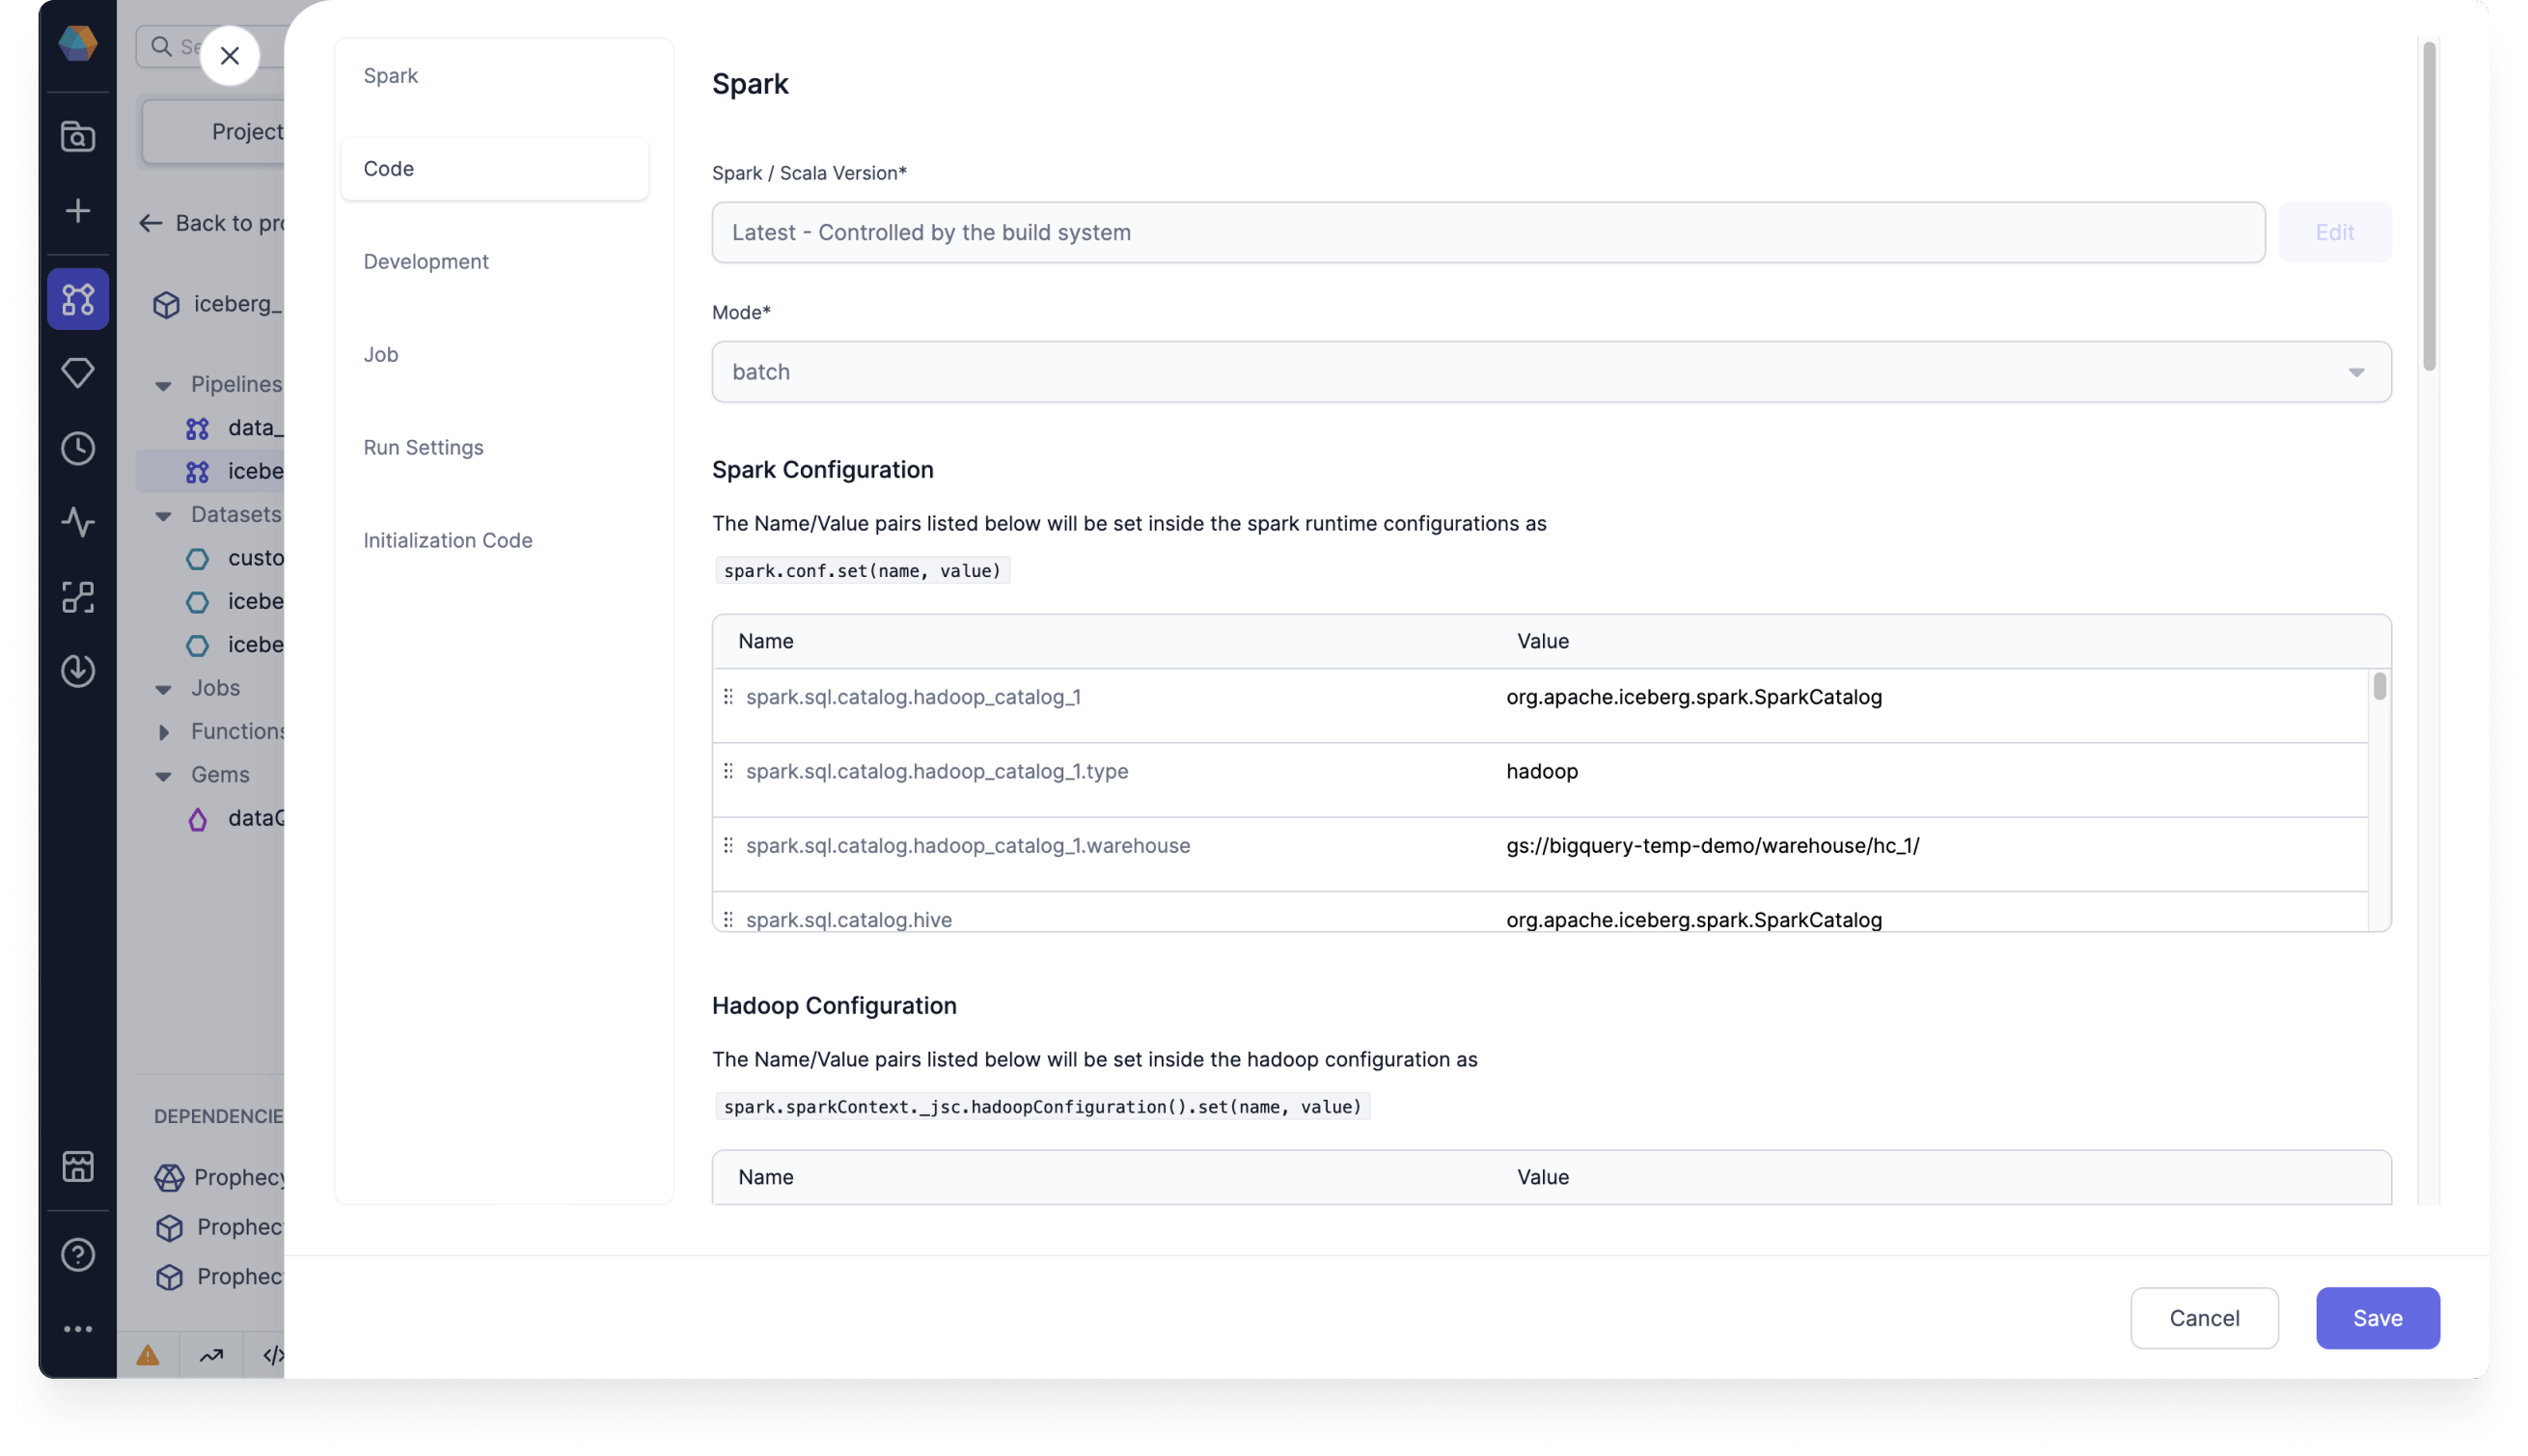 To configure Hadoop as a catalog, add the following Spark conf properties:
* `spark.sql.catalog.=org.apache.iceberg.spark.SparkCatalog`
* `spark.sql.catalog..type=hadoop`
* `spark.sql.catalog..warehouse=gs://///`
To configure Hive as a catalog, add the following Spark conf properties:
* `spark.sql.catalog.=org.apache.iceberg.spark.SparkCatalog`
* `spark.sql.catalog..type=hive`
* `spark.sql.catalog..warehouse=gs://///`
* `spark.sql.catalog..uri=thrift://10.91.64.30:9083`
You can set the default catalog by using `spark.default.catalog=`.
## Parameters
The Source and Target gems require the following parameters to read from and write to Iceberg:
| Parameter | Tab | Description |
| --------------------------- | ---------- | --------------------------------------------------------------------------------------------------------------------------------------------------------------------------------------- |
| Use Catalog | Location | Whether to use a configured Hadoop or Hive catalog name. |
| Catalog Name | Location | Name of your catalog if you enable **Use Catalog**. |
| Schema Name (Database Name) | Location | Name of the database to connect to. |
| Table Name | Location | Name of the table to connect to. |
| Catalog Type | Location | File path to write the Iceberg table in the Target gem. Possible values are: `hive`, `hadoop`, or `other` |
| File location | Location | Location of your file if you select `hive` or `other` for the **Catalog Type**. |
| Schema | Properties | Schema to apply on the loaded data. In the Source gem, you can define or edit the schema visually or in JSON code. In the Target gem, you can view the schema visually or as JSON code. |
## Source
The Source gem reads data from Iceberg and allows you to optionally specify the following additional properties.
### Source properties
| Properties | Description | Default |
| -------------- | ---------------------------------------------------------------------------------------------------------------------------------------------------------- | ------- |
| Description | Description of your dataset. | None |
| Read timestamp | Time travel in milliseconds to a specific timestamp. This value should be between the first commit timestamp and the latest commit timestamp in the table. | None |
| Read snapshot | Snapshot ID to time travel to a specific table version. | None |
You can only select `Read timestamp` or `Read snapshot`, not both.
If you don't use a time travel option, the Source gem fetches the most recent version of each row by default.
To learn more about Iceberg time travel and its use cases, see [Apache Iceberg TIMETRAVEL](https://iceberg.apache.org/docs/nightly/hive/?h=time#timetravel).
### Example
### Compiled code
To see the compiled code of your project, [switch to the Code
view](/data-engineering/development/pipelines/pipelines#project-editor) in the project header.
```python example.py theme={null}
def iceberg_read(spark: SparkSession) -> DataFrame:
return spark.read.format("iceberg").load("`hadoop_catalog_1`.`prophecy_doc_demo`.`employees_test`")
```
***
## Target
The Target gem writes data to Iceberg and allows you to optionally specify the following additional properties.
### Target properties
| Property | Description | Default |
| ----------------- | -------------------------------------------------------------------------------------------------------------------------------------------------------------------- | ------- |
| Description | Description of your dataset. | None |
| Write Mode | How to handle existing data. For a list of the possible values, see [Supported write modes](#supported-write-modes). | None |
| Merge schema | Whether to automatically add columns present in the `DataFrame` but not in the Target table to the end of the schema as part of a write transaction. | false |
| Partition Columns | List of columns to partition the Iceberg table by. Provide this during a `createOrReplace` write mode to leverage the`overwritePartitions` write mode in the future. | None |
### Supported write modes
| Write Mode | Description |
| ------------------- | ------------------------------------------------------------------------------------------------------- |
| createOrReplace | Create or replace the Iceberg table. |
| append | If data already exists, append the contents of the DataFrame to the Iceberg table. |
| overwritePartitions | Dynamically overwrite partitions in the Iceberg table. |
| overwrite | If data already exists, explicitly overwrite the partitions with the `Overwrite Condition` you specify. |
Among these write modes, overwrite and append work the same way for parquet file writes.
### Target Example
### Compiled code
To see the compiled code of your project, [switch to the Code
view](/data-engineering/development/pipelines/pipelines#project-editor) in the project header.
```python example.py theme={null}
def iceberg_write(spark: SparkSession, in0: DataFrame):
df1 = in0.writeTo("`hadoop_catalog_1`.`prophecy_doc_demo`.`employees_test`")
df2 = df1.using("iceberg")
df3 = df2.partitionedBy("Department")
df4 = df3.tableProperty("write.spark.accept-any-schema", "true")
df4.createOrReplace()
```
To configure Hadoop as a catalog, add the following Spark conf properties:
* `spark.sql.catalog.=org.apache.iceberg.spark.SparkCatalog`
* `spark.sql.catalog..type=hadoop`
* `spark.sql.catalog..warehouse=gs://///`
To configure Hive as a catalog, add the following Spark conf properties:
* `spark.sql.catalog.=org.apache.iceberg.spark.SparkCatalog`
* `spark.sql.catalog..type=hive`
* `spark.sql.catalog..warehouse=gs://///`
* `spark.sql.catalog..uri=thrift://10.91.64.30:9083`
You can set the default catalog by using `spark.default.catalog=`.
## Parameters
The Source and Target gems require the following parameters to read from and write to Iceberg:
| Parameter | Tab | Description |
| --------------------------- | ---------- | --------------------------------------------------------------------------------------------------------------------------------------------------------------------------------------- |
| Use Catalog | Location | Whether to use a configured Hadoop or Hive catalog name. |
| Catalog Name | Location | Name of your catalog if you enable **Use Catalog**. |
| Schema Name (Database Name) | Location | Name of the database to connect to. |
| Table Name | Location | Name of the table to connect to. |
| Catalog Type | Location | File path to write the Iceberg table in the Target gem. Possible values are: `hive`, `hadoop`, or `other` |
| File location | Location | Location of your file if you select `hive` or `other` for the **Catalog Type**. |
| Schema | Properties | Schema to apply on the loaded data. In the Source gem, you can define or edit the schema visually or in JSON code. In the Target gem, you can view the schema visually or as JSON code. |
## Source
The Source gem reads data from Iceberg and allows you to optionally specify the following additional properties.
### Source properties
| Properties | Description | Default |
| -------------- | ---------------------------------------------------------------------------------------------------------------------------------------------------------- | ------- |
| Description | Description of your dataset. | None |
| Read timestamp | Time travel in milliseconds to a specific timestamp. This value should be between the first commit timestamp and the latest commit timestamp in the table. | None |
| Read snapshot | Snapshot ID to time travel to a specific table version. | None |
You can only select `Read timestamp` or `Read snapshot`, not both.
If you don't use a time travel option, the Source gem fetches the most recent version of each row by default.
To learn more about Iceberg time travel and its use cases, see [Apache Iceberg TIMETRAVEL](https://iceberg.apache.org/docs/nightly/hive/?h=time#timetravel).
### Example
### Compiled code
To see the compiled code of your project, [switch to the Code
view](/data-engineering/development/pipelines/pipelines#project-editor) in the project header.
```python example.py theme={null}
def iceberg_read(spark: SparkSession) -> DataFrame:
return spark.read.format("iceberg").load("`hadoop_catalog_1`.`prophecy_doc_demo`.`employees_test`")
```
***
## Target
The Target gem writes data to Iceberg and allows you to optionally specify the following additional properties.
### Target properties
| Property | Description | Default |
| ----------------- | -------------------------------------------------------------------------------------------------------------------------------------------------------------------- | ------- |
| Description | Description of your dataset. | None |
| Write Mode | How to handle existing data. For a list of the possible values, see [Supported write modes](#supported-write-modes). | None |
| Merge schema | Whether to automatically add columns present in the `DataFrame` but not in the Target table to the end of the schema as part of a write transaction. | false |
| Partition Columns | List of columns to partition the Iceberg table by. Provide this during a `createOrReplace` write mode to leverage the`overwritePartitions` write mode in the future. | None |
### Supported write modes
| Write Mode | Description |
| ------------------- | ------------------------------------------------------------------------------------------------------- |
| createOrReplace | Create or replace the Iceberg table. |
| append | If data already exists, append the contents of the DataFrame to the Iceberg table. |
| overwritePartitions | Dynamically overwrite partitions in the Iceberg table. |
| overwrite | If data already exists, explicitly overwrite the partitions with the `Overwrite Condition` you specify. |
Among these write modes, overwrite and append work the same way for parquet file writes.
### Target Example
### Compiled code
To see the compiled code of your project, [switch to the Code
view](/data-engineering/development/pipelines/pipelines#project-editor) in the project header.
```python example.py theme={null}
def iceberg_write(spark: SparkSession, in0: DataFrame):
df1 = in0.writeTo("`hadoop_catalog_1`.`prophecy_doc_demo`.`employees_test`")
df2 = df1.using("iceberg")
df3 = df2.partitionedBy("Department")
df4 = df3.tableProperty("write.spark.accept-any-schema", "true")
df4.createOrReplace()
```