> ## Documentation Index
> Fetch the complete documentation index at: https://docs.prophecy.ai/llms.txt
> Use this file to discover all available pages before exploring further.
# Migrate Informatica to Spark
> How to migrate from Informatica to Spark
When you create an Informatica bundle for a Spark project in the Prophecy transpiler, you can analyze, change, and validate your migration before the transpilation begins.
## Prerequisites
To complete this tutorial, you first need to:
* Export your Informatica workflow.
### Export from Informatica Designer
To export your Informatica workflow from your Informatica PowerCenter Designer:
1. Navigate to the workflow you want to export.
2. On the top navigation bar, click **Repository**.
3. Click **Export Objects**.
4. Navigate to where you want to save your file, then click **Save**.
## Limitations
* Prophecy only supports transpiling files from Informatica PowerCenter Designer version 10.4.1 and later.
In other words, Prophecy does not support transpiling files from Informatica Intelligent Data Management Cloud (IDMC).
* Prophecy does not support transpiling your Informatica schedules.
You must manually configure your schedule in your Prophecy project after transpiling your Informatica workflow.
## Migration
### Upload your Informatica bundle
1. On the left navigation bar, click the **Transpiler icon**, the icon with an arrow pointing down in a circle.
2. At the top of the page, click **Import Bundle**.
3. Select the **Informatica** format and click **Next**.
4. Enter the bundle details.
| Field | Description |
| ------------------ | --------------------------------------------------------------------------------------------------------------------------------------- |
| Import Bundle Name | Name of your bundle. |
| Language | Change the language of your pipeline to **Spark**. |
| Team | Create or choose the team with access to the bundle. |
| Project | Create or choose the project of the migration.
Prophecy filters this list by projects that are written in the language you chose. |
| Branch | Select the Git branch where you want to upload your code. |
| Spark Fabric | Choose the Spark [fabric](/data-engineering/fabrics/spark-provider/prophecy-managed) to attach your datasets and schedules to. |
5. Click **Next**.
6. Upload all the Informatica files you want to convert to Spark pipelines.
Prophecy accepts the `.xml` file type, which contains structured information about your Informatica workflow.
7. Click **Next**.
### Import pipeline
Next, to configure how Prophecy imports your pipelines:
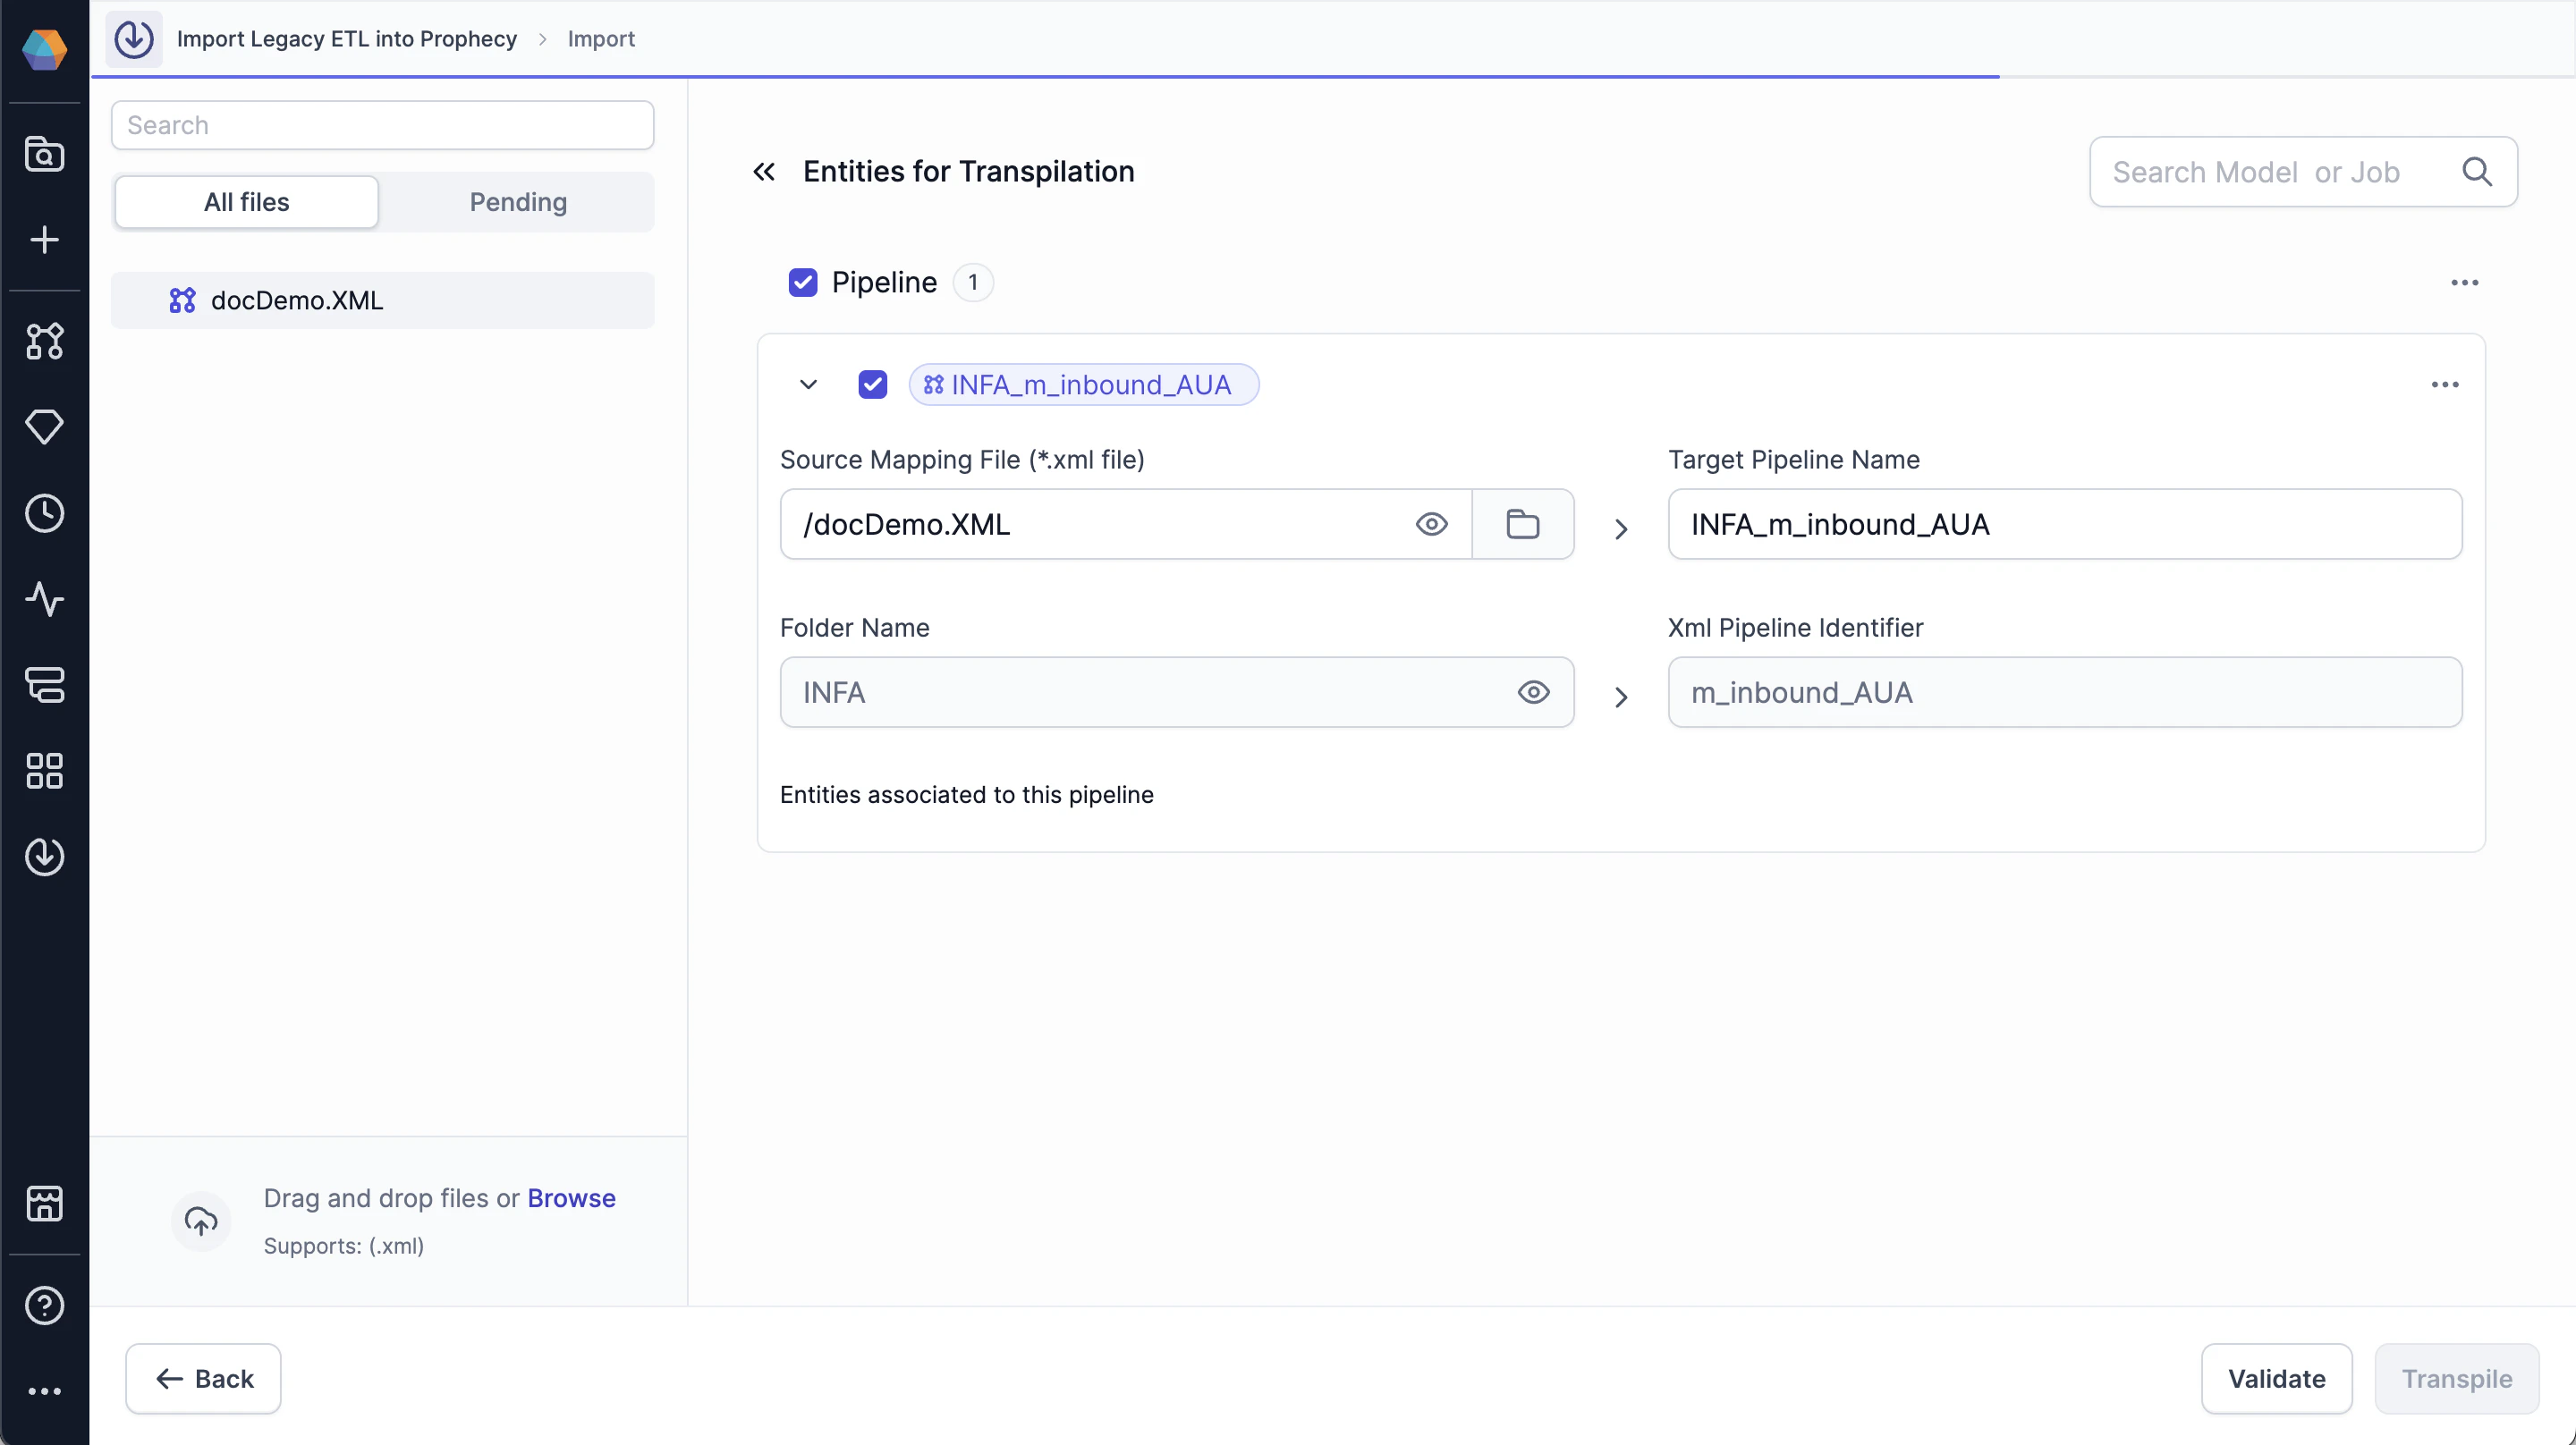 1. Click on each file to edit its configurations.
In the left sidebar, Prophecy lists the files you uploaded in the previous section, which are automatically staged to import. If you upload additional Informatica files on this page, then you have to manually stage them to import. All unstaged files can be viewed in the **Pending** tab of the left sidebar.
Once you add a pipeline, you can disable the import by deselecting the relevant checkbox. Disabling the import is useful if you want to save the pipeline in the import configuration to import it at a later time. However, you also can delete the pipeline from staging.
2. Click **Validate**.
You must validate your pipeline before you can start the transpilation. When you click the **Validate** button, Prophecy makes sure that the migration is possible with all the files you want to import.
3. Click the **Transpile**.
You can only click the **Transpile** button after Prophecy validates your files.
### Import transpiled entities
To import your transpiled entities:
1. Click **Import**.
Now, you see a list of transpiled entities that you can create when you import them. You can either import all of the entities, or you can disable some before importing.
1. Click on each file to edit its configurations.
In the left sidebar, Prophecy lists the files you uploaded in the previous section, which are automatically staged to import. If you upload additional Informatica files on this page, then you have to manually stage them to import. All unstaged files can be viewed in the **Pending** tab of the left sidebar.
Once you add a pipeline, you can disable the import by deselecting the relevant checkbox. Disabling the import is useful if you want to save the pipeline in the import configuration to import it at a later time. However, you also can delete the pipeline from staging.
2. Click **Validate**.
You must validate your pipeline before you can start the transpilation. When you click the **Validate** button, Prophecy makes sure that the migration is possible with all the files you want to import.
3. Click the **Transpile**.
You can only click the **Transpile** button after Prophecy validates your files.
### Import transpiled entities
To import your transpiled entities:
1. Click **Import**.
Now, you see a list of transpiled entities that you can create when you import them. You can either import all of the entities, or you can disable some before importing.
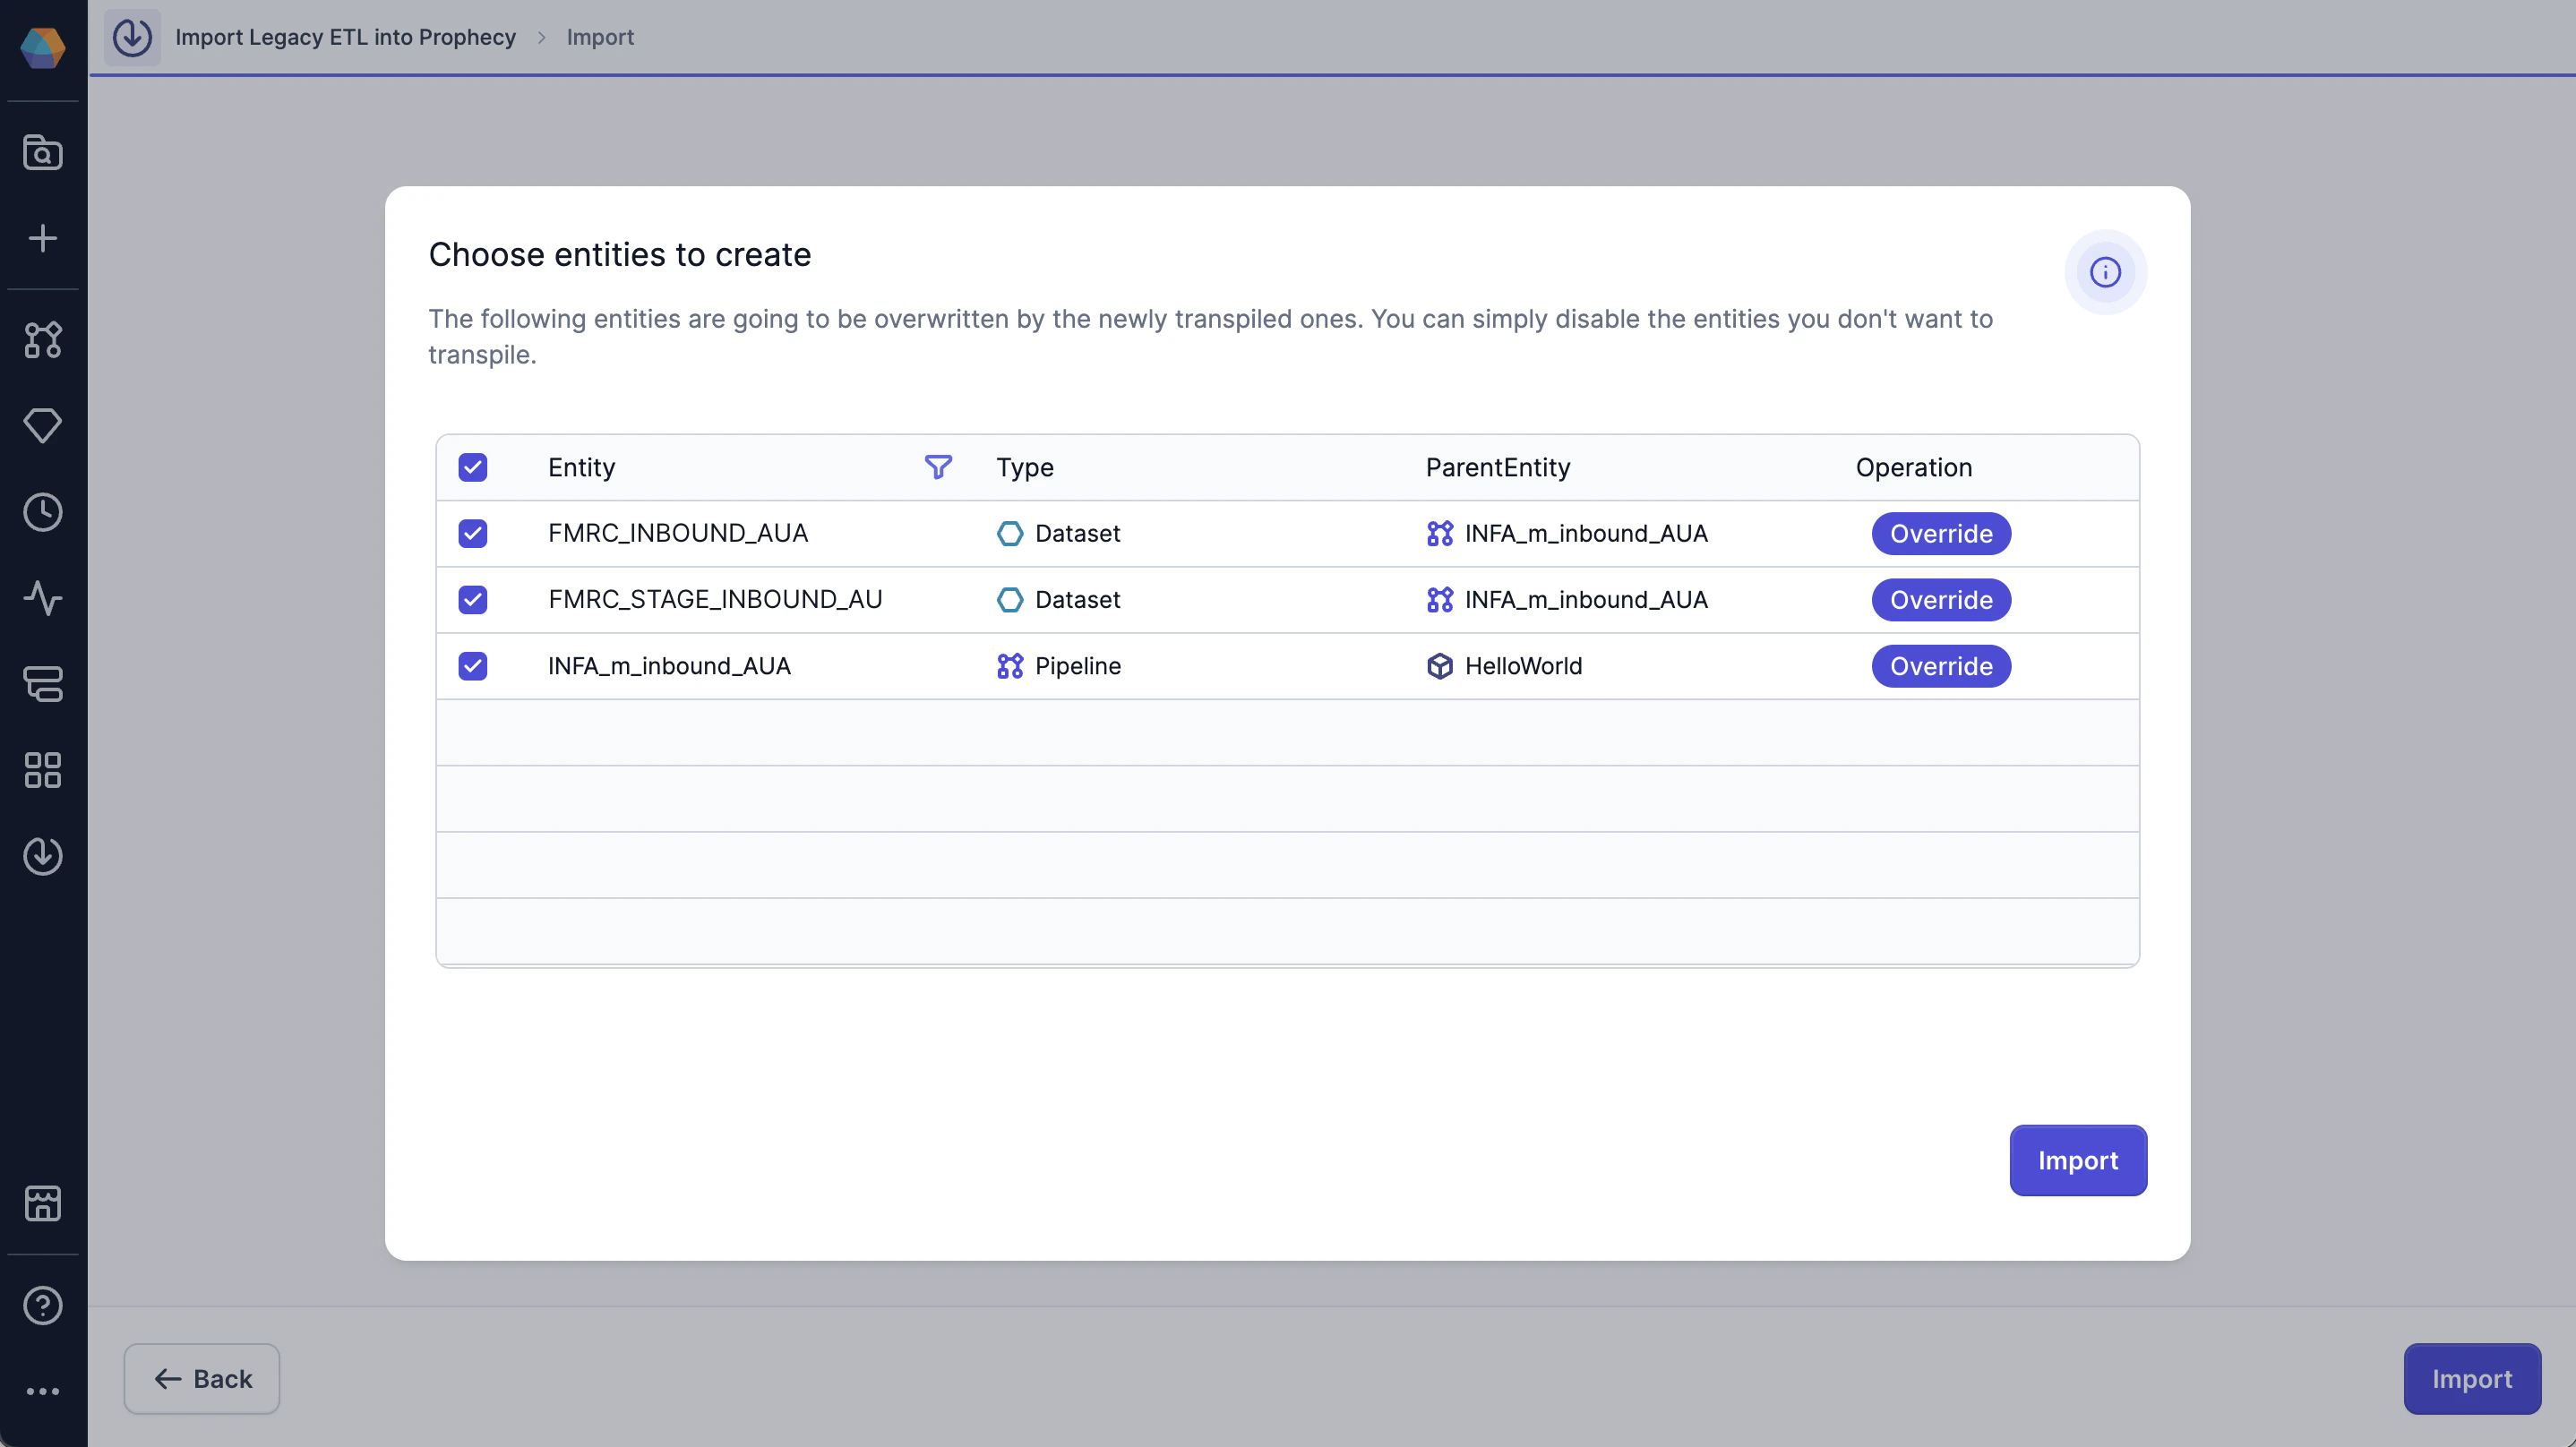 2. Click **Import** again.
3. Click **View Bundle Details**.
### Review Prophecy project
If there isn't an equivalent gem or function for a certain transformation, Prophecy inserts a placeholder **todo** gem or function in your pipeline where you can write your script or Spark statements to achieve the required functionality.
### Review bundle metadata
After you successfully import a bundle, you see the **Imported** status on the Transpiler page.
To see the bundle metadata, which includes information about all of the imported entities in the bundle, click on the bundle.
2. Click **Import** again.
3. Click **View Bundle Details**.
### Review Prophecy project
If there isn't an equivalent gem or function for a certain transformation, Prophecy inserts a placeholder **todo** gem or function in your pipeline where you can write your script or Spark statements to achieve the required functionality.
### Review bundle metadata
After you successfully import a bundle, you see the **Imported** status on the Transpiler page.
To see the bundle metadata, which includes information about all of the imported entities in the bundle, click on the bundle.
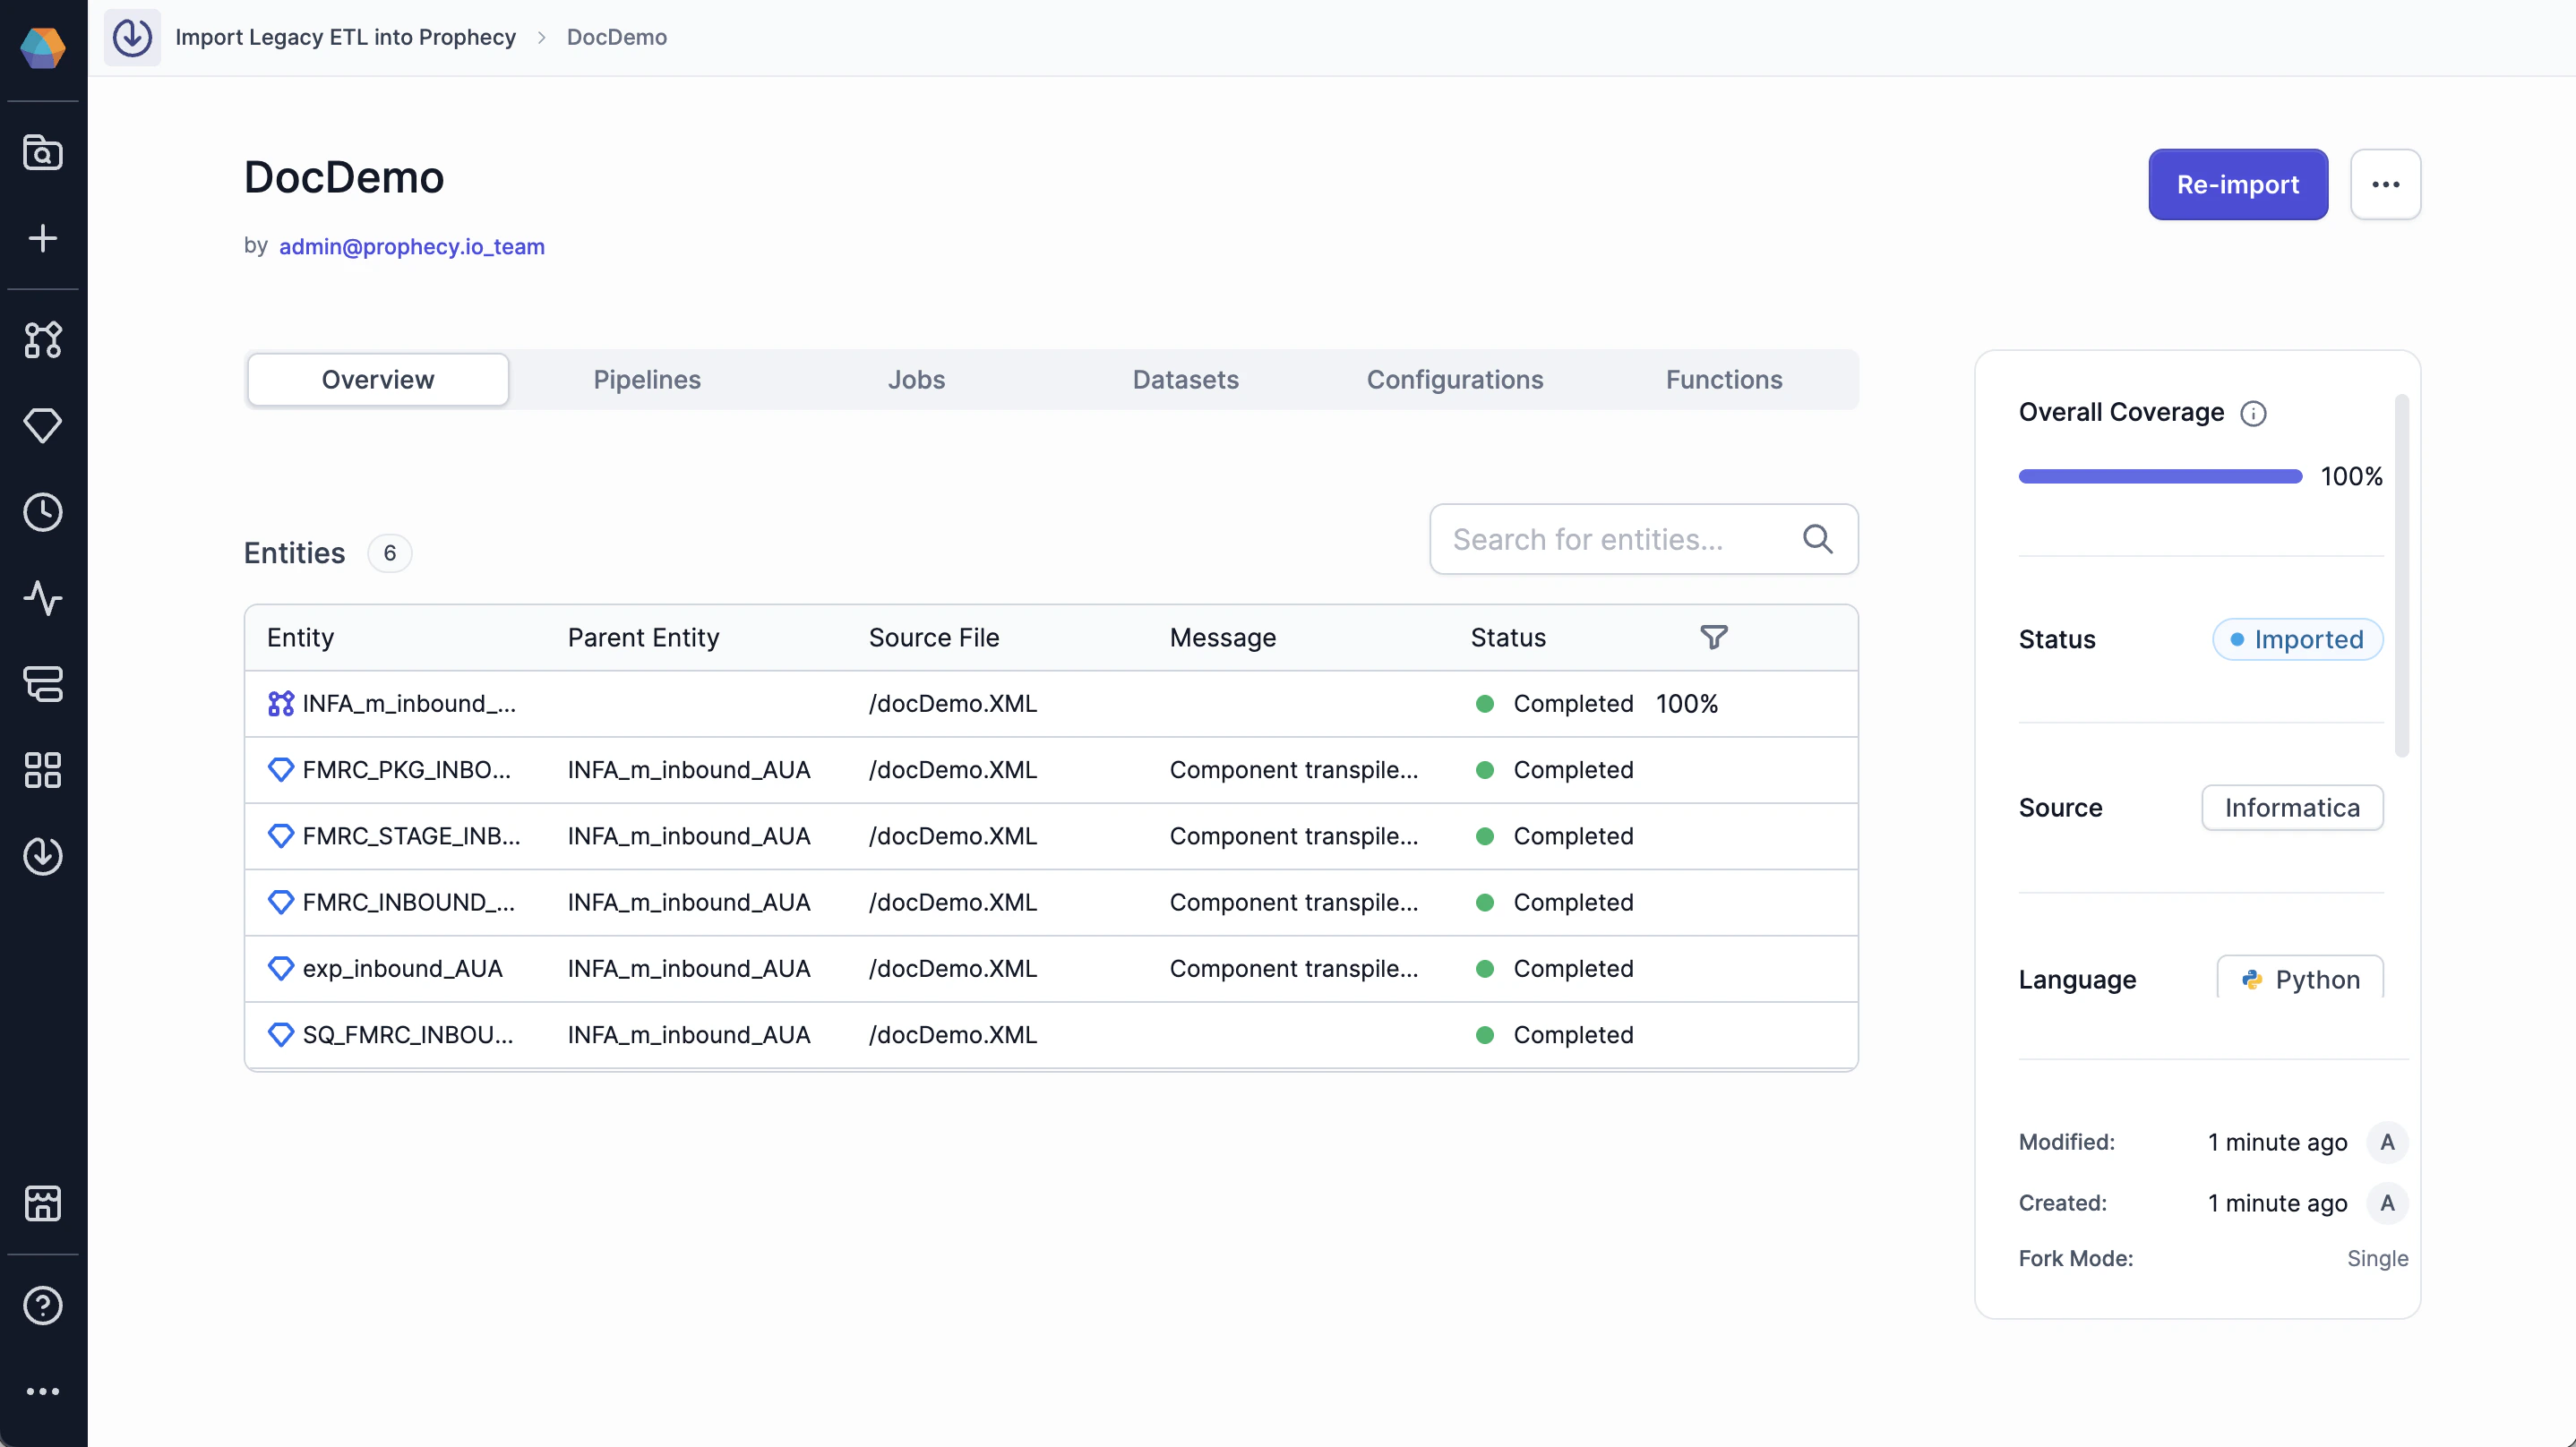 You can review the pipelines, jobs, tables, function, coverage, status, source, language, project, and fabric of the bundle in the right tile. You can open any entity in a new tab in the project editor by clicking on the entity.
### Testing
Open your bundle and run your pipeline to verify that it writes the same output as your Informatica workflow. If not, modify or add additional gems to make the output the same.
Before you deploy your project into production, we recommend you run both your Informatica workflow and Prophecy pipeline in parallel for at least two weeks. This helps you see if Prophecy consistently produces the same output as Informatica.
### Reimport pipelines
If you want to update or restart your transpilation, click the **Reimport** button at the top right corner of the bundle's page.
You can review the pipelines, jobs, tables, function, coverage, status, source, language, project, and fabric of the bundle in the right tile. You can open any entity in a new tab in the project editor by clicking on the entity.
### Testing
Open your bundle and run your pipeline to verify that it writes the same output as your Informatica workflow. If not, modify or add additional gems to make the output the same.
Before you deploy your project into production, we recommend you run both your Informatica workflow and Prophecy pipeline in parallel for at least two weeks. This helps you see if Prophecy consistently produces the same output as Informatica.
### Reimport pipelines
If you want to update or restart your transpilation, click the **Reimport** button at the top right corner of the bundle's page.