


Available for Enterprise Edition only.
Overview
Let’s learn how to create a Spark gem. At a high level, this involves the following steps:- Create a Spark project in which you will create your custom gem.
- Add a gem to the Gems section of the project sidebar.
- Specify the name and type of gem that you want to create.
- Write your code specifications.
- Preview the rendered visual interface of your gem.
- Fill in some values and review the generated code.
If you plan to share these gems in a package, be aware that everything in the project (pipelines,
subgraphs, jobs, etc.) will be part of the package, too.
Gem template
Each type of gem will have a different code template that Prophecy provides. Let’s review the template of a transformation gem.- Python
- Scala
Tutorial
Create a gem
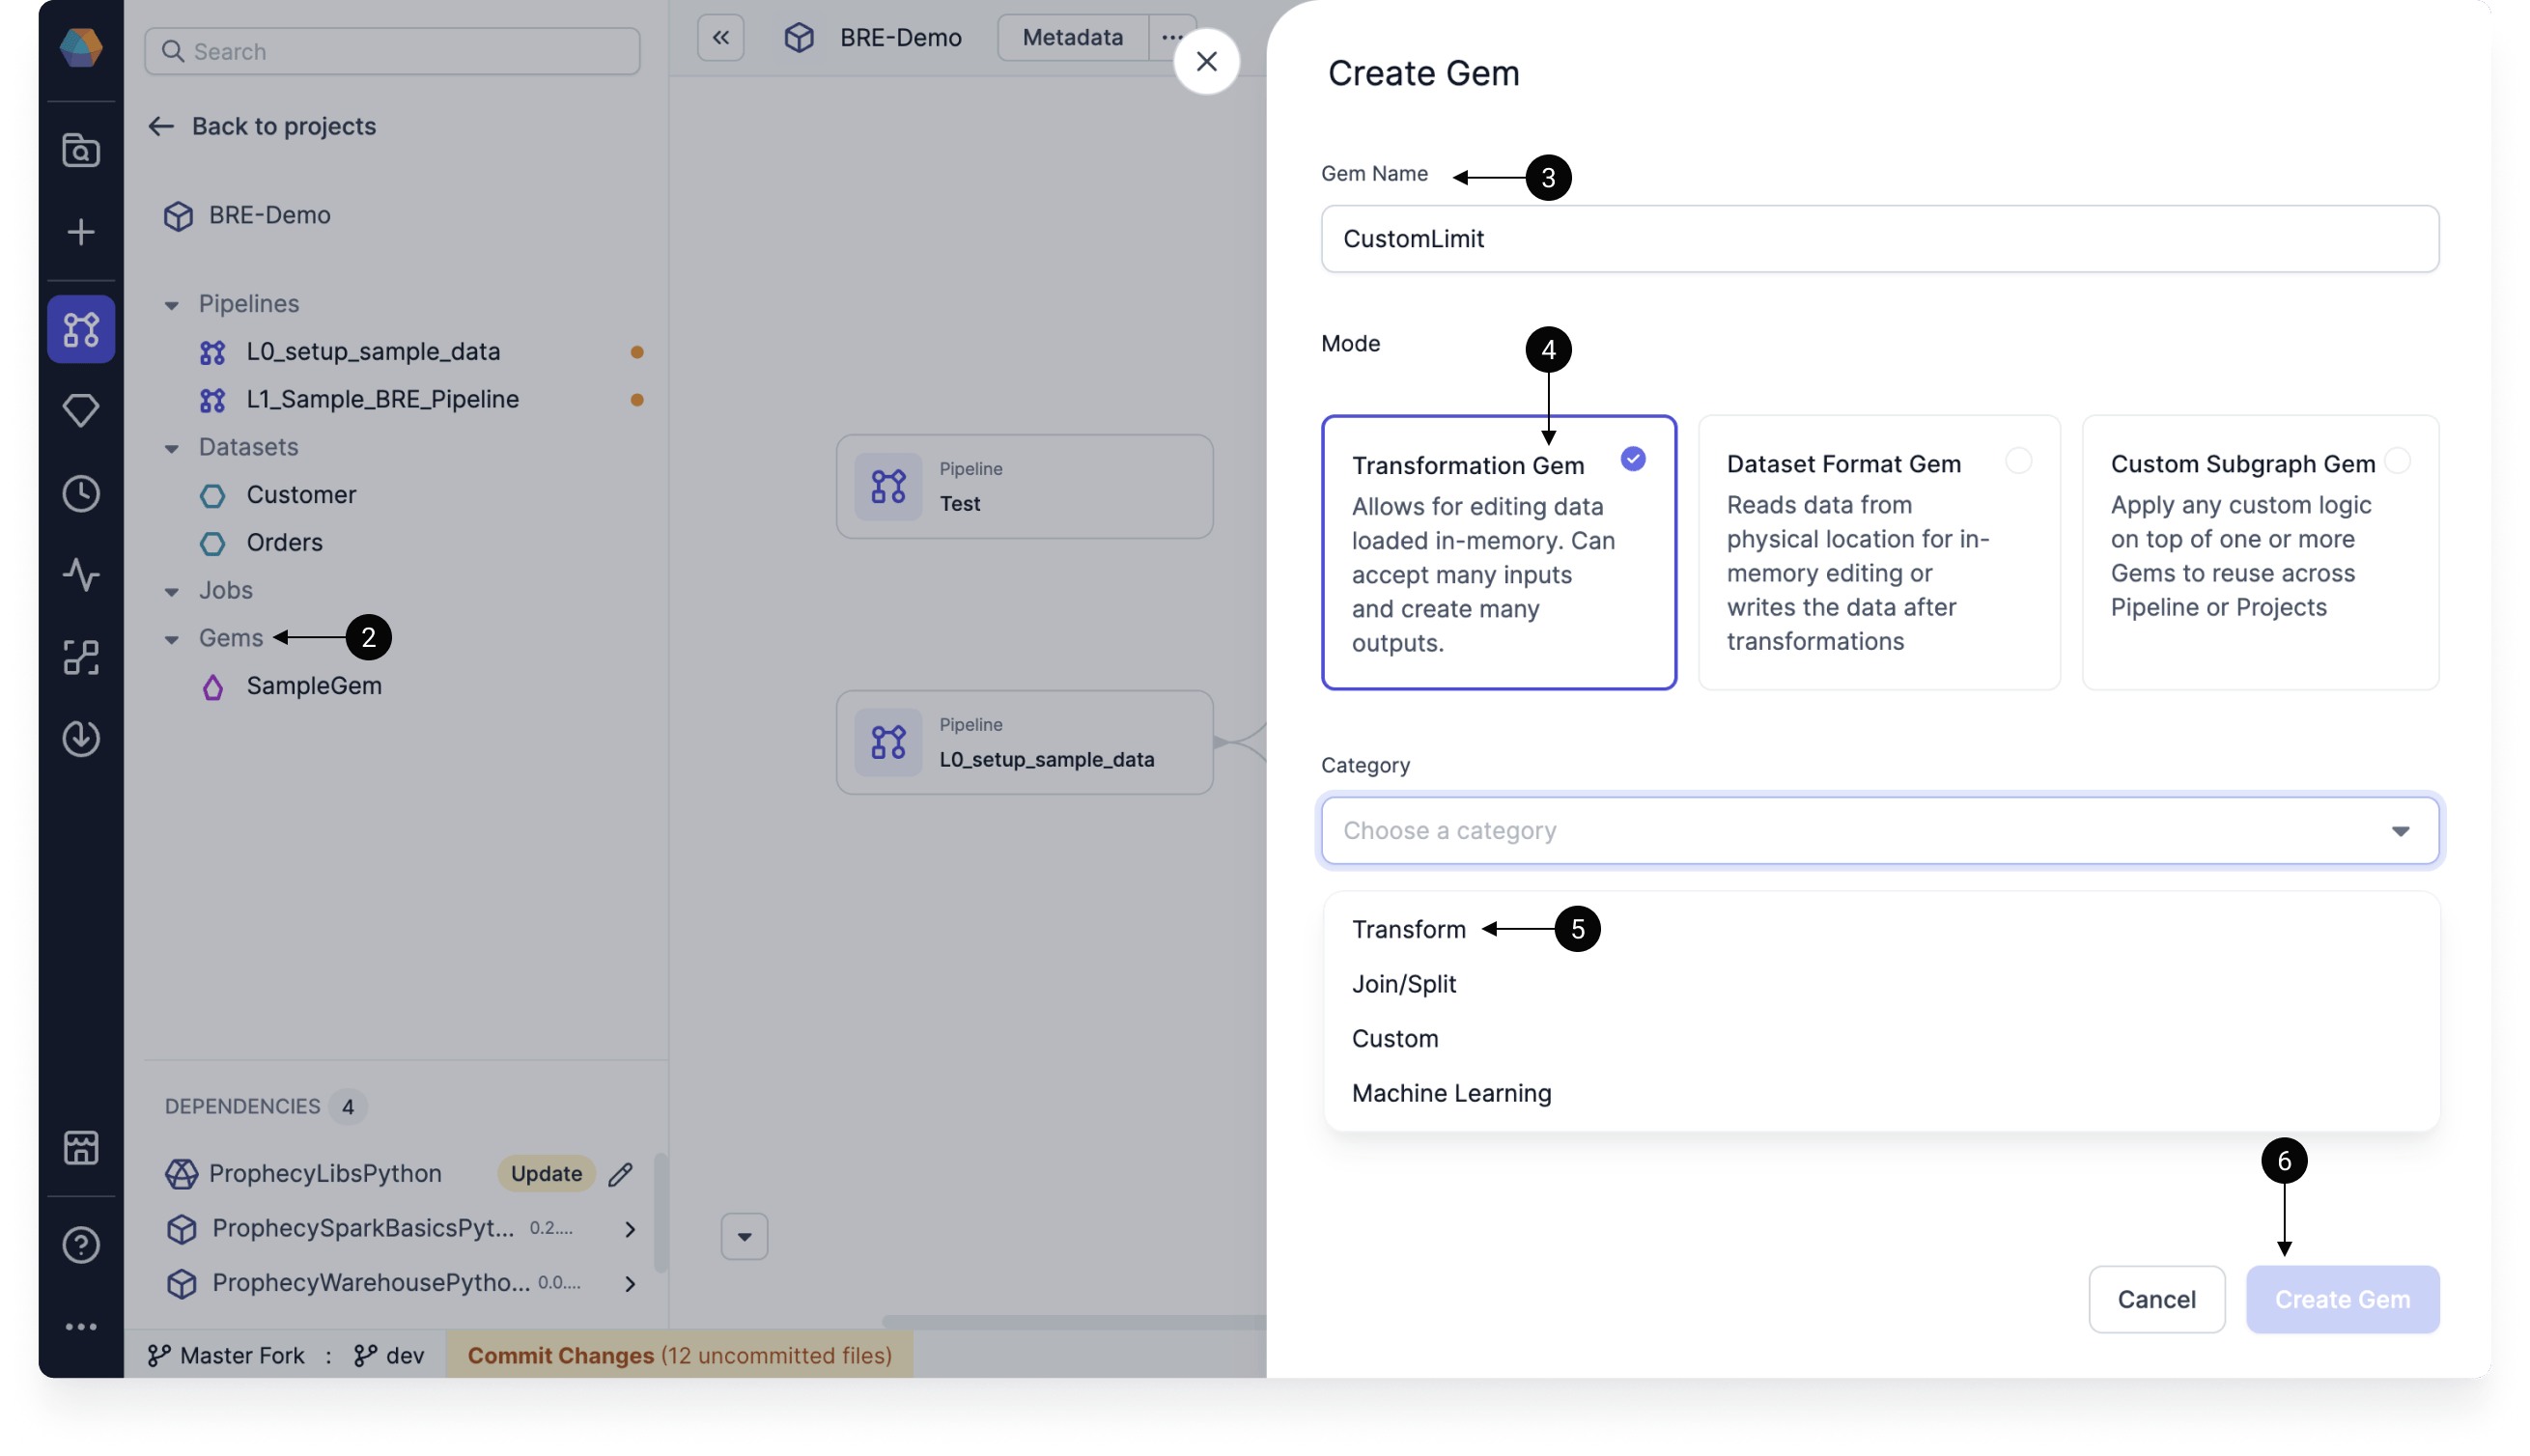
- Create a Spark project in Python. The gem will inherit the project-level language.
- Click on the + in the gems section of the project sidebar. This will appear on hover.
- In the Gem Name field, write
CustomLimit. - Choose Transformation Gem mode.
- Select the Transform category.
- Click Create Gem.
Update header
For gems written in Scala, be sure to update the package to reflect the project name. For example, if the gem is in a “Framework” project, use the statement
package platform.framework.Gems- Python
- Scala
Extend parent class
Every gem class needs to extend a parent class from which it inherits the representation of the overall gem. This includes the UI and the logic. For transform gems, you need to extend ComponentSpec . Next provide the name and category of your gem, “Limit” and “Transform” in this example. Another thing to note here is optimizeCode. This flag can be set to True or False value depending on whether we want the Prophecy Optimizer to run on this code to simplify it. In most cases, it’s best to leave this value as True.- Python
- Scala
class name and the val name.
Populate properties class
There is one class (seen here as LimitProperties) that contains a list of the properties to be made available to the user for this particular Gem. Think of these as all the values a user fills out within the interface of this Gem, or any other UI state that you need to maintain (seen here as limit). These properties are available in validate, onChange and apply and can be set from dialog, functions.- Python
- Scala
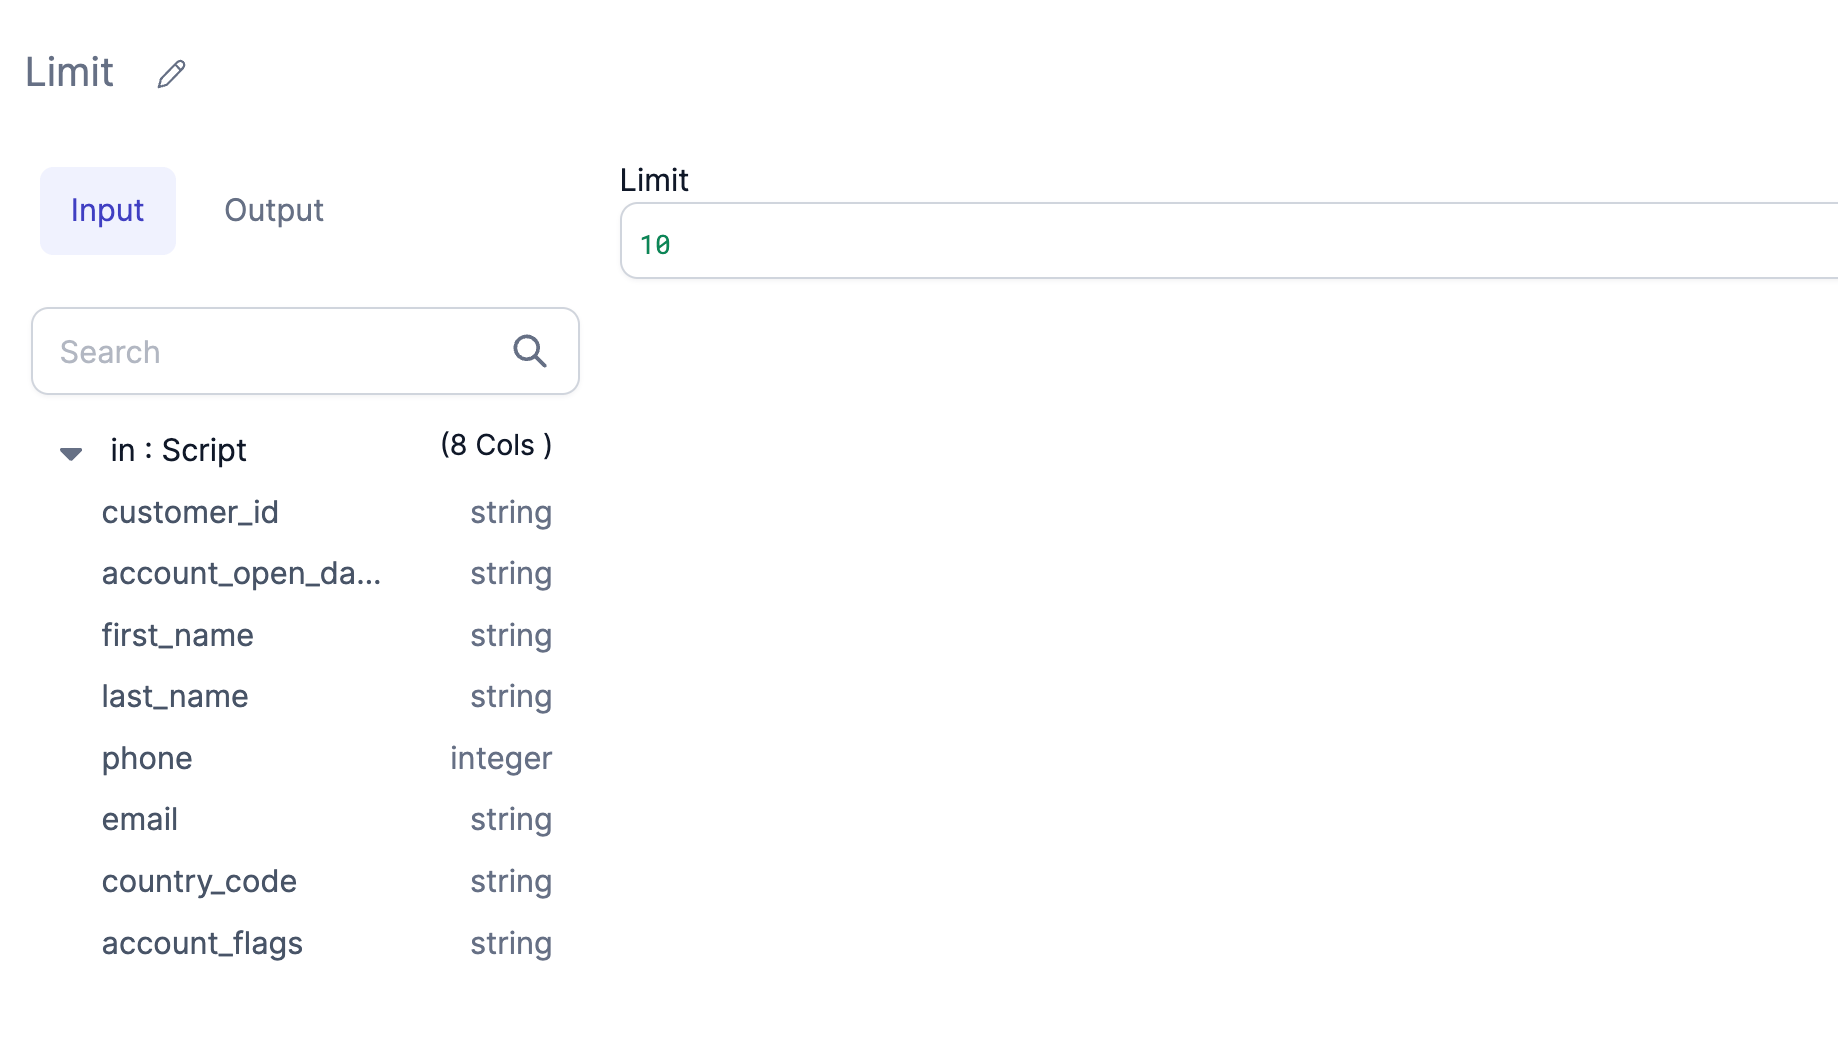
Create UI components
The dialog function contains code specific to how the gem UI should look to the user.- Python
- Scala
Validate user input
The validate method performs validation checks so that in the case where there’s any issue with any inputs provided for the user an Error can be displayed. In our example case the Limit condition must be an integer within a defined range. Similarly, you can add any validation on your properties.- Python
- Scala
Define state changes
The onChange method is given for the UI State transformations. You are given both the previous and the new incoming state and can merge or modify the state as needed. The properties of the gem are also accessible to this function, so functions like selecting columns, etc. are possible to add from here.- Python
- Scala
Serialize or deserialize
Serialize and deserialize methods in Scala are now open source and exposed to the user, so you could extend your own serializer classes if desired, using Play JSON library or any other format.- Python
- Scala
For Scala, this snippet binds the UI Properties to the case class:
(props: testProperties): String = Json.toJson(props).toString()Define Spark logic
The last class used here is LimitCode which is inherited from ComponentCode class. This class contains the actual Spark code that needs to run on your Spark cluster. The Spark code for the gem logic is defined in the apply function. Input/Output of apply method can only be DataFrame or list of DataFrames or empty. For example, we are calling the .limit() method in this example in the apply function.- Python
- Scala
If you are using an existing gem as a guide to creating your new gem, you will need to change the
following at a minimum: ComponentSpec, ComponentProperties, and ComponentCode.
Extend functionality
Now for the fun part! We understand a Transform example, and now we want to explore extending to our custom gem needs. There are several ways to extend your custom gem. Looking to craft or adjust a UI element for your custom gem? Get inspiration from the existing gems. Find a gem that has a UI element you want to use - like ColumnsLayout - and use that gem’s code. Looking to supply your own function for your custom gem? Add your function in the ComponentCode’s apply method. Looking to read or write to a data format beyond the (filetypes, warehouses, and catalog) provided out of the box? GemBuilder is not just for Transformations. Design a new DatasetFormat with Gem Builder using some modifications from the Transformation example.Extend UI
Let’s see how to use the ColumnsLayout UI element in detail: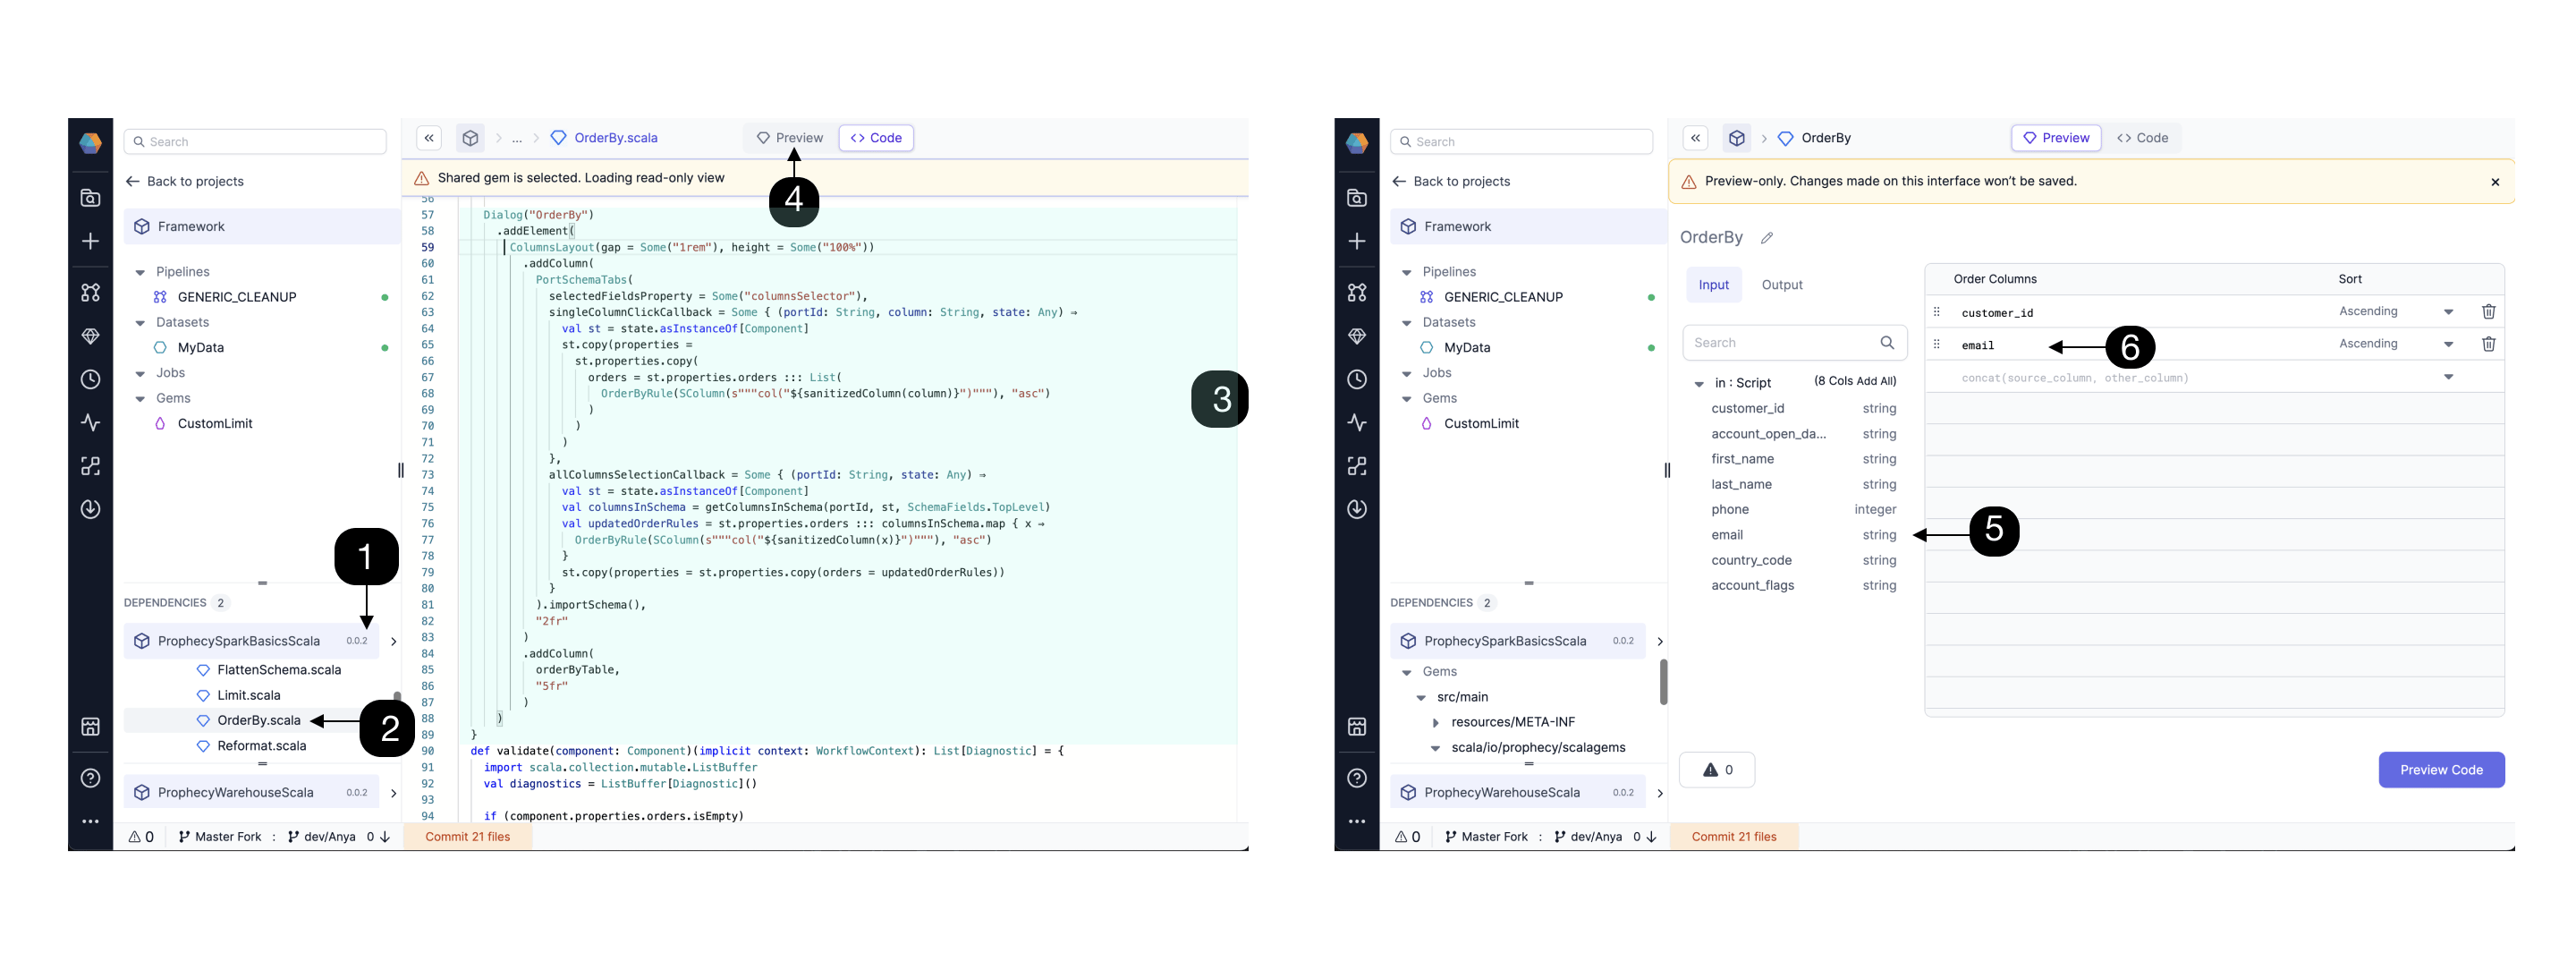
customer_id and email columns, and note these columns now (6) appear in the Order Columns list.
If you like the column layout, then add the ColumnsLayout element to your custom gem. Each time you edit the code, you can click “Preview” to test the change in the UI.
Extend the Component Code with functions
The ComponentCode contains the actual Spark code that needs to run on your Spark cluster. Functions are supported inside the apply method; just define and call the function. For example, the existing Filter ComponentCode can be (1) edited by adding the withColumn function: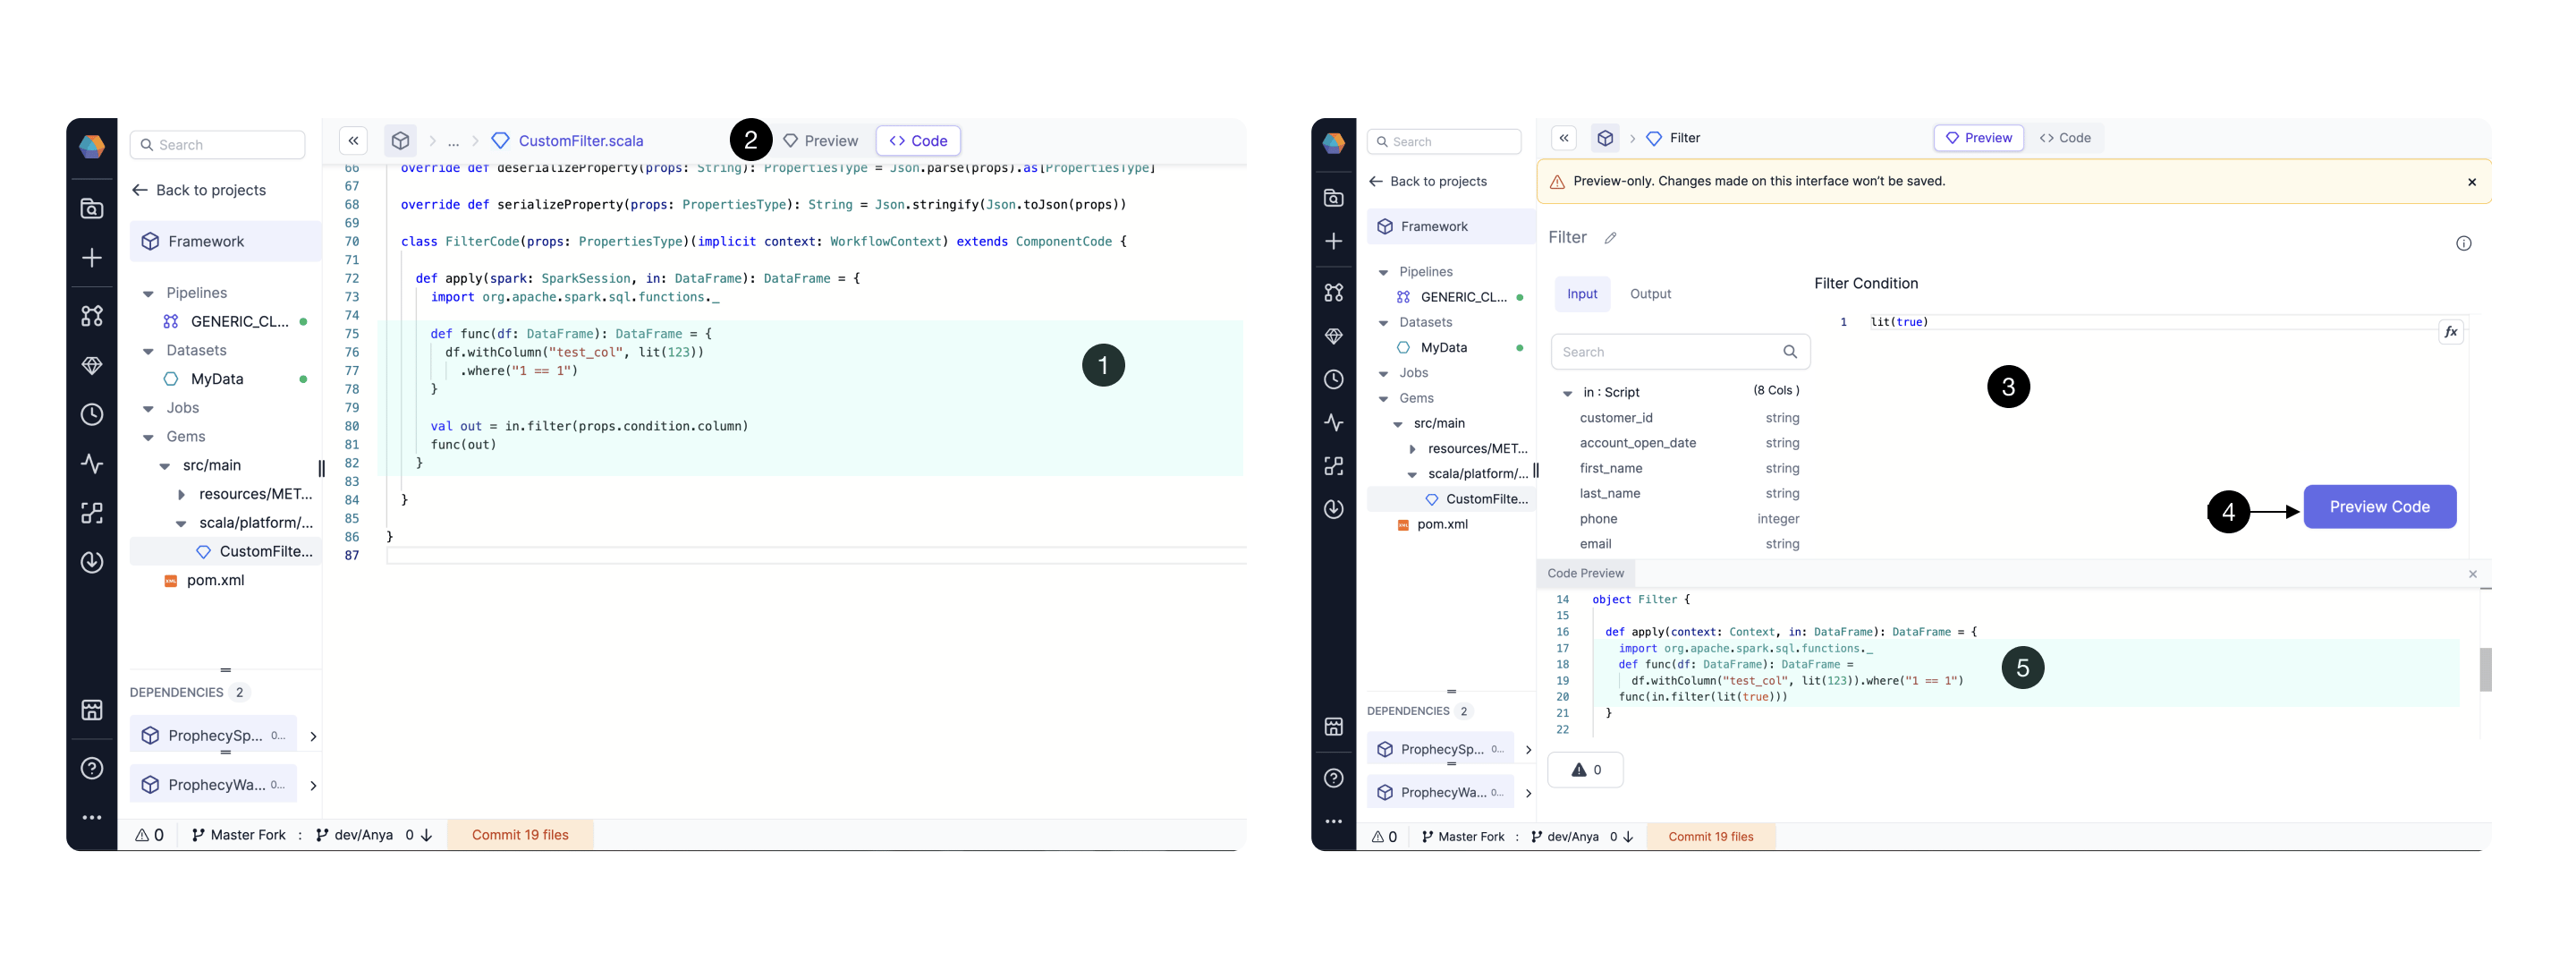
Troubleshoot errors
If there is an error in your code, your gem preview might not render correctly.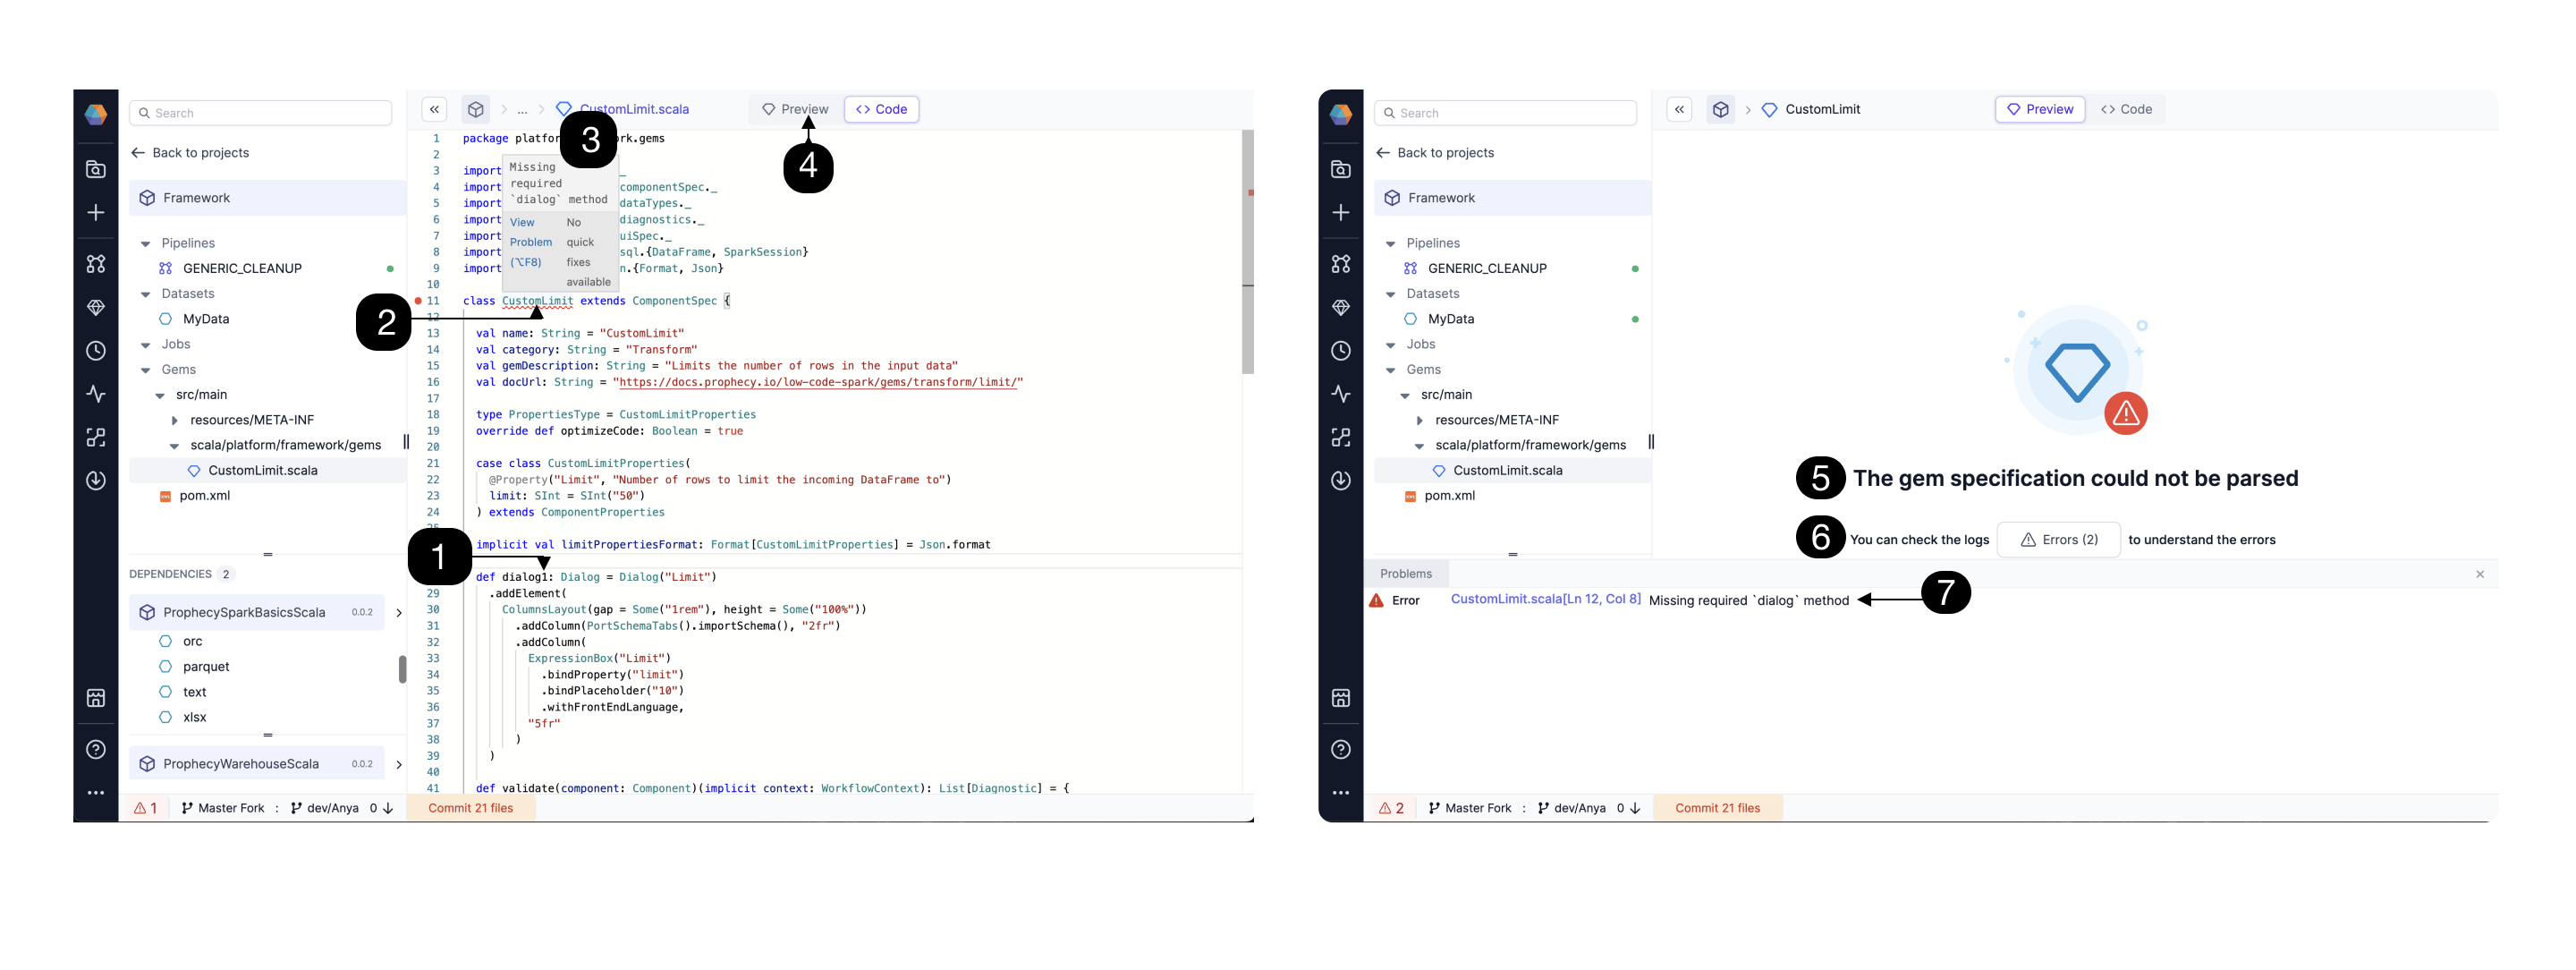
- Click the (2) underlined code.
- Notice a (3) detailed error message.
- Click (4) Preview to see how the gem will look as rendered in the UI.
- If a value is incorrect, the gem will not be able to be parsed, and a very clear error will appear (5) here as well.
- Click the (6) Errors button to see the (7) full error message.
Best Practice
When possible, use theset() operation, and avoid for loops. set() operations typically have a better average computational complexity than a list, which makes them more efficient.
This is especially helpful when you operate on the columns of wide tables, as this scenario can slow down the Prophecy UI.