Available for Enterprise Edition only.
Overview
When you configure SAML for EMR fabrics:- Any user assigned to the Okta app can use the EMR fabric configured with SAML using their own credentials.
- All signed-in users are granted the AWS role defined in the fabric settings.
- Users remain signed in as long as their token is valid.
- Users must sign in again when the token expires.
Prerequisites
To configure an EMR fabric that authenticates users with SAML, you need:- Access to EMR or EMR Serverless compute
- Administrator access to AWS and Okta
- Permission to set environment variables in your Prophecy deployment, usually associated with the Prophecy cluster admin role.
- Ability to create or edit an EMR fabric in Prophecy.
1. Create an Okta SAML application
To begin, create a new Okta SAML application:- Sign in to Okta as an administrator.
- Go to Applications > Applications.
- Click Create App Integration.
- Select SAML 2.0 and click Next.
-
For App name, enter
Prophecy SAML App, then click Next. -
For Single Sign-On URL, open the Prophecy EMR fabric where you want to configure SAML.
Then, copy the provided URL under Login URL and paste this into the Okta field.

- Below the URL, select the Use this for Recipient URL and Destination URL checkbox.
-
For Audience URI (SP Entity ID), enter a value to identify the entity issuer (for example,
prophecyokta). - Leave Default Relay State blank.
- Keep the rest of the settings as-is and click Next.
- Select This is an internal app that we have created.
-
Click Finish. The
Prophecy SAML Appappears in your application list.
Assign users and groups in Okta
When you assign users/groups in the Okta application, you determine who is allowed to sign in.-
In Okta, navigate to your application: Applications > Applications, then select the
Prophecy SAML App. - Go to the Assignments tab.
-
Click Assign to see the following options:
- Assign to People: Select individual users who should have access.
- Assign to Groups: Select entire Okta groups to simplify management for multiple users.
- For each user or group, click Assign.
- Confirm assignments.
Save the metadata.xml file
Next, save the metadata from this app to upload to AWS.
- In the Okta application, open the Sign On tab.
-
Copy the Metadata URL details.
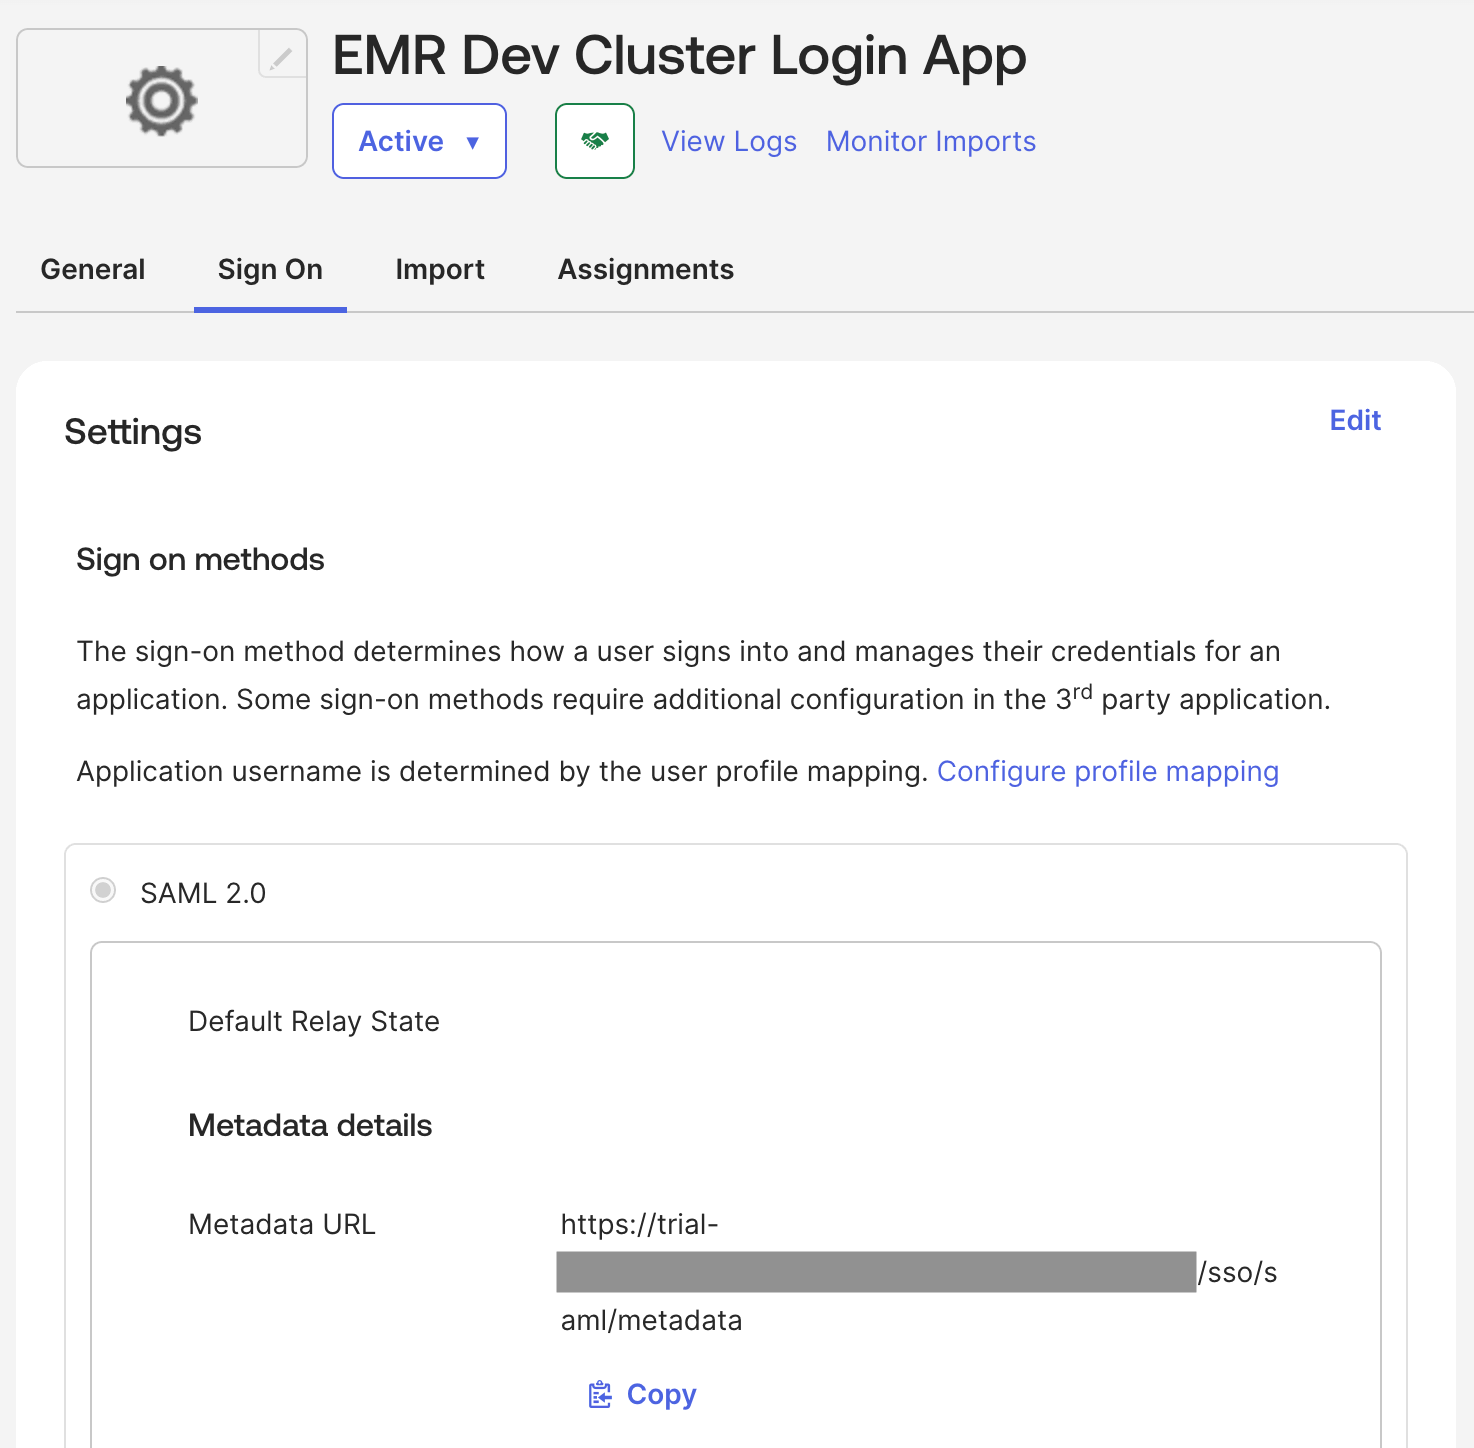
-
Save the copied information as a file called
metadata.xml.
2. Create an AWS Identity Provider
Now, create a new Identity Provider in AWS.- In AWS, open Identity and Access Management (IAM).
- Navigate to Identity Providers.
- Click Add Provider.
- For Provider type, select SAML.
- For Provider name, enter a descriptive name.
-
For Metadata document, upload the
metadata.xmlfile you downloaded earlier.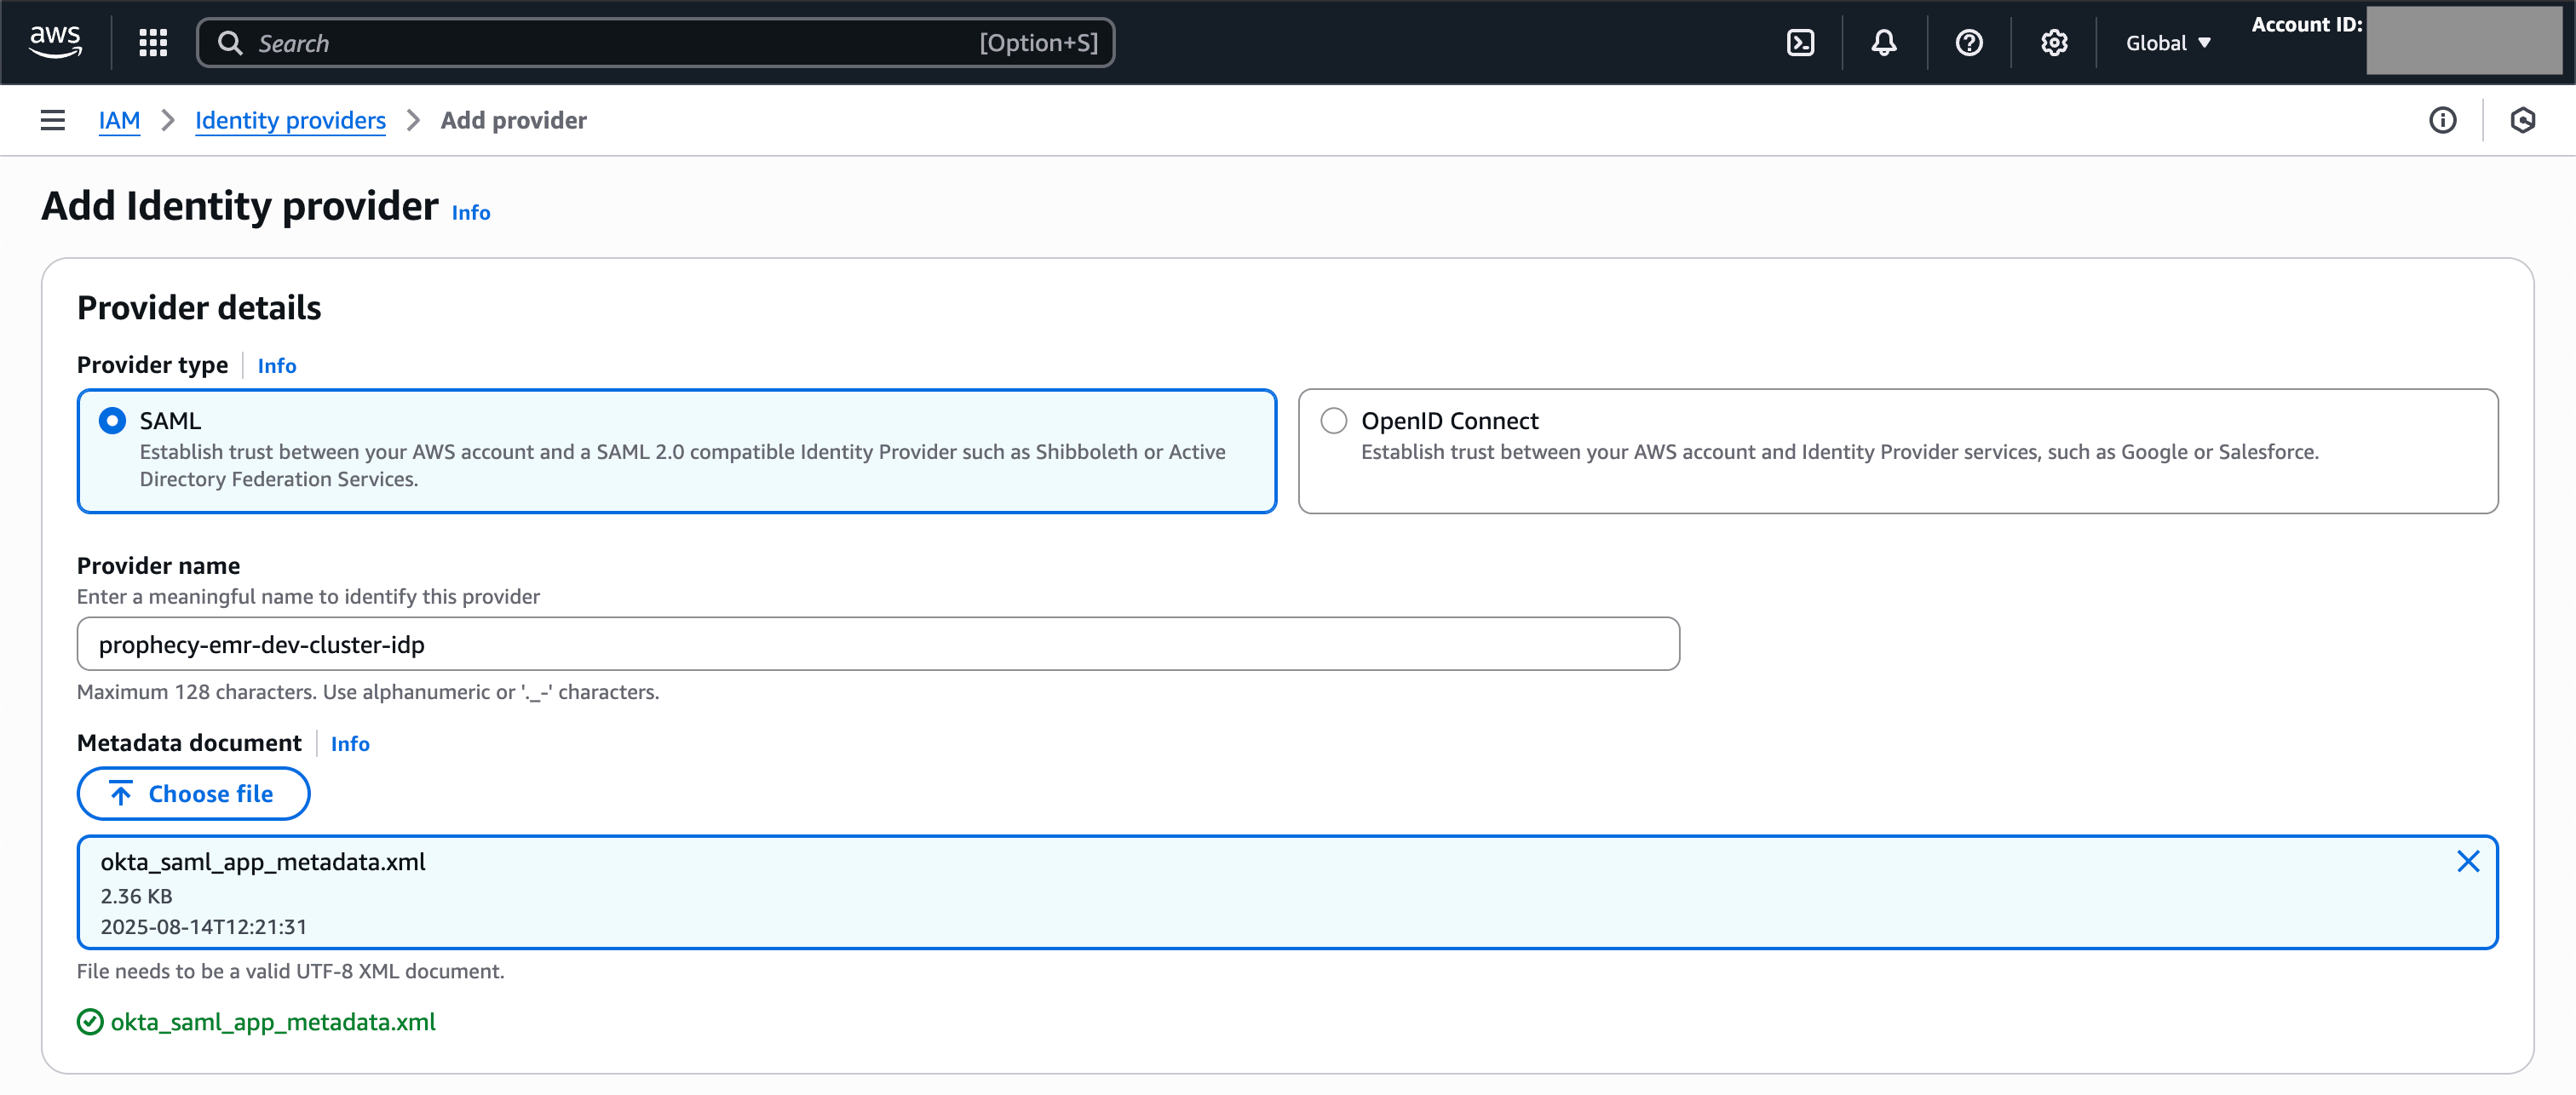
- Click Add Provider.
-
Note the Identity Provider ARN, which you will use when updating the Okta SAML application.
For example:
arn:aws:iam::<account_id>:saml-provider/okta-provider - Note the Issuer URL, which you will use when creating an AWS role.
- Note the SSO service location, which you will add to Prophecy via environment variables.
3. Create an AWS role for SAML authentication
Then, create a role that will be assigned to all users who attach to the EMR fabric.- In AWS, go to IAM > Roles > Create role.
- For Trusted entity type, select SAML 2.0 federation.
- For SAML 2.0-based provider, choose the provider created in the previous section.
- For Access to be allowed, select Allow programmatic access only.
-
Set attribute conditions in the AWS role to perform validations before allowing a user to assume the role.
Attribute condition Value Purpose SAML:issYour Okta Issuer URL The issuer verifies the SAML assertion was generated by your Okta tenant and not another IdP. SAML:audhttps://*.prophecy.io/*The audience ensures the SAML assertion was issued for Prophecy and not for some other service. - Click Next > Next (you will add policies later).
- Enter a role name and description, then click Create role.
- If applicable, ensure that the role has required permissions to interact with the EMR Serverless application.
- Optionally, edit the role to set the Maximum session duration.
-
Note the role ARN, which you will use when updating the Okta SAML application.
For example:
arn:aws:iam::<account_id>:role/prophecy-emr-okta-login-role
4. Update the Okta SAML application
In this step, add information from AWS into your Okta application.- In Okta, go to Applications > Applications.
- Select the application created previously.
- Go to General > SAML Settings > Edit.
-
In Configure SAML, under Attribute Statements, add:
Name Value https://aws.amazon.com/SAML/Attributes/RoleSessionNameuser.loginhttps://aws.amazon.com/SAML/Attributes/Role<AWS Role ARN>,<AWS Identity Provider ARN>https://aws.amazon.com/SAML/Attributes/SessionDurationValue can be less than or equal to the session duration defined in step 3.8 - Click Next, then Finish.
5. Configure Prophecy to enable SAML for EMR
Set environment variables
In your Prophecy deployment, set the following environment variables:| Name | Value |
|---|---|
AWS_SAML_APP_LOGIN_URLS | <Okta App Sign-On URL> |
AWS_SAML_ASSUMED_ROLES | <AWS Role ARN> |
Configure an EMR fabric
Finally, you can configure a fabric to authenticate using SAML.- In Prophecy, create or open an EMR fabric.
- Switch the authentication method to SAML.
-
Under Login URL, select the value from the
AWS_SAML_APP_LOGIN_URLSenvironment variable. -
Under Role, select the value from the
AWS_SAML_ASSUMED_ROLESenvironment variable. - Select the appropriate AWS region.
- Click Fetch Environments.
- In the Connect to Okta dialog, click Continue. This opens the Okta sign-in page in a new tab.
- Sign in with your Okta credentials.
- In Prophecy, complete the fabric configuration and save it.