- Setup: You’ll configure the dependencies, define credential secrets and load the pipelines from a Git repository.
- Build a Knowledge Warehouse: You’ll explore a set of Spark pipelines to (a)ingest unstructured data from your applications, pre-process, and (b)vectorize and store the data within your vector database of choice.
- Run a Live Inference Pipeline: You’ll run a Spark streaming Chatbot pipeline that reads messages from Slack and answers them live using information from your new Knowledge Warehouse.

Requirements
External dependencies
Optional, but recommended for best results:- Pinecone - allows for efficient storage and retrieval of vectors. To simplify, it’s possible to use Spark-ML cosine similarity alternatively; however, since that doesn’t feature KNNs for more efficient lookup, it’s only recommended for small datasets.
- OpenAI - for creating text embeddings and formulating questions. Alternatively, one can use Spark’s word2vec for word embeddings and an alternative LLM (e.g., Dolly) for answer formulation based on context.
- Slack or Teams - for the chatbot interface. An example batch pipeline is present for fast debugging when unavailable.
Cluster library dependencies
Required:- Spark-AI - Toolbox for building Generative AI applications on top of Apache Spark.
The cluster library dependencies are automatically included if you Fork our sample project as detailed below.
Platform recommendations
Below are some platform recommendations. Like all Prophecy projects the code generated by the template has no vendor lock-in so it should run wherever Spark does.- Prophecy Data Transformation Copilot (version 3.1 and above) - for building the data pipelines. A free account is available.
- Databricks (DBR 12.2 ML and above) - for running the data pipelines. There are some free/low-cost options available or you can use the compute that comes with Prophecy’s free trial.
1. Setup
We’ll start by forking our existing sample repository. This will leave you with your own copy that you can modify however you want.- Fork the repo so you have your copy at something like
https://github.com/<your_username>/gen-ai-chatbot-template - Clone the repo onto your local machine (i.e
git clone https://github.com/<your_username>/gen-ai-chatbot-template)
1a. Dependencies
Create accounts for the services you want to use for your Generative AI Chatbot. For each service create access tokens and save them within a file named.env in your repo. See sample.env for an example.
For our example, we will be using Slack, OpenAI and Pinecone.
Slack
Here are the steps to set up the Slack bot. If you prefer a video walkthrough, see here. Using a Slack workspace where you have Admin permissions, follow these steps:- Set up a Slack application using the manifest file here.
- Install the Slack app in the workspace.
- Create an App-Level Token with
connections:writepermission. This token is going to be used for receiving messages from Slack. Save it asSLACK_APP_TOKENin your.envfile. - Find the Bot User OAuth Token. The permissions (or scopes, in Slack terminology) are defined in the manifest file. This token is going to be used for sending messages to Slack. Save it as
SLACK_TOKENin your.envfile - Create a new Slack channel in this Slack workspace.
- Invite your Slack app to the channel.
- For more details on creating a Slack App, click here.
OpenAI
- Join your company’s OpenAI Organization by asking your Admin for an email invite. Alternatively, create an account here.
- Find your API key as described here. Save it as
OPEN_AI_API_KEYin your.envfile
Pinecone
- Join your company’s Pinecone Organization by asking your Admin for an email invite. Alternatively, create an account here.
- Open an existing Pinecone project or create a new one.
- Create an index. We used an index with
1536dimensions,Cosinemetric, and ans1pod type. - Within the appropriate Pinecone project, generate a Pinecone API key as mentioned here. Save it as
PINECONE_TOKENin your.envfile.
1b. Databricks Secrets and Schemas
The Databricks CLI is a command line tool that lets you interact with your Databricks workspace. Use the Databricks CLI here to store the tokens created in Step 1a safely as Databrickssecrets. Also, use the Databricks CLI to create catalog tables and schemas. Follow the steps below and for more details about the Databricks CLI read here.
Find setup_Databricks.sh here.
- Ensure that your
.envfile contains all the above secrets. Use the sample.env as an example, andsourceyour.envfile (i.esource .env) - Install the Databricks CLI using
pip install Databricks. Currently version 0.17.x is supported. - Use
databricks configureto set up a connection from your local machine to your Workspace. - Run
setup_Databricks.shto create the required secrets and schemas. - Expected output of
setup_Databricks.sh:
- Verify
setup_Databricks.shcreates the needed resources using these commands described here and here:
1c. Load the Git repository
- Login to Prophecy
- Import a new Prophecy project.
- Load the forked Git repository to the Prophecy project as shown in this 30-second video., pointing to your fork at
https://github.com/<your_username>/gen-ai-chatbot-template - Connect to your Spark cluster by creating a fabric following these steps.
1d. Set up Databases
This project runs on Databrick’s Unity Catalog by default. However, you can also reconfigure Source & Target gems to use alternative sources. For Databricks Unity Catalog, thesetup_Databricks.sh script has already created the following catalog: gen_ai and the following databases: web_bronze and web_silver. The tables are going to be created automatically on the first boot-up.
1e. Explore the Visual Interface
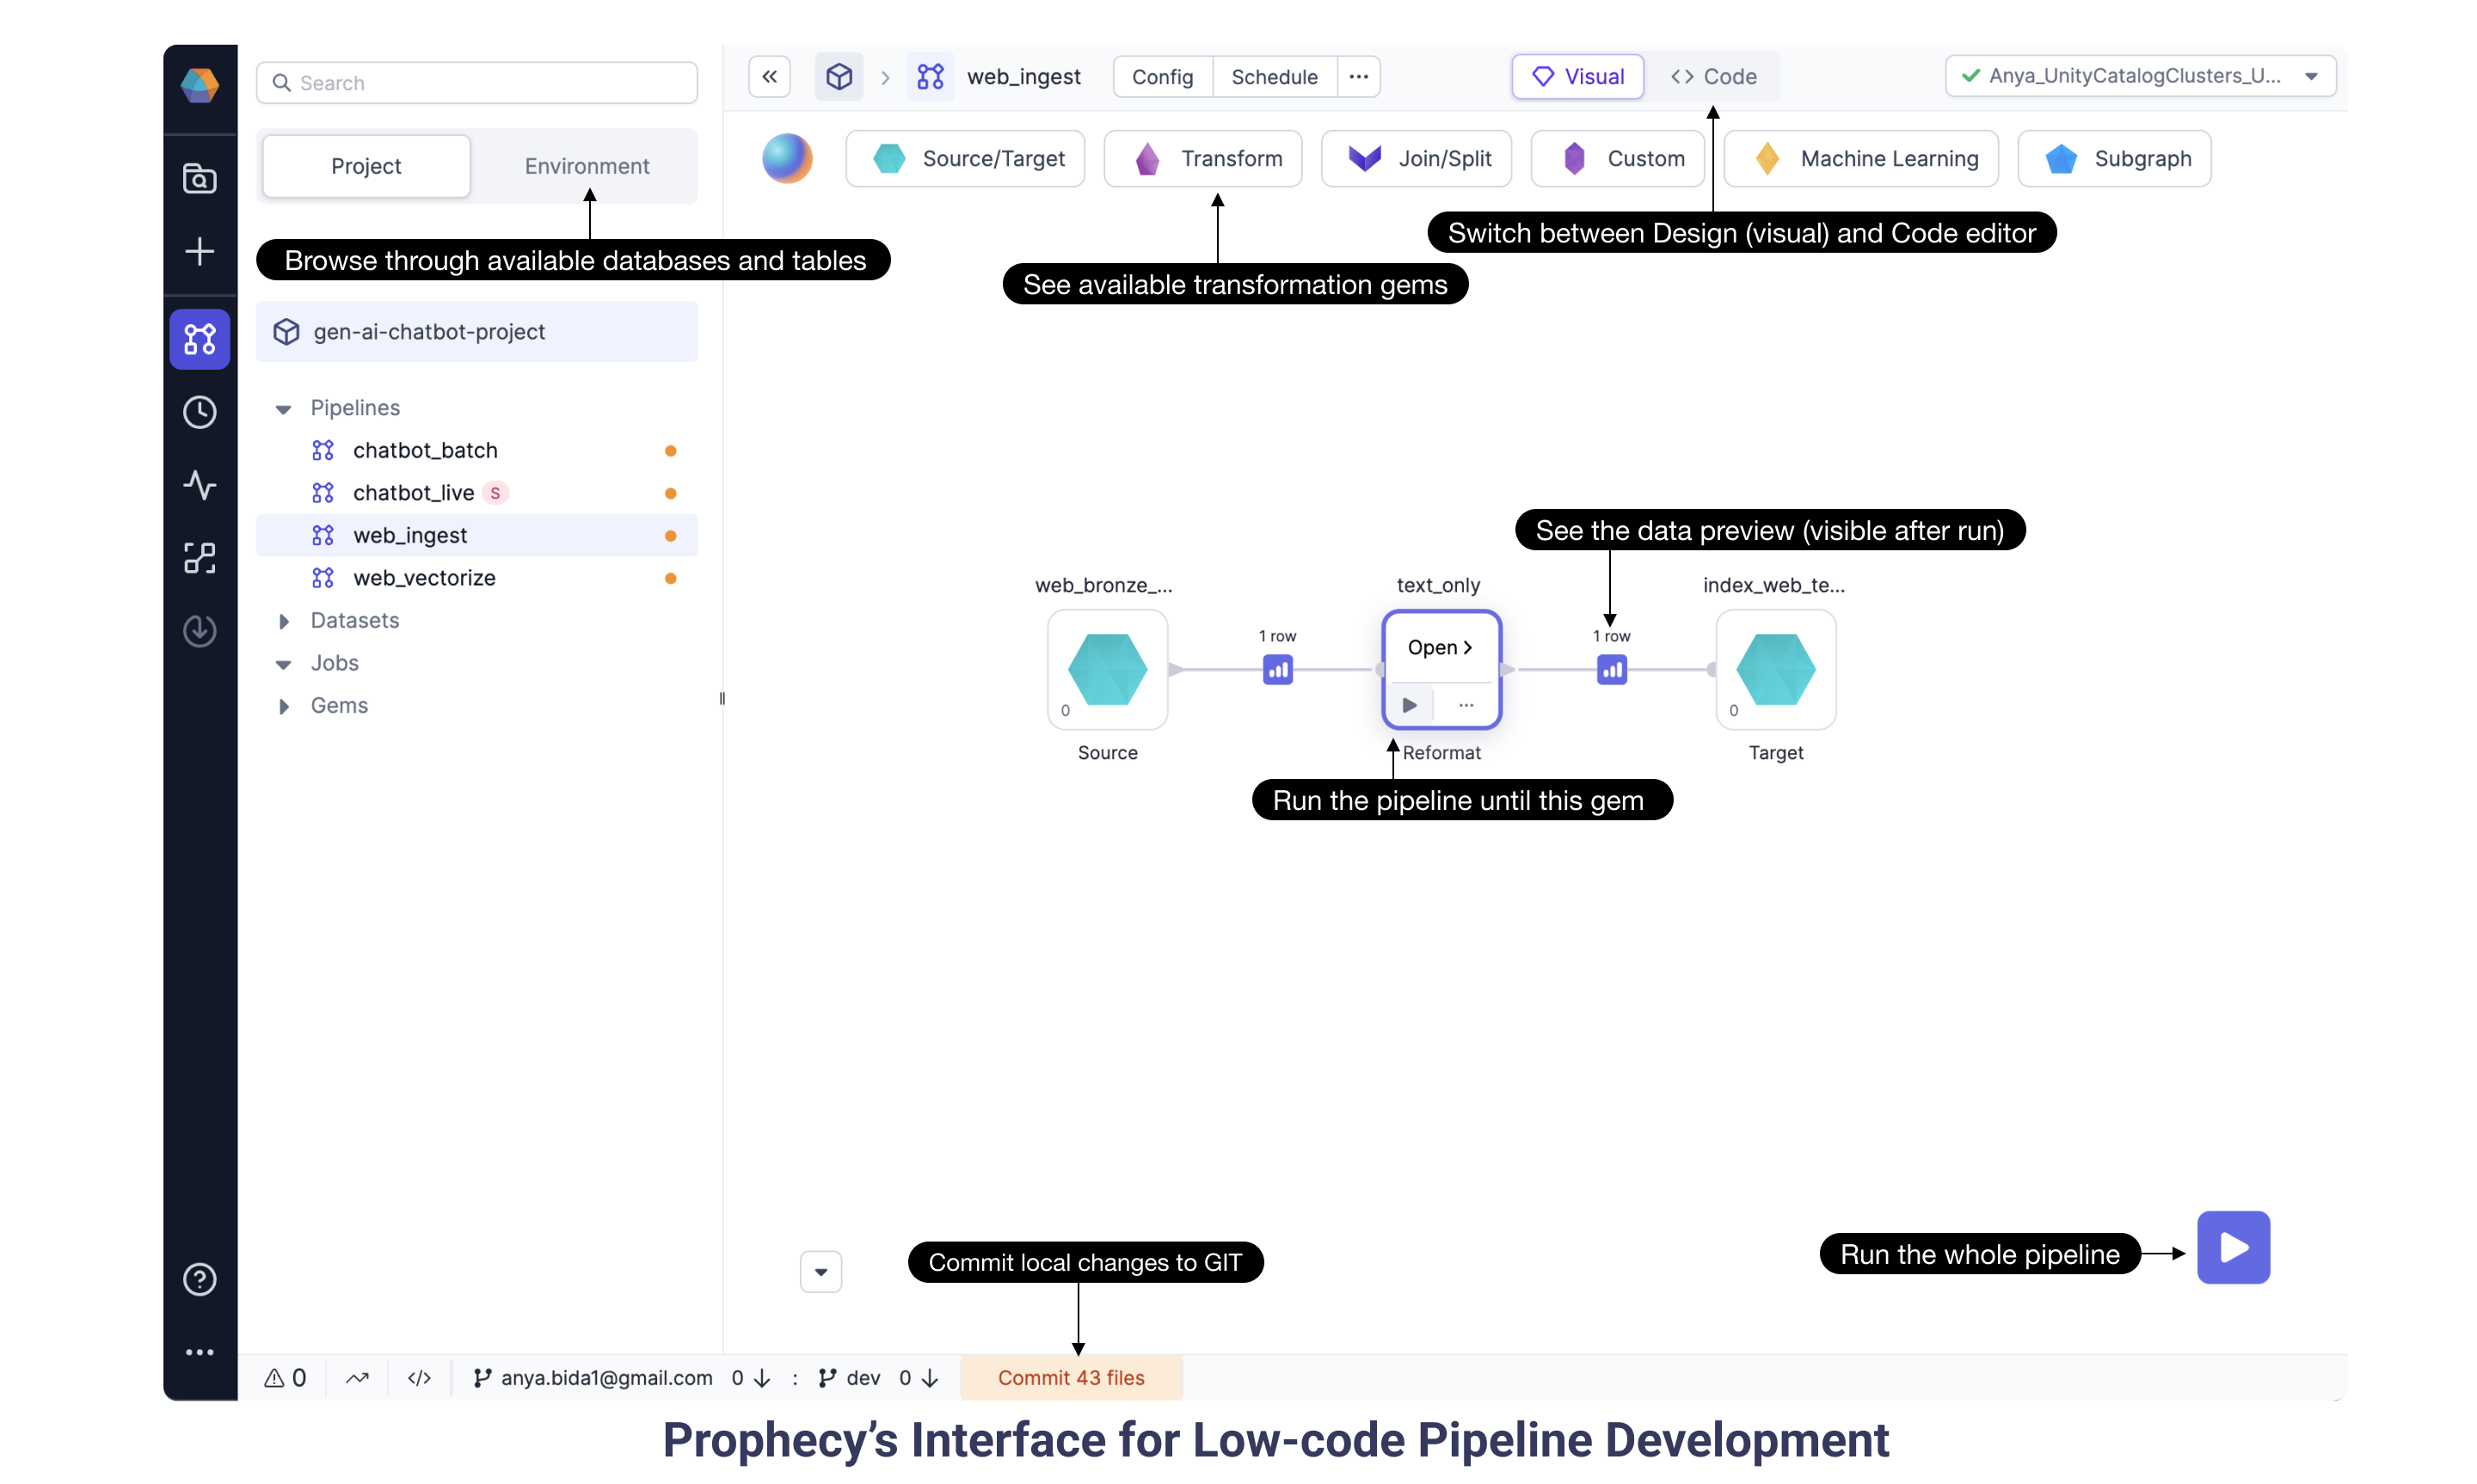
play button runs the pipeline and offers data previews between gems. This interactive feature is super handy to see how each gem manipulates the data and to quickly check that the data is produced as expected. The project runs entirely on Spark and will scale for any data volume, big and small.
Now that we’ve had a brief introduction to the Prophecy pipeline editor, let’s dig into the pipelines specific to the Generative AI Chatbot. The pipelines accomplish two goals: (a) build a Knowledge Warehouse full of vectorized web documentation, and (b) a streaming inference pipeline to read messages from Slack, query an LLM to formulate answers, and send them back to Slack. Notice most of the data manipulations are standard transformations to help construct a prompt for the OpenAI model (or the model of your choice).
2. Build a Knowledge Warehouse
2a. Web Ingest pipeline
We are ingesting unstructured data from Prophecy Documentation, in particular the sitemap which has links to all the individual web pages.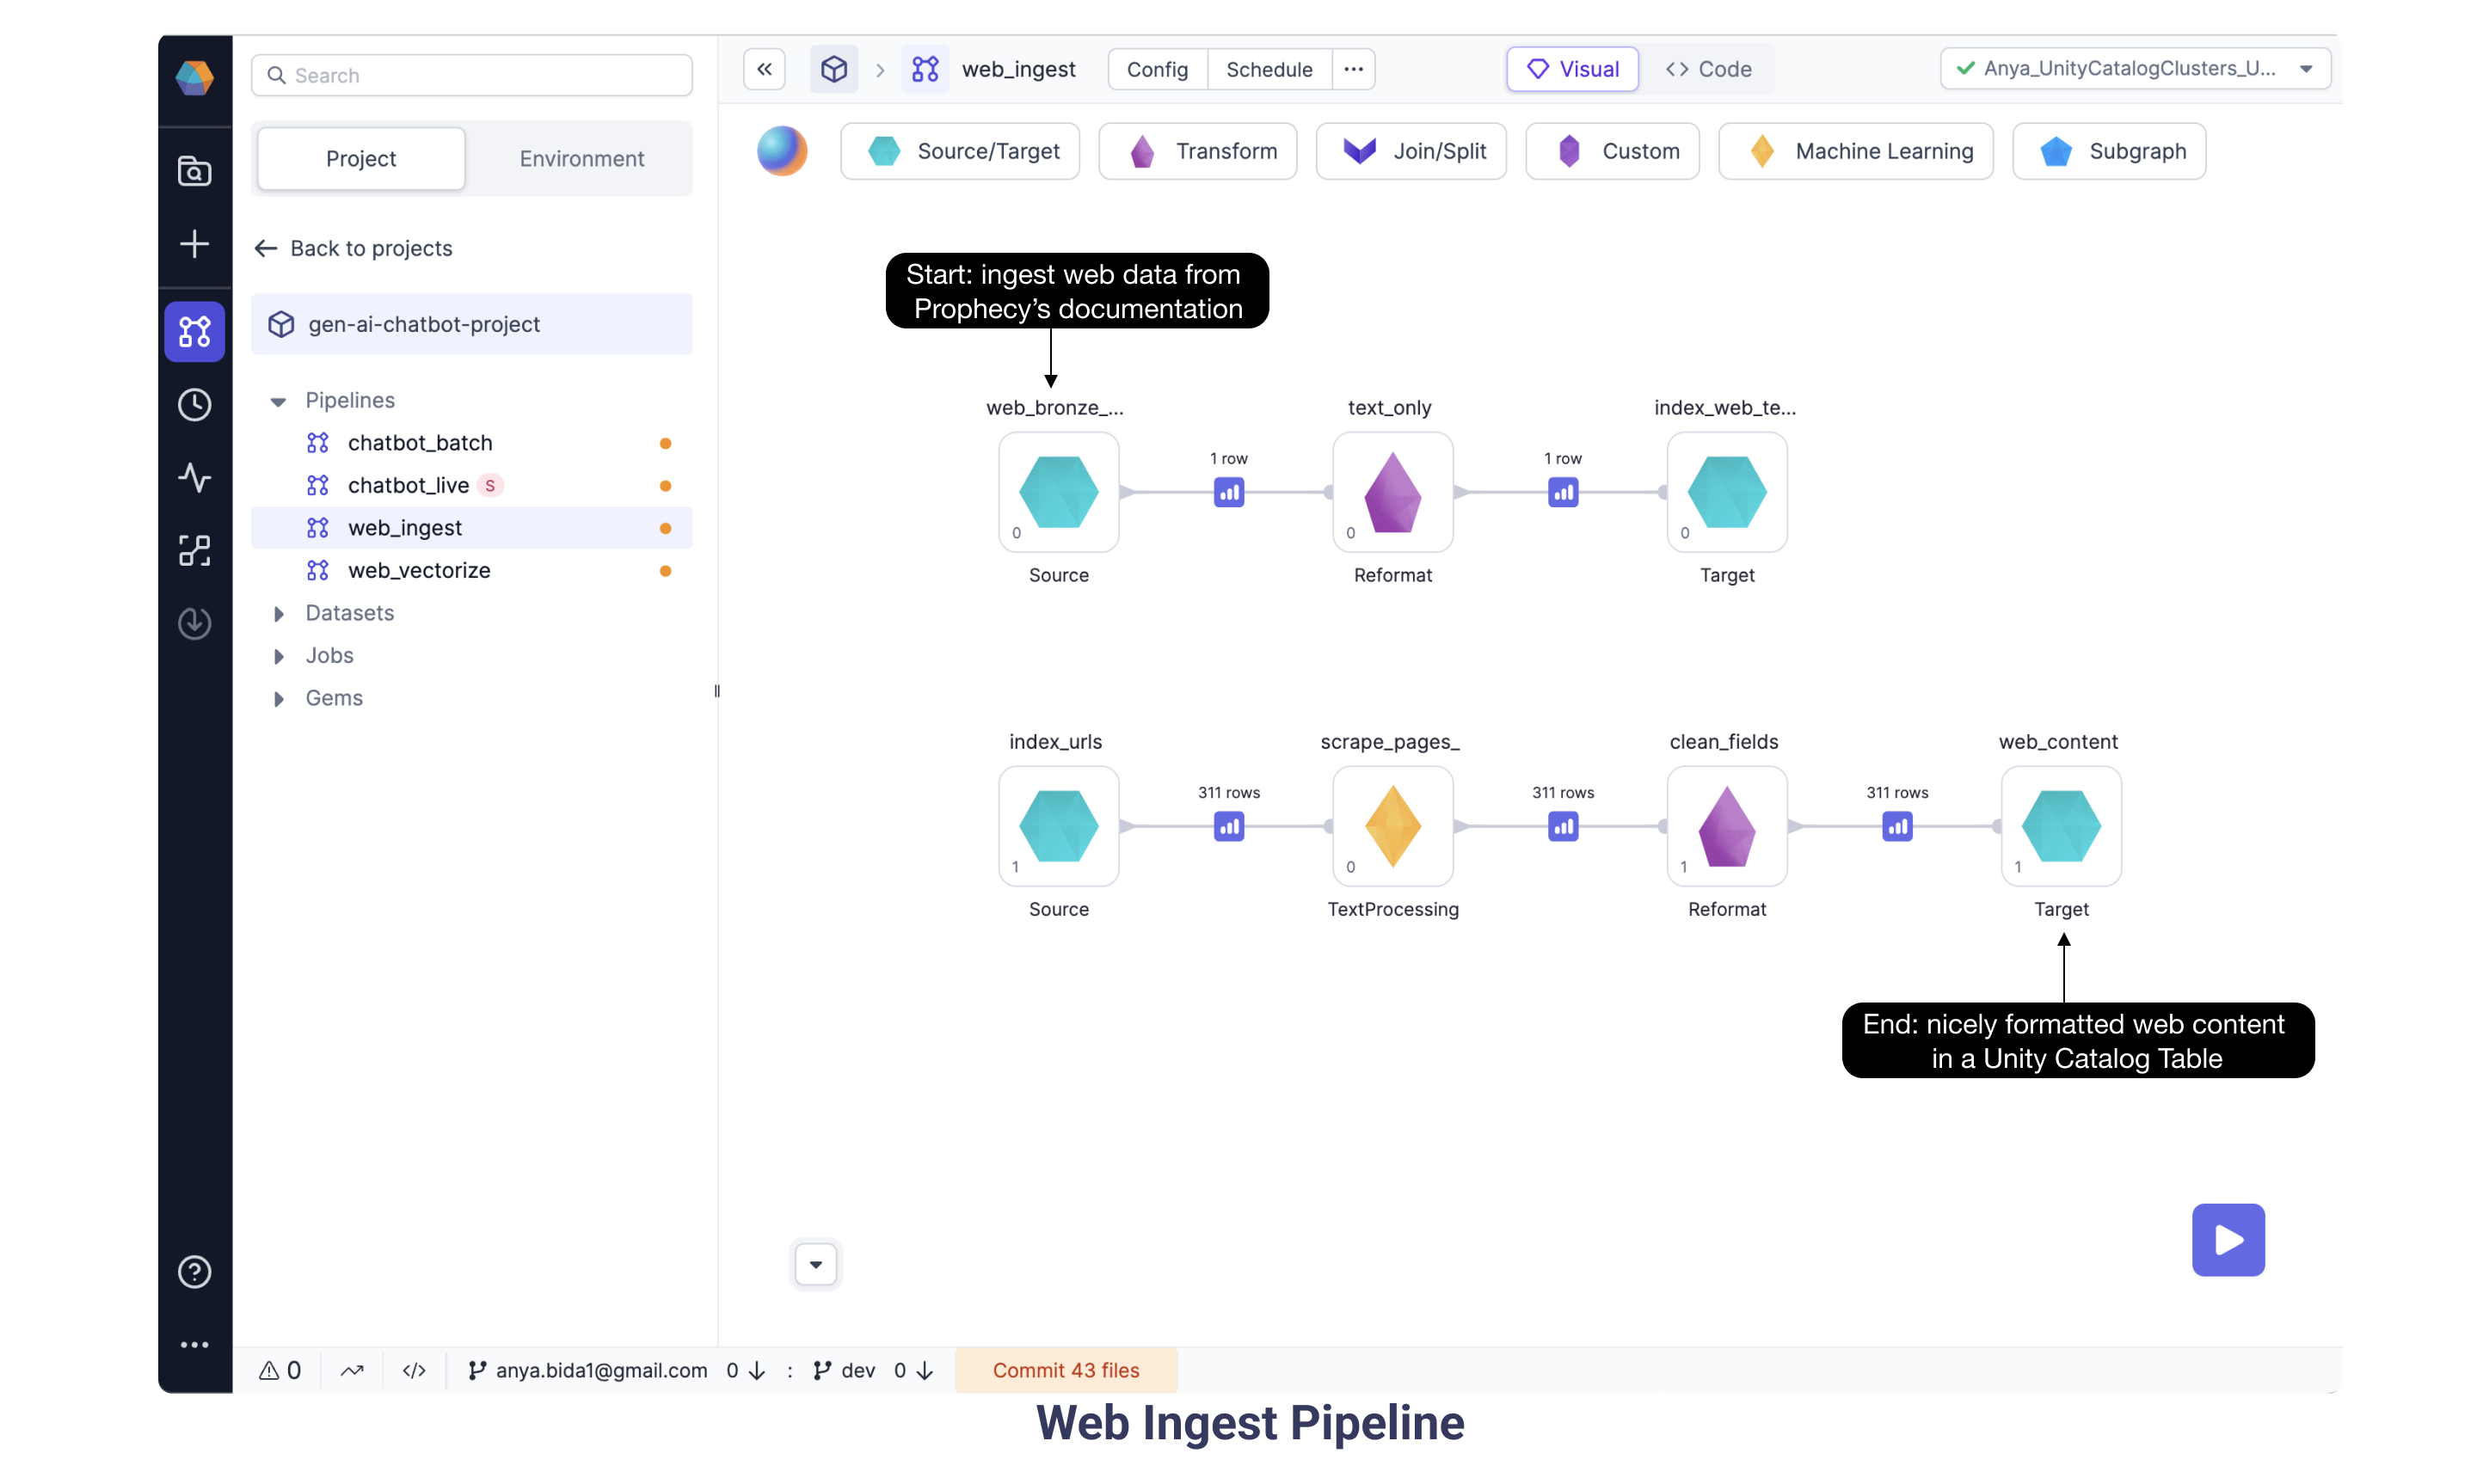
2b. Web Vectorize pipeline
Continuing with the goal of ingesting and vectorizing our web content, here we have the Web Vectorize pipeline. We want to assign each document a number sequence, or vector, to map the similarity and relationships between those documents. Here we selected OpenAI ada-002 model based on performance and cost. As some of the documents are very long, we split them into smaller chunks. Each chunk is sent to OpenAI’s ada model. Run the pipeline using the “Play” button and data preview buttons appear between gems. Open the data preview following the OpenAI gem and see the schema now includes a vector (or “embedding”) provided by the OpenAI model for each text chunk.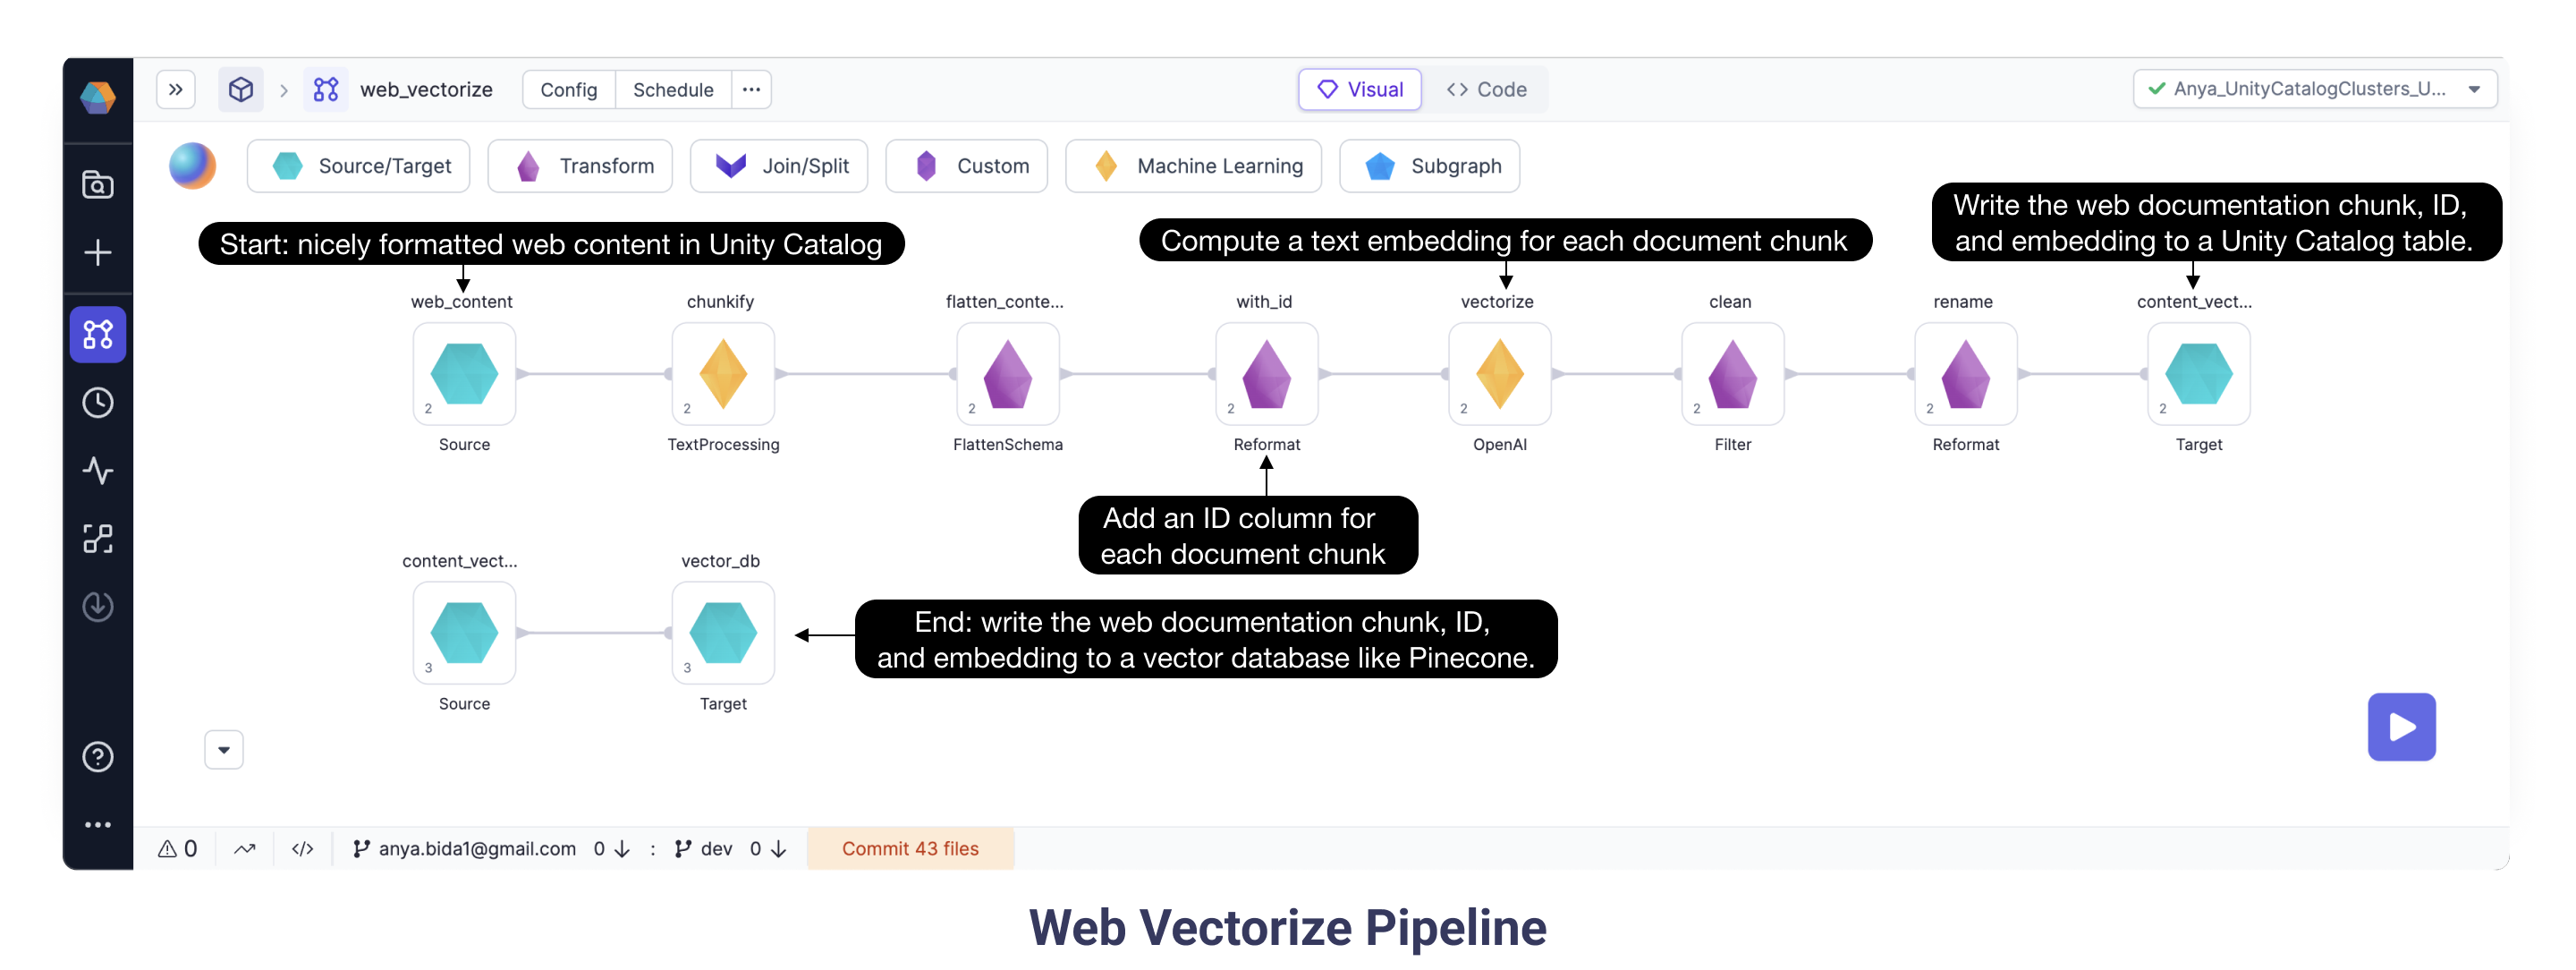
2b.i Configuring the Web Vectorize pipeline
- Verify the Vectorize OpenAI gem is configured with Databricks scope
open_aiand Databricks keyapi_key. - Verify the vector_db Target gem is configured with the Databricks scope
pineconeand Databricks keytoken.
3. Live Inference
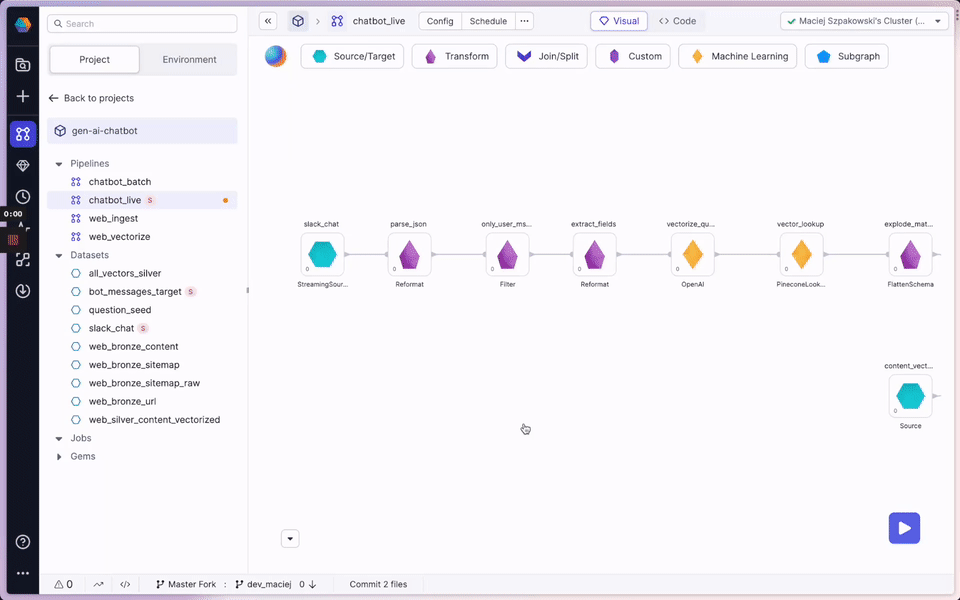
3a. Chatbot Live pipeline
Finally, we get to run the most exciting pipeline! The Chatbot Live streaming pipeline ingests messages from Slack and sends the question and the relevant context to OpenAI which provides an answer. After ingesting the Slack question message and doing some transformation steps, the Chatbot Live pipeline queries OpenAI to create an embedding specifically for the question. Then, the Pinecone Lookup gem identifies documents, based on their vectors, which could be relevant for the question. With the IDs and vectors in hand, we need to pull from the full document corpus the relevant documentation text. The Join gem does exactly this: gets content for the relevant document IDs. Now we are well on our way to creating a wonderful prompt! The OpenAI gem sends the relevant content chunks and the Slack question in a prompt to OpenAI, and the model returns an answer. Finally, the pipeline writes the answer back to the Slack thread.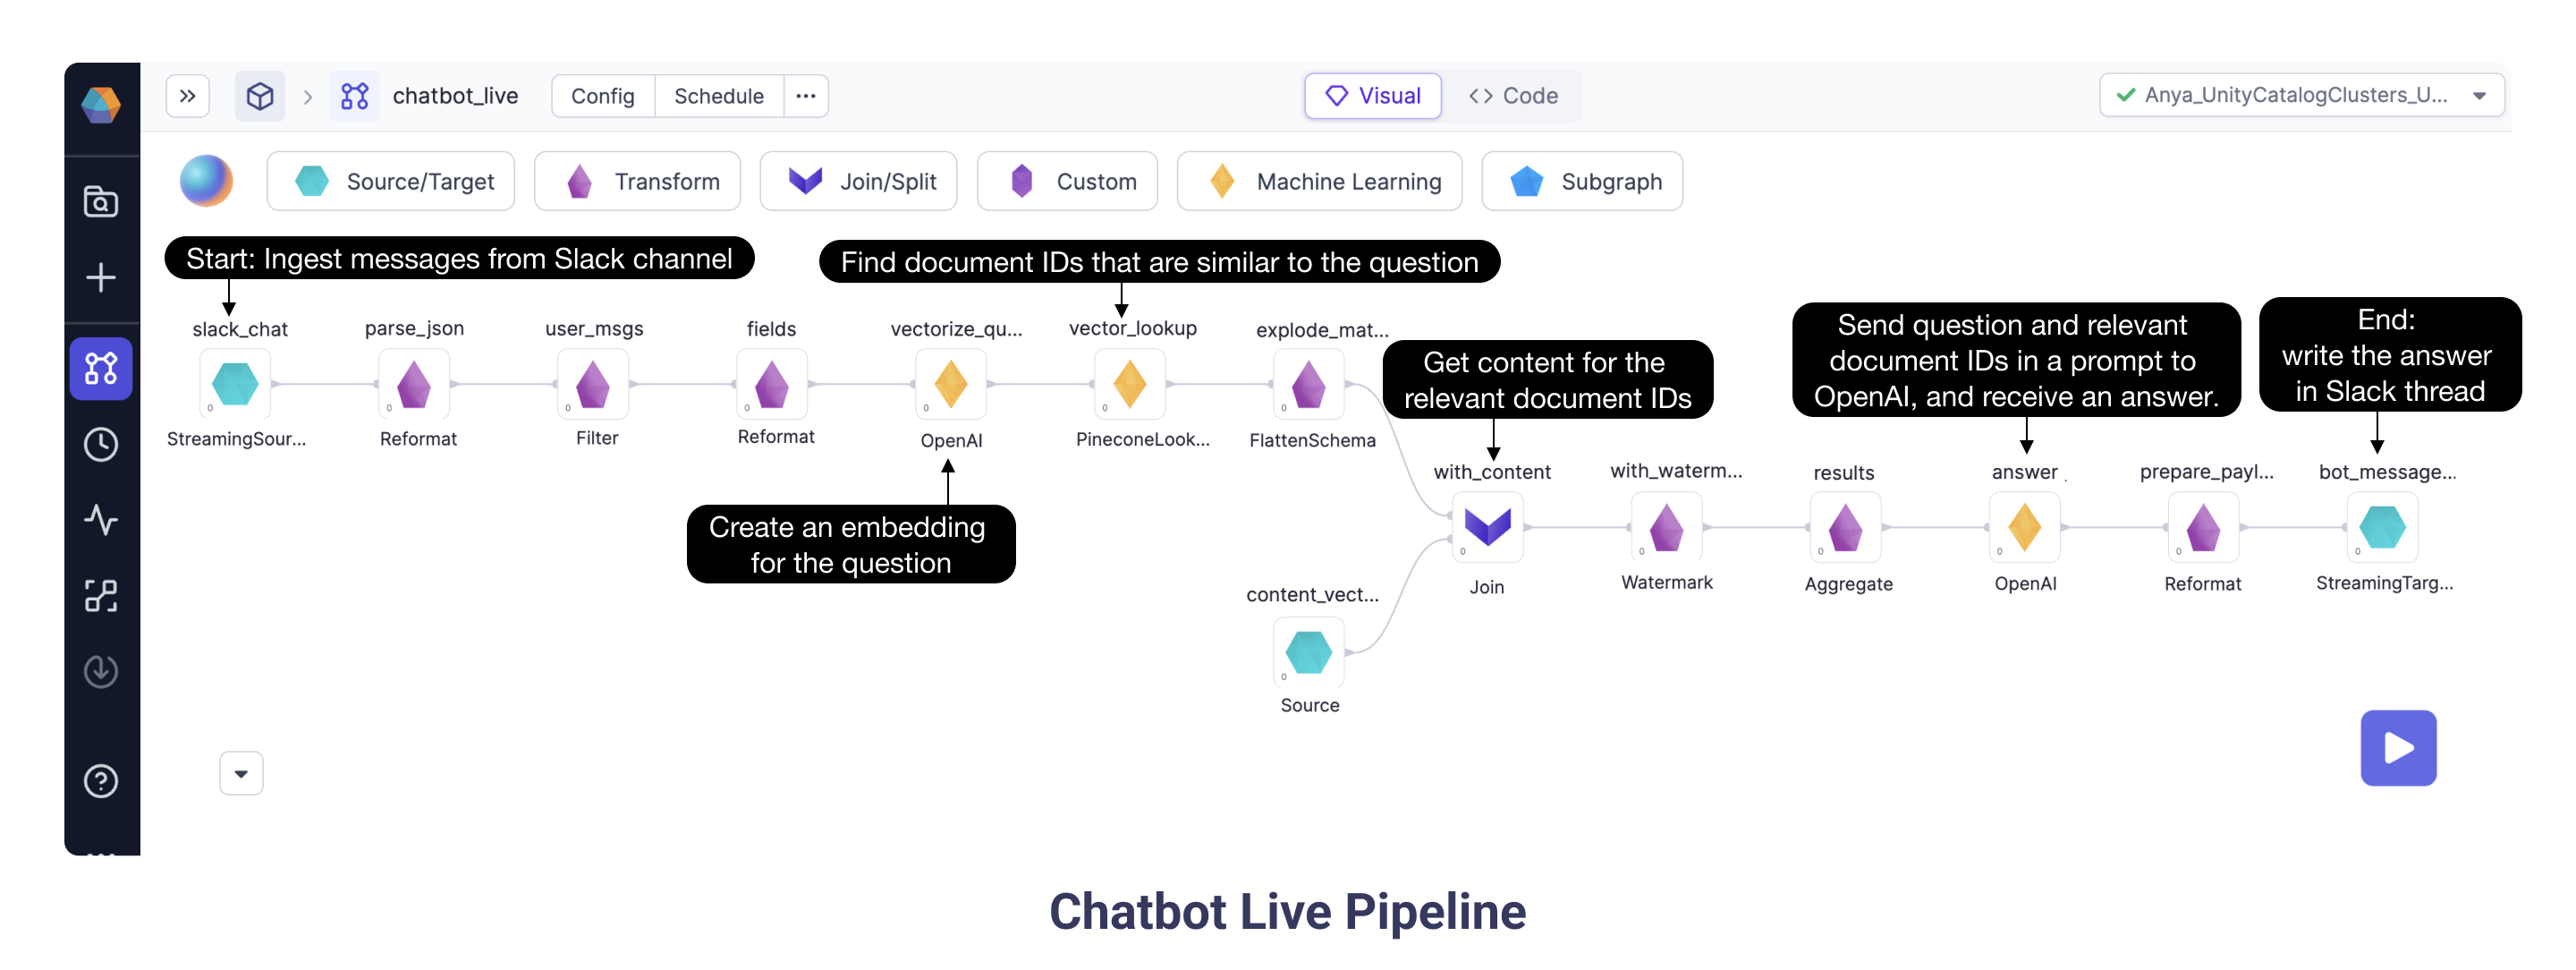
3a.1 Configuring the Chatbot Live pipeline
- Verify the
slack_chatSource gem is configured with Databricks scopeslackand Databricks Keyapp_token. While this token begins withxapp-, be sure not to use the plaintext value, as using the Databricks secret is a much more secure approach. - Update the
only_user_msgsFilter gem with the Slack app member ID: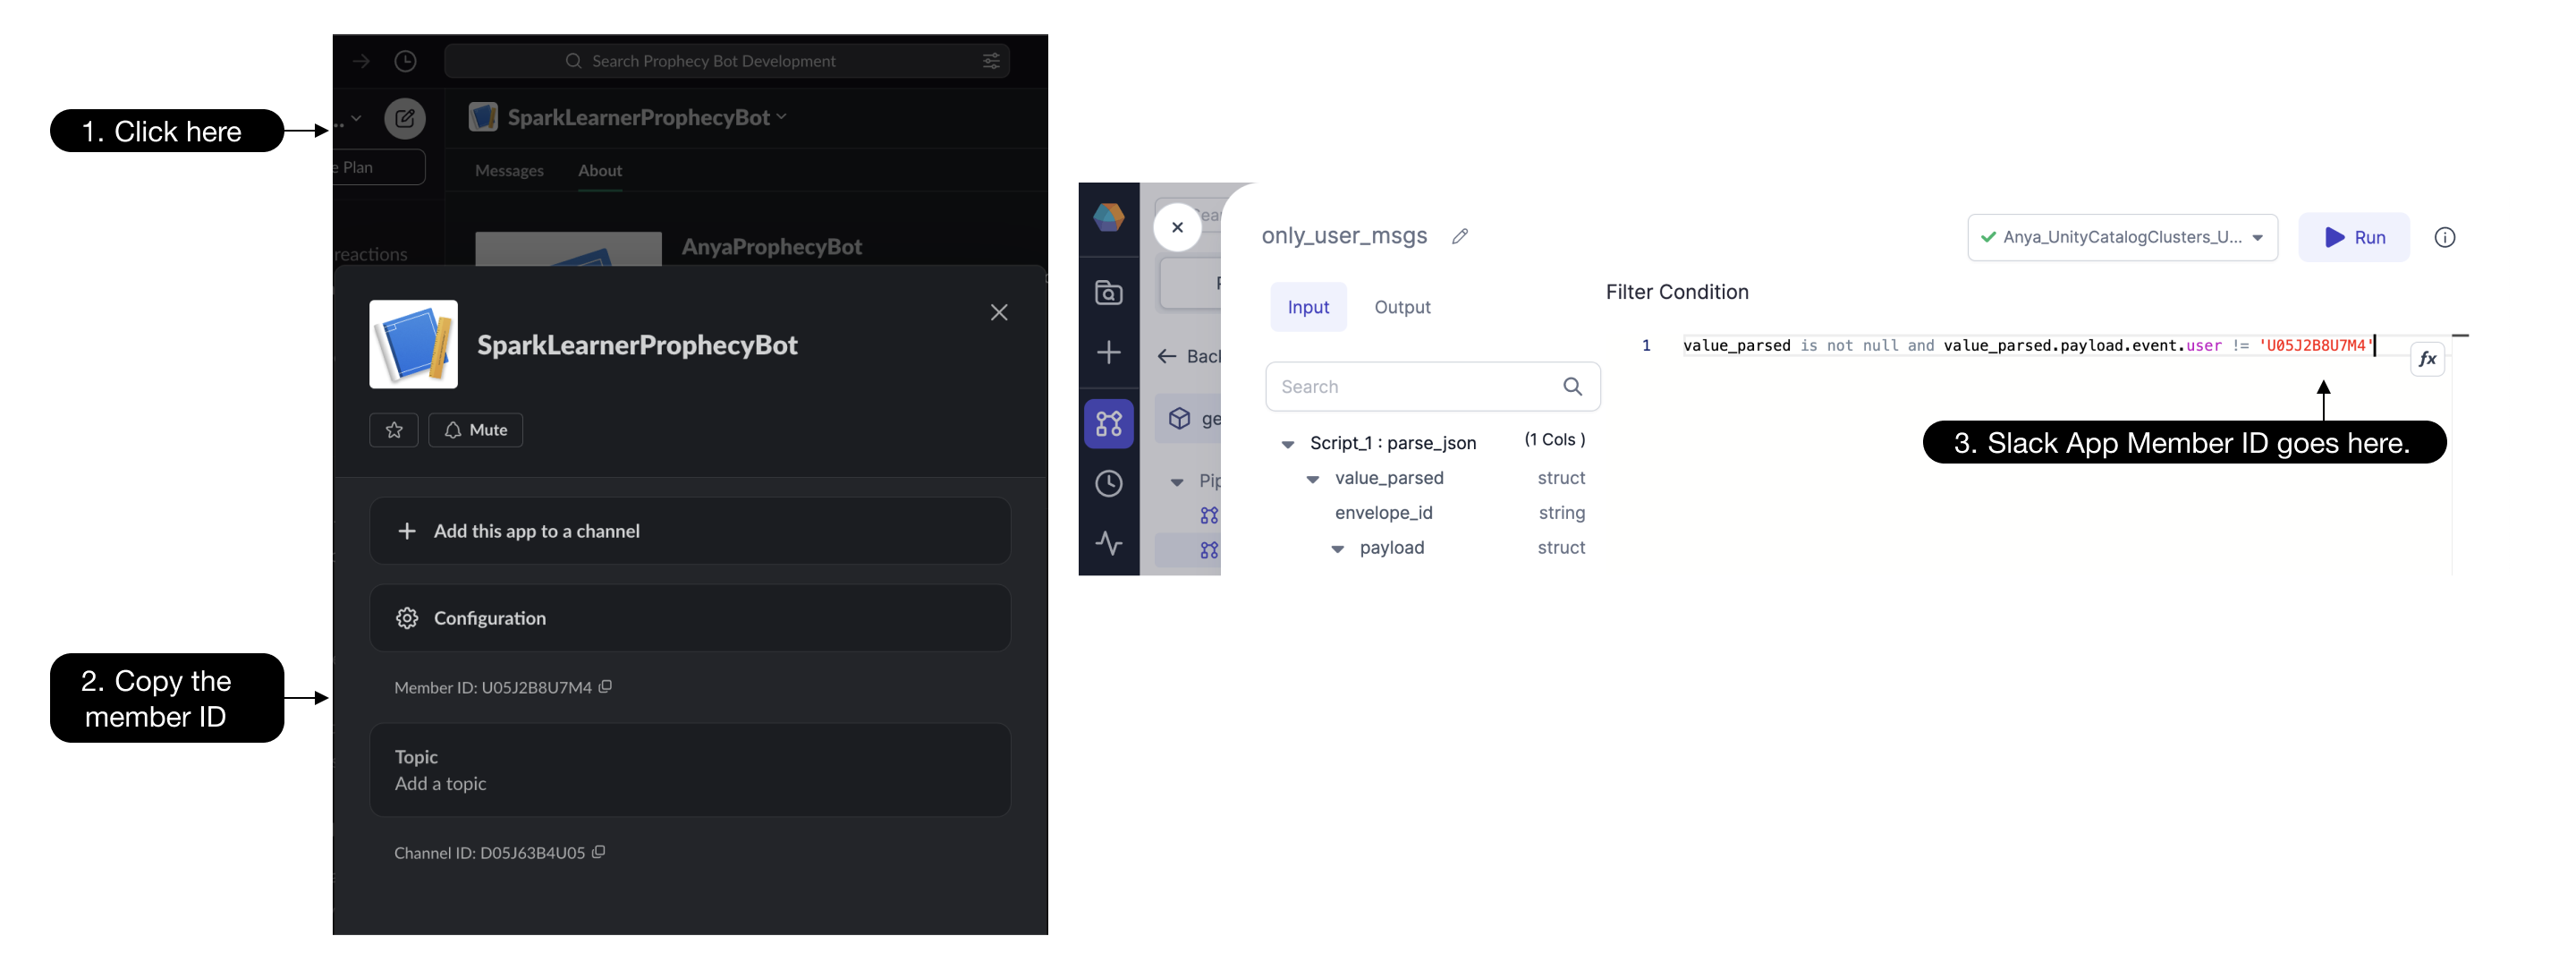
- Verify the
bot_messageTarget gem is configured with Databricks scopeslackand Databricks Keytoken. While this bot user OAuth token begins withxoxb-, be sure not to enter the plaintext value. - Run the streaming pipeline using the big
playbutton rather than the individual gemplaybuttons - Type a question into the Slack channel and check the pipeline to see if the question is ingested and processed. Use the interims (as described above) to watch your message travel through the pipeline. Error messages are visible in the data preview samples.
- Ask lots of questions!